Hello
again my blogger friends
I just had
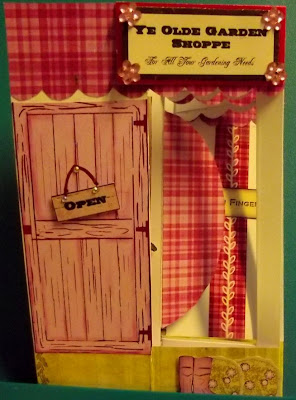
to share a super card that I got made up this evening..
Its from
the new Debbi Moore Garden Bookazine
Its really
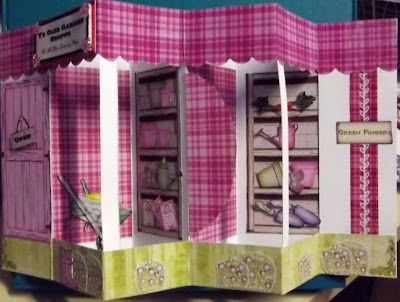
quite simple to do once you get your head around the folds.
The
pattern is over 2 sheets – one is the shop front and the other the
shop back
The
downside is lots of cutting out to do – but hey its got to be worth
it – even if you cut out a few bits now and then if you think it
too much of a challenge to do in one go.
The more I
look at this bookazine the more I get to wanting the full set of new
Shabby Chic cds to arrive!
I must mention this is NOT my design - its from the projects in the bookazine - but I have changed how things went to make it my card.
So
materials for this card I used ….
Heat mat
to work on and protect your surface – I always use it...
2 sheets
A4 white card
The
printed main sheet
A5 piece
of matching backing paper
A few gems
Glossy
accents
Sticky
pads
Eazi Score
Board & tool
Tonic 8”
guillotine
Scissors
Tweezers
Shaping
tool from www.dimensionstamps.com
Foam
shaping mat – stamping mat or even a mouse mat
To
make the card …
I started
by transferring the markings from the template to the 2 sheets of A4
card
I scored
all the relevant score lines then carefully cut away the windows
The centre
fold has the semi circle cut out for some reason – it also had 2
small tabs to cut out – these held the card front to the card back
To be sure
I had the folds the right way I used a couple of paper clips to hold
front and back in place.
Next I
added the pink scallop trim to the top of the card and the green
shabby effect border strip to the bottom – I used photo glue so I
would have time to get them straight.
Then it
was down to adding the many elements that were on the sheet...
I cut 2
panels of matching paper the same size as the shelves and they were
stuck to the left side of the shelves.
I used a
strip of matching paper with a small pattern down the last panel and
hung a Green Fingers plaque to it1
To the
door I added an Open sigh, drew in a faux hanger and then used pretty
gems as a nail for the hanger and also where the hanger would go into
the plaque.
On the
shelves were plant pots, gloves, trowels, carrots, seed packets etc –
they were random placed across the 2 sets of shelves.
The
wheelbarrow was propped up again the “wall” and a pair of wellies
left again some pretty shrubs.
I had a
mishap with the shop name plaque – so ended up having to cut it
right down then matted it onto a scrap of cerise mirri card...because
I had cut parts of the flower corners off I used some pink flower
shaped gems in the corners
And that's
as far as I have got – I will finish it off with flower soft in the
wheelbarrow and either glitter or add stickles to the flowers in all
the shrubs and maybe some glossy accents on the plant pots!
The great
thing with this card is is closes up to fit into an A6 envelope –
such a nice change having a big card that actually fits into a small
envelope!
Would love
to hear comments on this card please....
Thanks for
dropping by
See you
again tomorrow friends!
x


That looks so complicated, but the end result is fantastic.
ReplyDeleteWendy
oh i like these one they look good , hope you doing ok angela, keep the cards coming big hugs linda
ReplyDeletelove it xx
ReplyDeleteAmazing. Can I buy it if you not using it please?
ReplyDelete