Saturday 22 February 2014

Love Love Love


Good morning everyone
Bright and early with my card for today!
Today’s card is called Love Love Love and I have made it to submit to another blog challenge
Its very plain and simple, a typical Angie card I think...
I used an 8x8 card blank and added a piece of mat silver card leaving a narrow border around 3 sides and on the right hand side I used a Martha Stewart heart border punch.

I trimmed the image which was from Crafters Companion Be Bunni I think, and when I was happy with the size I used the matching Martha Stewart hearts corner punch to do the 4 corners.

A deckle edge blade was used in the Woodware Finger Guard Trimmer and a piece of pink mirri card was cut down to act as a mat for the image.

This was then stuck to the card front with cosmic shimmer pva glue.
A length of cerise pink grograin ribbon had a pretty silver ribbon slider attached then was stuck along the left side and secured behind the matt silver card.

Finally I added 3 LOVE  cut outs across the bottom and a single red heart the Love was cut from the centre of a large heart die cut.

To finish I simply added glossy accents to the 3 hearts, the eyes, the tag at the side of the bunny and finally the pink envelope!
Talk about quick card = I had this made and totally finished in less than 10 minutes it took longer for the glossy accents to dry than to make the card lol
See you all again soon
xx

Friday 21 February 2014

Peek A Boo Baby's 1st Christmas


Hi
A few days ago I came across a couple of blogs that offer challenges as we all know we tend to stick within our comfort zone so when I see these challenges I like to have a go as it’s a challenge to myself to do something a little different in the hope of getting a mention on it
So this card is for one of these blogs and I’ve called my card Peek a Boo Baby’s 1st Christmas

I used a 6x6 purple card blank and trimmed off the front leaving around 1cm to which I attached a square of acetate.

Then I stuck a sheet of pink Christmas text paper on the card inside with a peel off shooting star up in the top right hand corner.

On the front of the acetate I secured the front of a globe type design with sticky dots and the back of the globe matched up on the reverse of the acetate (this sheet was on my PC so have no idea where from or who by)

So far so good!
And on to the decorating

I came across a glittery pink star peel off border so used that on the cm of purple card at the front then attached a tag with baby’s 1st Christmas to the top using a button brad.

The stars that were left behind from the border were randomly placed around the globe.
And as for the main picture, I used some pretty pastel lilac pearls, these were quite big but worked fine inside the printed baubles, then tiny cream pearls were added to the centres of the flower bows on the tree.
Finally to the glitter! I used cosmic shimmer pva and just added dots of all sizes to the design then sprinkled with glamour dust
And that completes the card!!!
See you again soon my friends
xx

Sunday 16 February 2014

Springtime Egg


Hello...
Well I wouldn’t be at all surprised if you had forgotten who I was with my lack of posting...
Days just don’t seem long enough to fit in all I want/need/have to do I’m afraid but I’m sure I am not the only person who thinks this way....or am I???
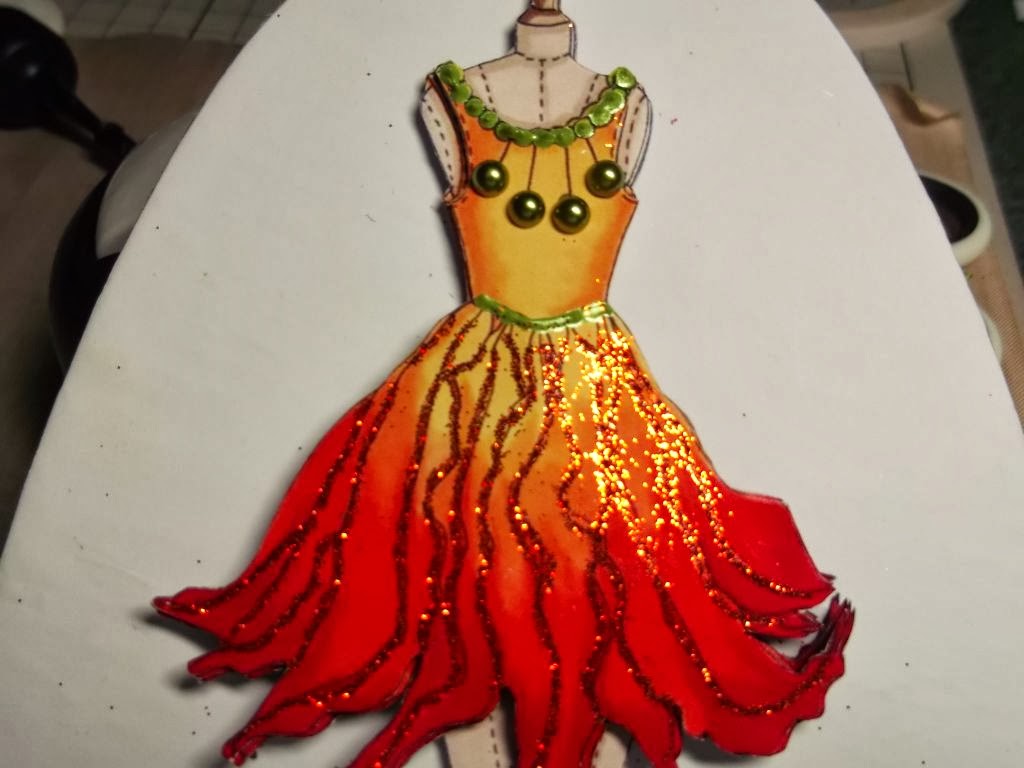
Anyway this morning I came across an MDF type egg shape that had been sent to me when I wanted to make something special for a friend for her birthday sadly I didn’t get round to doing anything so was pleased when I spotted it
I am so fed up of all the gloomy weather of late, rain, wind, rain rain rain so I had it in mind to do something bright and cheerful
I started by using the DecoArt Glamour Dust paint in sizzling red to cover the edge of the shape and then brushed out the paint onto both sides of the shape.

While I was waiting for that to dry I printed off a decoupage dress and the matching toppers for hat and bag these were from the fabulous cd by Katy Sue Fabulous Fashion..
I also printed off a sheet of pretty backing paper from Kanban Seasons cd rom.
I made up a solution of watered down pva and stuck the base layer of the dress topper to one side of the shape and then the backing paper to the other side, trimmed them close them rubbed a smoothing block around the edges.

The decoupage was cut out and built up for the dress, for the reverse I cut a shape using a nestability die and a piece of Kraft card, I rubbed the edges with distress ink and then stuck in place.
The hat and bag were cut out and stuck to the kraft card mat.
I used pearls in cream, green and red for the dress as well as some pearlidoodles as I didn’t have any green pearls small enough, then used a rich copper glitter to highlight the folds of the dress.

And finally to finish off I made a small handbag charm that can be detached and used

It was only after I finished this I saw the theme for the Sunday CD Challenge Blog All About Spring
I think the colour scheme and style suit just perfectly!!!
Someone will end up receiving this in the post ... you never know...it could be you!
Hugs
Angie
x

Sunday 2 February 2014

Valentine's Day Book Card


Hello
I won’t bother to apologise for not posting as I should as it seems to be happening time and again...I hope that one day I will get back into sharing card ideas with you on a daily basis
I made this card today as I was asked if I could do something for Valentine’s Day that looked nice but more importantly had meaningful words in the verse – I am hoping I managed it!
In my mind I wanted to make a book type card so that I had plenty of room to play about with so started by taking 2 sheets of white card, scoring down the centre to create 2 A5 cards then added glue to the inside right of one card and front cover of the other card then opened the 2nd card and secured the front to the inside right of the other card – this gave me potentially 6 A5 layers to work on

The front of the book card was first covered with a deep red and black patterned scrapbook paper, I didn’t leave any of the white card showing.
Next I printed out a sheet I had stored on my computer which featured a motorbike with gears and chains – that’s a good manly start to the card I would say, so the sheet was trimmed down so it would fit the card front but leave a border all round.

I had typed Happy Valentine’s Day on the spare tag before I printed the sheet so this was cut out and placed on the front to look as though it was attached to the heavy chain.
And with the chain in mind I used a length of chain and 4 black brads to form a heart shape in the bottom right hand corner – personally I think it looks pretty good!

To finish the front page I added 3 metal spacers at the bottom left corner and 3 in the top right corner and on the sentiment tag I stuck a clear gem which was embedded into a cog shaped disk.
Open up the book and on the right hand page I used a steam punk sexy lady sheet, she was dressed in a beautiful strapless black dress as well as long stripped stockings, black boots, black hat with a red rose decoration and finally a lacy choker round her neck.

To the left of the lady were a series of hearts and cogs cascading down the card and a huge pair of deep red lips with a white lace cog hanging out.
I covered the white card with red roses scrapbooking paper, then added the card topper leaving the all round border and to finish simply added a deep pink heart shaped gem to each corner of the sheet.
Opening up the card to show the 3 inside sections I covered the left and right sides with white backing paper that had different sized and coloured hearts, again I didn’t leave the white of the card showing.

I printed the verses onto a sheet of card that was the palest pink with darker pink smudges, and then used a nestability die to cut the 2 verses out and then a size bigger to cut 2 mats from the red roses scrapbook paper, I matted the verse to the rose mat then onto the heart backing – making sure the mats were at roughly the same height on the left and right side.
And that leaves just the centre panel – I printed off the backing paper and 2 toppers from a Jem’s Designs CD Rom but sadly cannot recall which one – I think it may have been something like I DO or some kind of wedding cd, anyway I covered the centre panel with the paper leaving just a small border along the long edges which I then ran some brown coloured ink over.

Using a length of brown with red core Co-ordinations card I put it through a 12x12 dotty embossing folder then used a sanding block to reveal the red core, the toppers were stuck to that then trimmed to leave a fine border.

I stuck the True Love topper to the top left side using double sided tape, then the beautiful verse topper was placed at bottom right overlapping the bottom corner of the other topper – I used foam pads on this topper.
And that’s it – my card for a friend for her partner...do you like it?
See you again soon
x