Wednesday 28 December 2011

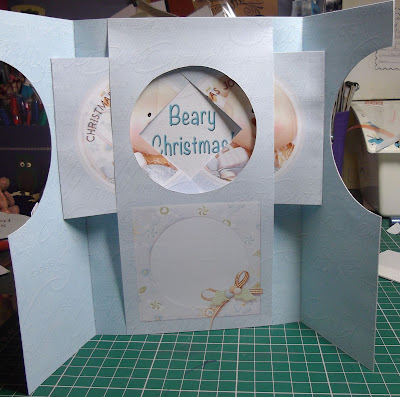
Special 21st Card Order

Hello again - long time no see I know...but hopefully 2012 will see me setting a goal and getting there!!

Anyway I had an email from a lady who had loved a Christmas card I had made her son (hubby's greenlaning pal) and for some reason I had added my made by stamp to the back of the card - so this lady asked if there was a chance I could make her a very special 21st birthday card for her to give her other son's girlfriend on her special day

And as always seems to happen - the dreaded sentence - BUT I need it before 31st December!! This was on 22nd December....

I hate letting people down so said I would do it and then set about with the WHAT CAN I DO? I asked my crafty friends for help - I had ideas galore sent my way but in the end I settled for a kit from Crafts You Print - its a Giant Easel Tableau Kit by Valerie Dawes

I normal print on the same setting - full page but past experience with these kits made me go down a size - so using WINDOWS PHOTO VIEWER I selected 20 x 25 cms for all 6 sheets

As my printer is temperamental when it comes to printing direct to card stock I used my matt photo paper then using Crafters Companion Stick and Stay attached the main sheets to white cardstock.

There was a lot of cutting out to do with this kit but it was easy cutting on the whole really...

I started to put it together in small sections and embellished each section before finally making up the whole card....

I used Cosmic Shimmer Coloured Pearlescent PVA glue to create pearly dots to the design but was so disappointed when the WHITE wouldn't do as it was told - instead of staying in dimensional dots it ran into blobby smudgy messes....so 3 times I ended up scraping it away and in the end settled for self adhesive pearls!!!

The blue and the burgundy dots went perfect and all in all I don't think it looked too bad using the pearls with the colours.

I used the fab ANITA's CLEAR 3d GLOSS to the centre of all the flowers, the orange segment in the glass and the whole of the keys. Large gems went on the top of the keys and the heart and I used blue and silver peel off letters to spell out Kerry Leigh and also the 21 inside the Happy Birthday heart shape.

Once it was all done I sprayed the card with Crafters Companion Iridescent Spray & Sparkle.

My friend Katie had bought me the new Enveloplus board from Crafters Companion for Christmas and she had helped me to make a box-a-lope so I decided this card needed to be boxed too...

As Katie had given me a 16" x16" sheet of white pearl card I used that and made the envelope with a 1/2" box side....WOW... I did it - all on my own too....I was sooo pleased....

I know its not that exciting to look at - but this is the front on my box-a-lope...


And this is the back view with the card inside and a post it note explaining how to seal it....


I know these piccies are almost the same as the finished card above but I am adding them anyway....


Honest opinions of the finished card gratefully recieved - as are any questions and comments!!

Thank you for looking and I do hope you enjoyed it!

Hugs
Angie
x


Monday 19 December 2011

Christmas Assortment!

Hello

Its been an age since I last shared any cards - sorry but there just hasnt been enough hours in the day to fit in everything!

Ive been making the cards but not sharing them - as I am still struggling to get everything done I thought I would just upload loads of finished cards for you to view

Please feel free to comment or ask questions about any of them - I will answer them as I get them!

Hopefully in the New Year I will get myself sorted and start again - doing a card a day!

We can all hope...

x


Friday 18 November 2011

Super FREE offer

I just have to share the news with you all....

In my inbox was an exciting emailing offering me a FREE cardmaking template

Well lets face it - theses days we dont get much for free do we??

So naturally I clicked and checked out the deal....

And here it is for you all to get your freebie too...

Get a free "Santa's Magical Sleigh" card making template from Card Carousel.

Simply click on he link above to be taken directly to the website and your free template

So what you waiting for???

I have mine and WOW

x

Wednesday 16 November 2011

All I want is....

This card was made within an hour of browsing a new CD I got...

The CD in question is Walter & Winnie Does Christmas - and yes the title is correct even though it does seem wrong!!

I believe it is part of the Polka Doodles range!

So - as you all know I am a huge OWL fan so this CD is right up my street - or should I say up in the tree....

I printed the sheet which actually has 2 of the same design per sheet so great to share or for batch making sessions....

I used a craft work cards scallop edged 6x6 square card blank and then played with the wonderful new WINTER limited edition Tim Holtz Distress Ink Pads - using a foam pad I covered the edges of the card in the richest red - Festive Berries

Then I sprayed the card front with Crafters Companion Glossy Spray - when it was tacky I used a straw and blew into the gloss to give a bubbled textured effect!!!

I trimmed the image to leave a wide white border and then built up the cute decoupage - there are only 3 or 4 easy to cut pieces....and attached then using small double sided pads.

I matted this onto a piece of green mirri card which I had cut inverted corners and leaving a wider than normal border.

I cut a piece of silver mirri card and then used a deckle edge cutter to cut a piece of Christmas text paper - again from the CD - and stuck it in place.

Next I wrapped a length of green printed ribbon round the silver mirri & paper panel and fixed at the back - then used a smaller length but showing the reverse of the ribbon, I formed a few folds and secured in place with double sided tape - and the cut both ends into V's

Once the card blank was dry I attached the silver panel in place and then the green panel on top - then fixed a red printed card candy to each corner...

I then realised I had a touch of red ink on the front white panel and a smudge on the reverse so used a dabber and lightly dabbed the white panel - on the back of the card I did swirls of colour which looking surprising pretty!!!

Finishing touch was the glitter! I used a thick layer of Pinflair Glitter Glue on the edge of the hat and pompom and then sprinkled with glamour dust and left to dry before tapping off the excess - this makes the sparkly fur trim look quite thick - not like the normal look of Glamour Dust!

Hope you liked this card - I did two more so sooner or later you will see another!!!

Thanks for looking again....


Tuesday 15 November 2011

Monotone Cuttlebug Tree

This is a project I put together for the card classes and was so popular


Its not everyone that is lucky enough to own a die cutting machine so when I put this together I took the Cuttlebug in so people could have a play and enjoy it!!

So to make the card I used a sheet of A4 black cardstock which I folded in half to create the tent fold A5 card blank.

I covered the card all but a narrow border with a black and white patterned paper

Using an EK Success border punch I punched a length of lacy swirls and matted it to a piece of silver mirri card


This was then glued across the card centre.

A small piece of white card had a length of black organza ribbon wrapped around it and secured at the back then matted onto a piece of black card leaving a narrow border all round.

The embossing folder was actually a free gift in a magazine - so I used a small piece of silver mirri board and embossed this using the Cuttlebug then attached to the white cardstock along side the black ribbon.

Red gems and pearls were added to the tree to decorate and add just a hint of colour to the monotone look

A silver dufex sentiment was attached across the punched border to finish!

The difference between the 2 cards apart from the backing paper and punched border stip is the tree design

The top one is EMBOSSED - so the pattern is raised to the touch

The bottom one is DEBOSSED - so the pattern is sunken to the touch

Thanks for looking


Gothic Beauty

I wanted to make a card with a difference for a lady I know in passing who was having a tough time

She is a bit wild - nutty - different!!!

So I decided to use a cd I loved but so far hadn't had reason to use


Jems Designs - Gothic Beauties

So to make my card I used an A4 sheet of red pearlescent card stock which I folded in half to produce my A5 card blank

I used a piece of black mirri card which I punched a border using a lovely Martha Stewart punch called CHERISH

This was matted centrally to card blank then I adhered the base image onto a piece of red card stock and attached to the black mirri card

I had an oddment of red mirri card so using the same punch I punched top and bottom edges and fixed in place below my image

Although the photo doesn't show it - this is decoupaged - and as usual the top layers were shaped before adding them.

No signs of glitter on this card - but I did use red flower soft and some red pearls to tart it up a little

The finishing touch was the "Follow your dreams...." sentiment which was so appropriate for the reason behind this card

I hope you like this as much as the recipient did!!!

Saturday 12 November 2011

Posing Polar Bears

Today's card to share is taken from the new cd release from Peerless Designs

Cuddle Upz 3 - Arctic Adventure

This card is actually one of the complete 3d cards - so its a click and print out the main card and the 2nd sheet is the decoupage elements


As I print direct to matt photo paper I chopped the back off the main card and before matting the front of the card I used my Silent Setter to make a row of holes above where I planned to add the sentiment

A length of deep blue grosgrain ribbon was woven through the holes - and I lightly fanned the ribbon that showed on the card - and liked this effect as something different! 

 So then I matted the front onto a piece of bright blue card then direct to my navy blue A5 card - now it was ready to add the easy to cut out decoupage

Like I tend to do these days, I used a shaper tool on  the top layers of decoupage which made the layers blend together nicely

All that was left was to add the sentiment to the bottom right of the card on sticky pads

My finishing touch was to spray the entire card with Crafters Companion Iridescent Glitter and add a beautiful matching insert

A super card for any occasion - any age group - and male or female

Thank you for looking - watch out for more lovely cards made from this fab new cd


Friday 11 November 2011

Gilded Owls

Today's card is something new to me and I love it!

For this card I used....
Blue Eazi Score board and tool
 Dreamweaver pair of Owls stencil,
Pearlescent embossing paste,
Copper Thunder gilding flakes
MATT Black and Tan coloured cardstock
Copper pearl cardstock
Martha Stewart branch punch
Little Claires circular sentiment
Brown organza ribbon
Papermania shimmer chalk
Crafters Companion Spray & Shine
Double sided tape, PVA glue, low tack tape, quickie glue pen,
A paper trimmer
and a selection of contrasting pearls.


The first job was to attach the stencil to my black cardstock with low tack tape - I took most of the tack away so it wouldn't mark the black card - this is done by pressing the tape to clothing and pulling off several times.

Once attached I used the palette knife to completely cover the owls then scrapped away the excess paste and put it back in the pot.

Carefully I removed the low tack tape and discarded it - then put the owls to one side to dry completely

Next stage was to cut the black cardstock down to 15cms wide and scoring to create an easel card - that was line 7 A4 half fold and line 4 A4 gate fold

I measured a strip of matt tan cardstock to approx 2"  wide by 5.25" (5cms x 13cms) long - and punched along one long edge then turned over and matched up as I punched the other edge.

A piece of dark brown organza ribbon was wrapped around this punched strip and secured behind. A length of foam tape was attached to the back and then placed on the base of card to form the stopper.

I used a die cut circular sentiment from Little Claires that also featured an Owl - coloured it with Papermania shimmer chalk then sprayed lightly with Crafters Companion spray & shine to seal it, this was added to the centre of my punched strip with foam pads.

Using the same matt tan cardstock I measured a piece of card approx 5"  x 4" (12.5cms x 10cms) and punched one edge using the branch punch again.

Matted to this was a piece of copper pearl 4.5" x 3.25" (11.5cms x 8cms) then matt black 4.25" x 3" (11cms x 7.5cms) copper 4" x 3" (10cms x 7.5cms)

Once the embossing paste was dry completely ( around 4 hours I think I left it) I repositioned the stencil and used a good quality PVA glue to cover the owls - removed the stencil then completely covered the design with copper thunder gilding flakes and pressed firmly all over the design so as not to leave any white showing - then tapped the card to remove the excess and set aside to dry again

Once the PVA had dried I brushed away any loose bits of gilding then cut the topper down to fit onto the last matted piece of copper card - so approx 3.8" x 2.8" (9.5cms x 7cms) and attached centrally using double sided tape

All that was left was to add my pearls - I used a dark brown in the 4 corners of the owls topper and brown - beige - tan in the top left edge and bottom right edge of the punched matt tan cardstock

On the easel base I used 3 copper coloured pearls along the front edge at the left and the right to finish.

I do hope you like the card and that my instructions have proved useful!

Please note all measurements are approx.

Wednesday 9 November 2011

Poinsettia

This card is another taken from Ella Designs 12 Cards For Christmas cd

The poinsettia is a stunning image and a real delight to work with

I decided to use a scallop edged card from Craft Work Cards

The main base image was added centrally to the card and then I made a start on the oh so easy to cut out decoupage


I built the design taking care to shape the top most layers to define the shape of the petals....

I wasnt sure what to use for decoration then spotted the last few Glitterations Sticky Gold dots which worked a treat!

I added a small gold glitter dot to each of the scallops down the right hand side and across the decorative panel across the centre of the card

4 larger dots were added to the 4 outer corners and then gold stickles was dabbed around the centre of each poinsettia to complete this lovely tradional christmas card

Thank you for your time

Gift Wallet Card

Hello again - bet you thought I had given up making cards didnt you?

Sorry - life just gets in the way at times....

So here we are - I have lots of new cards to share with you so lets hope time doesnt run away with me again....

This is a lovely card and gift in one really as it has a lovely pouch in which you can slip a gift voucher, gift card or even money

It is taken from a wonderful new cd I have by Ella Designs - called

12 cards of Christmas


However as you can see in this card - some can be adapted for general use

Everything is so easy on this cd - I simply chose the complete 3d card option which offered 2 pages of printing - and really easy to follow instructions on how to make the card up too!

I had to cut my a4 card down to measure 13cms x 29.7cms - that left a strip of waste card which then was cut to 8cms x13cms leaving just a small amount of waste

The scoring is all done using the Eazi Score Blue Board - so the large card i splaced landscape and scored on line 7, move the whole piece over so your score line is now on line 5 and then score line 6

Next I rounded the corners to the right hand side of the card before taking the small piece of card and scoreing it on line 1 and line 2 and rounding the right hand side corners.

The small strip is then attached to the large piece with double sided tape to form the envelope flap as in the photo above

Now the nice bits - I cut out the pieces to cover the inside and outside of the card - as I said it is all measured for me - just cut and stick in place!

Once the backing papers are on its time to add the pouch inside - how easy  - it was just a case of scoring and creasing the outer edges of one panel and securing on place with double sided tape


Finally I attached the base layer of decoupage to the front flap - taking care not to attach anywhere else or the card wouldnt open

After all the decoupage was added I stuck a gift tag to the scrap card and cut out, then punched a single hole and used coloured fibres to finish!

The whole card was highlighted with glossy accents and glitter to finish

What a super card and pressie in one - wouldnt you agree???

Thanks for looking - see you again soon


Sunday 23 October 2011

Flowers & Lace

An 8x8 card blank was used on this sheet.

The sheet shows a collection of pretty lilac and purple flowers hiding among the leaves...


I cut out the layers and built them up using stick pads

ON the lace surround I used lilac pearlidoodles in the centre of the flowers as with that stuff you simply add your blob to suit and when you lift the bottle up it forms a peek which stays in place even when dry!!!

Once it was all finished and dry I did the 1st coat of Crafters Companion varnish spray - love the spray but after giving the card at least 7 coats I was almost out of the spray!!!

Blue Pansy

Almost to the end of these 8x8 cards now

This pretty card is suitable for most occasions however when making up the card I went with a Happy Birthday sentiment as we all need these cards all the time.

So as with the last lot of cards - the base layer was attached to an 8x8 card blank


The corners were rounded on the base image as well as the card blank.

The top layers of decoupage were carefully shaped then added to finish the card

Once I was happy with the card in general I decided to spray it all in crafters companion silver glitter spray = and what a result!!

Pinky Purple Pansy

Hope you wont get too bored with these cards - basically as they are all pretty much alike!

Another previous purchase from Crafts You Print - which I dont have any information on for you - Im so sorry!


Anyway - this lovely pansy sheet was added to my 8x8" card blank - having first rounded the corners on the card blank and the sheet....

After cutting and building up most of the decoupage just leaving the top layers which I shaped before adding!

I chose some small but pretty cerise coloured pearls which were added around the lace edging for a great effect.

Once the pearls were dry I sprayed the entire card with Crafters Companion irredescent glitter spray to give it a WOW factor


Saturday 22 October 2011

Glittered Roses

So tell me in all honesty who would NOT like to recieve this stunning card??

It is so different - so pretty - so suitable for any occassion which is why I didnt actually add a sentiment to it at the time....

Another sheet from Crafts You Print that I have no maker or number of - sorry!


But I added the base sheet to an 8x8 card and added the small amount of 3d decouage

I decided not to stick the butterflies wings down as they look so pretty being free...

The roses and butterfly were all edged using a Sakura Quickie Glue Pen and sprinkled with a generous helping of Glamour Dust

3 large lilac pearl gems were attached to the top right corner and 4 small gems filled in the design at the centre top of the sheet!!

All in all a very pretty card for all ages and occasions - I am even thinking of framing this as it would look stunning....

Tell me what you think to it now please...

Almost Monochrome

I have to say I adore this card

I just dont really know how best to describe it so opted for almost monochrome!!!

Again its a large 8x8 card with the sheet bought from http://www.craftuprint.co.uk/ some time ago so again I cannot give you any info on designer or sheet number as yet


Once I had added all the decoupage I set about embellishing the card

So I simply added a tiny silver coloured pearl to the centre of each flower that are in the lace border

The butterflies in the design were actually only attached down their body - the wings were actually free....

The rest of the flowers in the design has either tiny pearls in cream or silver added and the odd few flowers had a tin blob of purple Stickles just to add a touch of bold colour

A sentiment was attached at an angle across the bottom corner and a small sprinkle of glitter here and there finished this lovely card

I'd be interested on your thoughts of this card please....

For DADDY

This card was purchased from Crafts You Print

Its a bit of an odd one really as the text reads

To my fantastic Daddy
with lots of love and cuddles

But never mind - I just liked the sheet as it had OWLS on it


So I used an 8"x8" card blank - mounted the base layer to the right hand side of the card and wrapped a length of Hunter Green organza ribbon around the spine and tied a neat knot

By the way the ribbon is from http://www.joannasheen.com/ and a real bargain at around £1.30 a spool in loads of fab colours and widths too - be sure to have a good look around....

Back to the card - my next step was to add some beautiful border peel offs to the edge of the base layer - I used glittered ones for a great sparkly effect

As I had a space above the image I simply added a row of card candi in blue and green taht matched colours on the sheet itself

Last thing I decided to do was add pearls as eyes to both owls

Have to say I am so pleased with the finished card!!!
And your thoughts now please.....

Pink Lace

Its been such a long time since I was last on - so lets hope the delay was worth it for you all!

This card is made from a Craft You Print sheet but sadly at the moment I dont know who designed it nor the CUP number - will try find the onfo and update this....

I recall printing the sheet some months ago and it was while having a huge tidy and clear out in my craft room I came upon a pile of lovely sheets and set to work on them!


So as you will have seen from the title I called this card Pink Lace - its self explanatory really - pink design with lovely lace detail....

The card blank is an 8"x8" so on the large size but then the sheet needed the larger card to display it

Literally all I have done is cut out the main base layer and attached it to the card blank

Then built the very simple decoupage layers to finish

Added a Happy Birthday sentiment from teh sheet across the bottom then sprayed the whole card front with Crafters Companion Irredescent Glitter Spray for a lovely finish!

Thank you for looking.....any questions please?

Friday 7 October 2011

Woof Woof

I saw the promotions for this lovely new CD ROm

PAWS FOR THOUGHT

By Cupcake Crafting

As I love my dogs - 3 Lurchers - I just had to have the cd too!!

So many fab designs - how do you chose?

Who knows - but I did settle for this stunning dog....


To start with I chose a white 6x6 scallop edged card blank and then added a mat of black card leaving a narrow border all round to show the scallops

Onto the cardstock I added a piece of the co-ordinating backing paper.

I printed the sheet onto matt photo paper and once the base layer was cut out I matted it onto balck card thenfixed at an angle to the main card blank

I went on to build up all the decoupage layers - shaping the top layers before adding!

To finish I added spots of glitter to the few flowers, black enamel accents to the eyes and glossy accents to the nose.

As for the sentiment - I didnt add anything as this card is great for so many occassions so will simply add one when I use the card!!

Sunday 2 October 2011

1st REAL Card!

I really wanted to share this beautiful card with you all

It was made by my beautiful grandson Layton aged 3yrs 6months


He was sent lots of yummy pressies from one of grandmas friends so I suggested to Layton he may want to make Sheila a card

He was offered a few ideas but wanted to stamp and chose the stamp himself - the ONLY assistance he had from me was to ensure the card was the right way up and I inked up the stamp

I was truly amazed as he stamped the image and then ever so carefully used my Promarkers to add colour to the image

Then he drew in the border lines again with Promarkers

He rummaged through my peel off bits which are there for his use anyway and the hearts, flowers and butterflies were added

The card candy were just odd ones that were on my work space so he added a sticky pad as hes seen me do time and time again then placed them carefully on the card.

He asked to use my glitter so we went for a safe option and he had full access to my Stickles collection - again he amazed me when he simply added dots of glittery colour to the design

I gave him the peel off sentiment and he carefully positioned it and smoothed into place....as there wasn't any ribbon on the card I asked if he would like a bow so he toddled off to find my stash of ready made bows and chose the blue one....

I really wish I had set the video to record him making this card as he really thought through what he was doing - and it was obvious he takes in everything I do as he even used a prit stick on the card candy after peeling the back of the pads - just like grandma does!!!

So what do you think to this little masterpiece I wonder? I know that Sheila received it and said it has pride of place....

And here is my precious grandson Layton....proudly taking a photo of his card - again something he sees me do with every card I make!!!


Saturday 1 October 2011

Dressing The Tree

This beautiful card was designed by my best friend Paula Middleton

She is always up for a card challenge so when I said I wanted something special to do in class she didnt let me down!


So the shopping list for this card is

A5 card blank, a 6" doily, piece of silver mirri card, red paper, white paper with tiny dots, narrow green ribbon, Lily of the Valley rubber stamp OH CHRISTMAS TREE,

Then a 3.5" circle to punch on, a round sentiment (Little Clairs) punched fern leaves in shades of green and white, flowers either silk or you can punch and make your own and a piece of lace is optional!

The card is a tent fold so be sure to have a sharp crease or your card is will slide open rather than stand

Cut a piece of silver mirri board leaving a wide border all round the white cardblank.

Cut your red paper and spotty paper to fit onto the silver card but dont fix in place yet as you need to add your lace if using it, then the ribbon on top and fix to the back of the red & spotty papers - the lace and ribbon have hid your join now.

Stick your doily in the centre of your red panel using DST just in the centre so its not seen

If you have punched your leaves you might wish to edge some with glue pen and drop into your glitter before sticking in place!

The same with the flowers - glitter then stick in place

Now to the stamping - use a foam mat when stamping and it helps to stand up too - stamp the image centrally making sure you have all the cap in the picture

Then colour your image in your choice of colours - this was done using promarkers but you can use what suits you!

Once all coloured highlight with glue pen and sprinkle with glitter before fixing to the centre of the doily - and then add your circular sentiment to the top left corner

Now stand back and admire the finished result - STUNNING!!!

Thanks go to Paula for her design and to Katie for the flower punch and tutorial


The card shown above was the one I made - it didnt have lace - and I punched out the petals and made the flowers following Katies instructions!


Christmas List

This super image was taken from a lovely cd by Joanna Sheen and the very talented Gordiano

CHIRISTMAS CREATIONS is a cd that every crafter should own!


So to start I used a deep red pearl card which I folded into an A5 card

I cut out all my decoupage and slowly started to build it all up shaping the last layers.

I matted the base image onto red card

Using scraps of cardstock and a 2" square scalloped punch I punched 2 squares of green 2 gold mirri and 2 cream pearl - then cut them corner to corner thus doubling the amount of home made corners

I matted gold onto cream and green onto gold then fixed these behind the corners of my base image making sure it would all fit onto my card still

Once happy with how it looked I stuck in place

I used a sentiment from the sheet and cut a line almost at the outer edges so I could slip my ribbon card through making a slider

This sandwich was cream base with gold mirri panel then the greem carrdstock was slotted through the sentiment and all were then attached into place

A quickie glue pen was used to hightlight santas white bits and then glitter was sprinkled on

Stickles were used on the 4 corners to hold polka doodles polka dots in place then 2 tiny red pearls were placed either side of the sentiment

A stunning card for all ages!