Monday 22 April 2013

I'm so glad....

Hi again
Bit later than I planned to post tonight but thought Id better get it done as tomorrow the PC is taken down so it will be a few days before I get online again 0 as far as I know everything will be up and running on Thursday.
A few days ago I mentioned I had a couple of stamped cards to share so this is the 2nd one.
I used some amazing stamps from a new company http://www.aciddropsandwhatnots.co.uk/
The stamps are so different – really quirky – great fun...
And as you can see they work well when simply matted and layered in basic colours!!!
So materials for this card I used ….
Heat mat to work on and protect your surface – I always use it...
6x6 scalloped card blank
sheet of grey backing paper by Papermania
Stamp AD22 Normal
Oddments of black & red card
flat back gems in red and a red card candy
Sticky pads
Eazi Score Board & tool
Tonic 8” guillotine
Scissors
Tweezers
Shaping tool from www.dimensionstamps.com
Foam shaping mat – stamping mat or even a mouse mat
To make the card …
The scalloped card blank was folded in half then I trimmed a piece of grey patterned paper to fit the front leaving the scallops clear – then paper stuck in place with double sided tape.
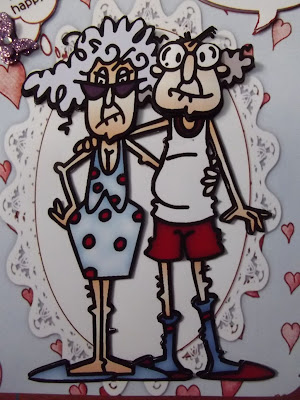
I stamped the lady using Black Memento ink pad, trimmed it down, nipped the corners then matted onto a piece of black card then a slightly larger piece of red card– then stuck to the right hand side of the card front but at an angle again with double sided tape.
Next I stamped 2 of the sayings – I'm so glad at the top with the lovely shaped divider across the bottom and then the 2nd part of the verse.
Like the main image I nipped the corners, matted onto black and then red then added to the card below the printed flower design with double sided tape.
All that was left was to decorate and that was quick and easy..
I used red flat backed gems in the centre of the flowers of the backing paper.
A single red card candy was added to the centre of the large flower on the backing paper
I may when I find my crafty things – add a dot or two of colour to the lady – or even a sprinkling of glitter – but for now she is as she is!!!
And that's the card completed.
this is in the to use or to sell box
Catch you again “sometime soon”– same place folks
x

Sunday 21 April 2013

Darling Of Course....

Hi again
I'm really sorry that I am hit and miss at the moment but its the house move that's taking up every spare minute we seem to get – opps just told you all a little white lie – the sun was yelling at me yesterday so I just had to laze around in the garden!!! Got a lovely start to the suntan though.
A few days ago I mentioned I had a couple of stamped cards to share so this is the first.
I used some amazing stamps from a new company http://www.aciddropsandwhatnots.co.uk/
The stamps are so different – really quirky – great fun...
And as you can see they work well when simply matted and layered in basic colours!!!
I have just been back on the website and ordered another couple of stamps for when I manage to get my new craft room set up again!!!
So materials for this card I used ….
Heat mat to work on and protect your surface – I always use it...
6x6 scalloped card blank
sheet of grey backing paper by Papermania
Stamp AD20 Lost 14 stone
Oddments of black card
flat back pearls in natural and metallic grey
Sticky pads
Eazi Score Board & tool
Tonic 8” guillotine
Scissors
Tweezers
Shaping tool from www.dimensionstamps.com
Foam shaping mat – stamping mat or even a mouse mat
To make the card …
The scalloped card blank was folded in half then I trimmed a piece of grey patterned paper to fit the front leaving the scallops clear – the corners of the paper were nipped with a corner punch then paper stuck in place with double sided tape.
I stamped the lady using Black Memento ink pad, trimmed it down, nipped the corners then matted onto a piece of black card – nipped those corners then stuck to the left hand side of the card front again with double sided tape.
Next I stamped 2 of the sayings – the Darling at the top with the lovely shaped divider across the bottom and then the 2nd part of the verse.
Like the main image I nipped the corners, matted onto black with nipped corners then added to the card at an angle with double sided tape.
All that was left was to decorate and that was quick and easy..
I used natural coloured flat backed pearls in the 4 corners of the lady and in the centre of the black flowers of the backing paper.
The metallic grey pearls were stuck in each corner of the sayings and also in the centre of the white flowers of the back ground.
I may when I find my crafty things – add a dot or two of colour to the lady – or even a sprinkling of glitter – but for now she is as she is!!!
And that's the card completed.
I did have someone in mind to send it off to but did something different so this is in the to use or to sell box
Catch you again “sometime soon”– same place folks
x

Wednesday 17 April 2013

On The Move

Hi
I guess you are all wondering what's going on as I haven't been around for a while
Well the news is I am on the move!
We were offered a too good to be true bungalow and we took it!
It's an amazing 2 bedroomed detached bungalow with HUGE master bedroom that has en-suite shower, toilet and hand basin as well as a very big 2nd bedroom (my future craft room)
A family bathroom with bath, toilet and hand basin – so best of both worlds – a shower is refreshing and as quick as you want it to be whilst still having the option of a long hot soak in a bath
A lovely big fitted kitchen, dining area – patio doors to the patio and garden...
Utility room which is a good size too
Side drive with big garage
Garden to the front and side of the bungalow and then an enormous back garden which has 6ft wall at one side and 6ft fence along the back and up to the garage...perfect!!
The loft is all floored so great storage area
In the porch there is a big double doored cupboard for storage as well as big airing cupboard in the family bathroom and a huge storage cupboard in the dining room
Bet you are thinking yep sounds too good to be true too!!
So we signed up and have spent past week packing – its hard work – especially as its only a few weeks since my knee operation but we are getting there – we have filled the car a few times and taken it over – then yesterday a friend and her hubby kindly came and filled their cars with stuff to take over – thank you Beth & Mike!!!
We will make the move next Wednesday 24th April
Oh I haven't mentioned where we are going – at present we live in Hull East Yorkshire but will be moving over to New Holland in North Lincolnshire
Anyway majority of my craft stuff is packed up so I just cant make any cards to share
Having said that I was doing a stamping class last night and actually made 2 cards but forgot to bring them home so they are there for another day!
I adding some piccies for you all to see just what we are moving into!!


Hope to be back tomorrow with one of the stamped efforts to share
Take care
xx

Friday 12 April 2013

Minnie Mouse

Hello my blogger friends
I must apologise for yesterday – have no idea as to why I didn't post – hadn't dawned on me until I came to do tonight's
So this is a card that I was asked to make a few days ago – she wasn't in a big rush for it but as I didn't have much else to do I decided to crack on with it.
I was told it was for a 3 year old who loves Minnie Mouse – this is what I made
So materials for this card I used ….
Heat mat to work on and protect your surface – I always use it...
Pink A4 and A5 card
Decoupage sheet
2 different backing papers
inverted corner punch
Sticky pads
Eazi Score Board & tool
Tonic 8” guillotine
Scissors
Tweezers
Shaping tool from www.dimensionstamps.com
Foam shaping mat – stamping mat or even a mouse mat
To make the card …
I folded the A4 pink card in half to make the card blank.
I used the Minnie Mouse backing paper to cover the front of the card blank leaving just a narrow border all round.
Next I trimmed the A5 card so it would sit on the card front and show a little of the paper all around it – when I was happy with the size I used my inverted corner punch on all 4 corners.
Added large sticky pads to the back and added to the card front.
I trimmed down the pink woven backing paper to fit inside the pink panel – punched the corners then stuck in place with double sided tape
Next I cut out the base piece of the Minnie Mouse decoupage and stuck it to the left side of the card, the decoupage elements were cut out and added with sticky pads.
Once Minnie was finished I added the Minnie Mouse to the left of her and a few of the pretty flowers to the bottom right of the panel.
Because I hadn't left myself a lot of room to add a sentiments I ended up using the PC so added Happy Birthday Gracie 3 today – I used a lovely font that boxed each letter
When I cut the words out I didn't cut straight – the boxes weren't straight anyway – so wiggled the scissors as I cut.
The words were stick to the card with tiny sticky pads.
And that's the card completed.
It was collected today and the customer was over the moon with it – I do like good feedback!!!
Catch you again tomorrow – same place folks
x

Wednesday 10 April 2013

Baby Weigh In

Hello my blogger friends
My step daughter is expecting her 3rd son in the next few weeks so I got ahead slightly and made the card so its now all ready to be posted!
The kit is from www.craftsuprint.com and was designed by Janet Briggs. I haven't a number but the sheet is named Baby Boy Bear Scales Decoupage Mini Kit
So materials for this card I used ….
Heat mat to work on and protect your surface – I always use it...
Mid Blue A4 card
Decoupage sheet with matching insert sheet
Chloe's stamp – lattice background
Silver glitter embossing powder
Versamark ink pad
Sticky pads
Eazi Score Board & tool
Tonic 8” guillotine
Scissors
Tweezers
Shaping tool from www.dimensionstamps.com
Foam shaping mat – stamping mat or even a mouse mat
To make the card …
I folded the mid blue card in half to make the card blank.
I inked up the rubber stamp with a Versamark (clear) ink pad then stamped the whole front of the card – this stamp is great for matching up to make a continuous background.
Next I covered the stamped area with WOW silver glitter embossing powder, tapped off the excess then heated.
The base image was cut from the sheet and stuck to the card front using double sided tape.
Next I cut out the decoupage elements and added those using sticky pads.
Once that was done I added the sentiment to the top left corner and then started on the inside
For that I folded and then trimmed to size a sheet of bright blue vellum, it was stuck in place with 2 small pieces of double sided tape.
The kit actually offered a pre printed verse on the insert so I simply trimmed and then stuck onto the blue vellum.
To finish the front I simply highlighted with glamour dust while other areas had glossy accents added!.
And that's the card completed.
Nothing fancy – but hey its the thought that counts so they say!!!
Catch you again tomorrow – same place folks
x

Tuesday 9 April 2013

Happy Anniversary

Hello my blogger friends
When I saw this sheet I just had to get it printed out and made up for my hubby as its our 11th wedding anniversary at the start of May.
The sheet is from www.craftsuprint.com and was designed by Carol Smith. I haven't a number but the sheet is named Stella & Gus have a long and happy marriage!
So materials for this card I used ….
Heat mat to work on and protect your surface – I always use it...
Purple A4 card
Decoupage sheet
Candy Crush coloured vellum
2 purple glittered butterflies
Corner Chomper
Sticky pads
Eazi Score Board & tool
Tonic 8” guillotine
Scissors
Tweezers
Shaping tool from www.dimensionstamps.com
Foam shaping mat – stamping mat or even a mouse mat
To make the card …
I folded the purple card in half to make the card blank then used the corner chomper to round the corners.
I trimmed the coloured vellum to fit the card front leaving a border then used the corner chomper on these corners.
The vellum was stuck to the card blank with double sided tape but I only put the tape down the centre of the card so the main image would cover it up.
Next I cut the main layer from the sheet – rounded the corners then stuck t the card with double sided tape.
The small amount of easy to cut decoupage was cut out, shaped and added to the card front with sticky pads.
The thought bubble and also the speech bubble were stuck in place with a large sticky pad.
The purple glittered butterflies were randomly placed just to lift the design
A simple Happy Anniversary was stuck across the top.
I haven't got around to glittering or adding glossy accents yet but better get a move on as time is passing by so quickly.
I just love these kind of cards – they always make people smile!!!
Catch you again tomorrow – same place folks
x

Monday 8 April 2013

A New home

Hello my blogger friends
Well I just have to share this card with you – I actually made it before my operation but forgot I had the photos on my camera.
I was asked to make a new home card – the person it was for lives for Disney in particular Tigger and just loves the colour red.
So after much searching I came across this sheet which I think fitted well – it has Pooh and friends but I added a personal message to the sign post.
I hope you like what I have done with it!
So materials for this card I used ….
Heat mat to work on and protect your surface – I always use it...
Red A4 card
Decoupage sheet
Sheet of matching backing paper
A5 piece of red card
A5 piece red mirri card
Shaped nestability dies
card candy
coloured glitters
Sticky pads
Eazi Score Board & tool
Tonic 8” guillotine
Scissors
Tweezers
Shaping tool from www.dimensionstamps.com
Foam shaping mat – stamping mat or even a mouse mat
To make the card …
I folded the red card in half to make the card blank.
The backing paper was cut in half and one piece was trimmed to fit the card front – the corners were nipped with a corner punch..this was stuck in place with double sided tape.
I trimmed a piece of red to fit – then stuck with tape.
Using the shaped nestability I first cut the backing paper then a size down I cut the red mirri card
Both pieces were then stuck down with double sided tape.
Before printing the decoupage sheet I added text saying
“Helping Kerry & Dan move to their new home” this was cut out and the base image stuck in the centre of the red mirri panel using small double sided sticky pads.
The rest of the decoupage was cut out and added shaping the top layer.
I used newspaper print card candy for the corners – back were stuck to the backing panel and white ones to the red card panel
I added glossy accents to some areas and in others it was coloured glitters which all worked really well.
The lady I made it for was chuffed to bits with it and couldn't wait to hand it over to her friend Kerry
I'm pretty sure it will have gone down well as it ticked every box didn't it???
Catch you again tomorrow – same place folks
x

Sunday 7 April 2013

More Pansies!

Hello my blogger friends
Yesterday I shared a card using a vase of pansies – well today's card is using the same sheet but at a reduced size and in a very different way!
The sheet is by Robyn Cockburn and was purchased from www.craftsuprint.com the sheet number is 75407_123
So materials for this card I used ….
Heat mat to work on and protect your surface – I always use it...
Cream A4 card
Decoupage sheet printed at A5 size
A5 piece of lilac pearl paper
piece of aqua card
Embroidery threads
card candy
clear AB gems
sentiment tag
EK Success border punch
Sticky pads
Eazi Score Board & tool
Tonic 8” guillotine
Scissors
Tweezers
Shaping tool from www.dimensionstamps.com
Foam shaping mat – stamping mat or even a mouse mat
To make the card …
I folded the cream card in half to make the card blank.
The lilac paper was trimmed to fit the card front then I punched the long sides with an EK Success birder punch and attached to the card blank with double sided tape.
I trimmed the aqua card to fit inside the lilac panel, clipped the corners then stuck my pricking pattern to the card – this was then placed onto a foam mat and the dots pricked with a pricking tool
The pattern was removed then I stitched the design, starting at the top left I came out at 1 and in at 7 and so on until the stitching was completed.
The aqua panel was secured to the card with large sticky pads.
Next the image was cut out – the base image was placed inside the stitched area and the decoupage was shaped and stuck in place with sticky pads.
Once the decoupage was all added I used a gold stickles to add a blob of shiny colour to the centre of the pansies.
A tiny dot of Cosmic Shimmer PVA was added to the punch holes and the tiniest (1mm) clear AB gem was put in place.
A larger clear AB gem was stuck in the centre of the ribbon bow.
4 white with silver spot card candy were added to the 4 corners.
Lastly I added a tag sentiment with a small piece of blue ribbon through the hole to finish this lovely card.
This is the project we will be doing in class this week- I know we did it a couple of years ago but with so many new members its a good card to go back to!
Hope you like it too
It is another for the use or sell box
Catch you again tomorrow – same place folks
x

Saturday 6 April 2013

A Vase Of Pansies

Hello my blogger friends
I have managed to finish off 3 cards that I started yesterday as well as get lots of bits and bobs sorted too!
I have used a sheet that has been a favourite for a long time – this may well be the 6th or 7th card I have made with it – all different too!
The sheet is by Robyn Cockburn and was purchased from www.craftsuprint.com the sheet number is 75407_123
So materials for this card I used ….
Heat mat to work on and protect your surface – I always use it...
smooth black A4 card
Decoupage sheet
A4 piece of aqua bazill card
piece of purple mirri card
length of lilac organza ribbon
4 metallic purple card candy
5 clear AB gems
Sticky pads
Eazi Score Board & tool
Tonic 8” guillotine
Scissors
Tweezers
Shaping tool from www.dimensionstamps.com
Foam shaping mat – stamping mat or even a mouse mat
To make the card …
I folded the smooth black card in half to make the card blank.
The aqua card was trimmed to fit the card front and attached with double sided tape.
Next I cut the base image out – on the sheet Robyn says you can stick this to a sheet of folded card and cut around it to make your shaped card but I had other ideas.
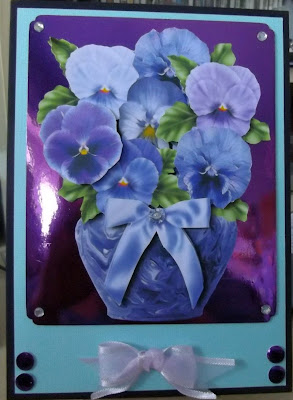
I laid the vase of flowers onto a piece of purple mirri card and marked the size, this was then cut out and I used a nicked corner punch to lightly shape the corners.
The mirri layer was stuck to the card again with double sided tape – I positioned it towards the top so I had room below for a sentiment of bow.
The vase of flowers base layer was attached to the mirri card with double sided tape then the decoupage elements added with small sticky pads...I lightly shaped the pansies as I was adding them.
A bow was tied using wide lilac organza ribbon and was stuck under the vase with tape.
To finish I added 2 metallic purple card candy to the bottom corners of the aqua card then clear AB gems to the corners of the mirri card and one in the centre of the bow around the vase.
And there we have a pretty vase of pansies card that would suit so many different occasions
It is another for the use or sell box
Catch you again tomorrow – same place folks
x