Saturday 20 August 2011

Waterfall - HOW TO

I know its been a few days since I posted the last project and with that was a promise to do you a step by step on how to do a Waterfall Card

You will need - waterfall sheet, 4mm double sided tape, 2 brads, pricking mat and tool - then glitter or embellishment to finish!

So better late than never - here it is...just hope my explanation is easy to follow - but I did do plenty of photos to go with it so here goes....


This is a shop bought sheet with almost all you need for your waterfall card - there is a small card blank, the waterfall mechanism, the square panels, overlay bar and a sentiment


Start by removing from the sheet and smoothing off all the tabs (if there are any) then lay your pieces out so you can identify each one

You have 3 score lines on the mechanism - score these sharply - and ideally score on front and back, then fold over on the centre score line with the coloured part on the inside as in the photo


Next you need some double sided tape, I use 3mm or 4mm usually - place a piece on just BELOW the 3 score lines (I have written TAPE to help you) and also add tape across the long bar at the bottom - this has the hole at either side of the mechanism


So far so good I hope... so now we are up to making up the waterfall - don't panic as it really is straight forward - and once you have made one - you wont forget!!!


Right - now take remove the backing paper from the bar, rub your PRITT STICK across the sticky double sided tape (this is so if you don't line up correctly you can easily remove and try again) then press the coloured piece securely onto the DST as in the above photo


Remove a piece of DST from under the lowest score line and position the 1st square panel so it sits straight on the mechanism


Continue this way till you have added all the square panels - by now you can clearly see you have your own waterfall workings - but it needs finishing


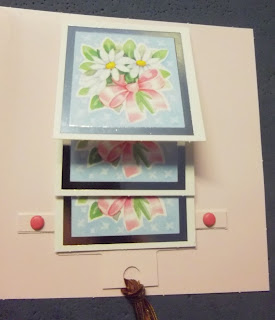
Our next steps are to punch a small hole in the bottom pull tab - and thread some ribbon or fibres and secure in place. Place the whole mechanism onto the card - this is a matter of personal preference as to how you line it up.  Once you are happy with the position you need to make 2 holes on the bar - one either side of the mechanism - go through the bar and the card front. Then take a contrasting brad and press through one of the holes and secure on the back of the card front - do the same at the other side - the above picture shows I have attached at one side, I moved it down so you could see it is only held in place with the brad - so NOT add any DST or FOAM as this will stop your waterfall working!!!


So now we have our waterfall made and attached to the card

Yippee - pull the tab with ribbon towards you gently and watch the square panels start to flip over!!!


The photo here shows what is on the reverse of the card front - just the legs from 2 small brads - these will not be seen once an insert is added!!!

And this is my card all done - well except for the sentiment!!!

How easy was that then?

This sheet was by RED HOT BED - you can buy waterfall sheets from most craft shops - or online sites - eBay - crafts u print etc!!!

I also have the basic measurements for you to make yours from scratch whether it be for a card or an ATC .... will post those measurements very soon!!!

If you would like to know HOW TO MAKE something - please leave me a message - if I know how to do it I will happily do a step by step with photos for you!!!

Thank you for looking - and sorry the photographs weren't too good this time - I cant get back to the correct settings - AGAIN!!!!!

Sunday 14 August 2011

Waters Edge

This is another card that I made some time ago but decided to share it as it uses a few different techniques

This is a lovely selection of papers and sheets by DESIGN HOUSE The WATERS EDGE

So to make this card I chose an A4 sheet of bright yellow card stock, and using the Eazi Score board I laid it so the short edge was against the butt panel, then scored on line 7 (A4 half fold) then on line 4 (A4 gate)

When folded this offered a fold back gate fold card.

I opened the card and had the long edges at top and bottom,  and marked the left edge of the short side approx 10cms up from the bottom, then drew a faint line from my mark across the card to the top of the centre fold line - and cut it off!

This gave me the shape of card I wanted!

I printed just one sheet of backing paper - it had a water pool to the right side so cut that a5 size and stuck to the inside of my card as in the picture. I cut the remaining half sheet in half and stuck to the 2 panels - again as shown in the picture - just remember you are using the front of panel 2 and back of panel one - so mark your paper and check before cutting as you may end up with the slope going the wrong way! Leave a narrow border all around the panels as the yellow of the card brings out the colours of the paper and images.

Once all the backing paper was attached I cut out the 2 waterfall designs - the normal size for the inside back and the mini for the middle section.

A waterfall mechanism is easy to make - if you know how! Just read instructions and follow exactly - making sure you add double sided tape in the correct places - and DO NOT STICK THE WHOLE THINK to you card or it will not work....

Will do a step by step and add to the blog later for you all!

So the waterfall was made up as I wanted - now I had to attach to my card with brads - so I laid it in place and used a pricking tool to mark out where the brads would go.

The brads hold the bar ONLY - so that you can pull the waterfall to view.

I added one of the tags that came on the waterfall sheet to the pull part of the waterfall with a pretty brad

I did exactly the same with the mini waterfall and added it to the centre panel - as this meant the brads would show through I made a small banner of card stock, backing paper and sentiment and added it across the brads!

The last thing I did to the card was chose the last panel from the sheet I matted it onto dark green then yellow card leaving narrow border all round - this was then attached to the fold back front panel

All that was left now was the fun part - GLITTER!!!!

I used a quickie glue pen to highlight the swirls in the water and of course the wings of the dragonflies then sprinkled with Glamour Dust

This is a lovely card suitable male or female, for any occasion and any age!!!!

Thank you for looking

Thursday 11 August 2011

Sun-Sea-Sand

This was a card I made last year as an order!!!

And a tall order it was too

The only info I was given was - she was to celebrate her 50th birthday - she would be lounging on a tropical beach - and she loves the odd glass or ten of wine!!!

Oh and she has a great sense of houmour!

I racked my brains for something different - and totally out of my comfort zone!!

I saw the doodles sheet on Crafts U Print - again by Lee Jacobs so bought that

Cut it out, made up the decoupage, and used the glossy accents for the bikini top and flip flops but what next??

I did a google search for a tropical beach scene and found this one - it was perfect!!!

A bright yellow sheet of A4 card was folded to create my card blank the I used an EK SUCCESS border punch to take off the open edge from the card front - and added a piece of blue holographic card behind to make the front the same size as the back again!!!

Using my Cricut I cut out Congratulations with a shadow too and added below the image - and a huge 50 was cut and stuck to the top corner

Job done!!

It was a huge success - loved by the recipient, the lady who ordered it - and I quite like it myself - but certainly wouldnt like to have it sent to me!!!! lol

Tuesday 9 August 2011

Oh Pretty Frog

This is a card I made last year but thought you might like to see!!!

It was a sheet again bought from www.craftsuprint.co.uk

I signed up as a card maker for CUP hence buying and making so many crafts u print sheets!!!

Anyway this is among my favorite cards - why? I really cannot pinpoint the answer to that!

Anyway, here is the card...and this is how I made it!

I used a 6x6 butterfly printed card - the card was pale blue with a darker butterfly design

I cut out the main panel and attached to the card with double sided tape, then added a glitter edge to the panel by placing double sided tape around the design, removed the backing and then sprinkled with Glamour Dust.

I built up the simple decoupage as I cut it out and shaped the top piece to add dimension....

To the left edge I used 3 mid green and 2 pale yellow paper flowers - the green were attached at top middle and bottom then the yellow one in the 2 missing spaces!

A pale lilac card candy was attached to the centre of the flowers using a tiny sticky pad.

To finish this sparkly card I coloured the heart and dots on the frog using a glitter pen then spent ages using Eucalyptus Stickles to fill in all the dots on the background...

All together this card took around 90 minutes to complete which seems a long time but the card was a joy to make and I wanted to be sure the stickles filled the dot completely and stood proud without spilling out!!!

Falconry Doodles

Hello again....

Today's card is something I made for one of our falconry friends, we found out by accident on Saturday that its his birthday this week

And as us crafters know - its lovely to actually make a card with someone in mind rather than just for the sake of it!

So here's the card in question

The sheet was bought from http://www.craftsuprint.co.uk/ and is by a fab doodles designer LEE JACOBS

I used a sheet of mid brown A4 card stock to create my folded A5 card blank,

As the sheet has just the falconer on it I needed a suitable background so did a google search for TREES and this background worked perfectly as it was in colours to match the image!

So I added the printed tree backing and left around 3cms clear at the top and bottom of the brown card - once the backing for attached with double sided tape I used a white with gold edge wavy line border peel off as you can see in the photo.

I made up the decoupage using Pinflair silicone and shaped the top layers before putting into place

Once dry I stuck the image to my card - over to the right hand side and with his foot and basket almost at the bottom of the card.

Added a circular Birthday Wishes disk to the top left corner and decorated the design using glossy accents on his boots and the birds face and then enamel accents on the shirt and bag detail....

All in all a great card for an bird of prey enthusiast!


Saturday 6 August 2011

Polar Bear's In August?

Hello again - been a while since I posted anything - sorry!!!

Today's card is not something I have made - it was designed by my best friend Paula Middleton - I just did a few minor alterations to it - including changing the card stepper from a single step into the triple step with the help of my other good friend Katie - thank you both....

So to the card - as I said its a triple side stepper card blank that was then chalked with 2 shades of blue Dovecraft shimmer chalks.

The stamps are from Dimension Fourth and feature B&F (Back and front ) polar bears....

So using the tree, mountains, snowballs, sign post,  gliding polar bear and baby polar bear we stamped each out several times.

Then carefully used a pale blue Pro Markers to add an outline just inside the stamped images, then run the blue edges with a Sakura Quickie glue pen and sprinkled with glamour dust

Then to cutting out the images - they were cut out leaving a border around - this makes the cutting much easier to do and adds dimension to the image.

Once everything was highlighted, glittered and cut out the fun started as it was time to create a winter scene

And that's exactly what we did - have a good luck at the card - I'm sure you are saying you love it! So did I and the people in the classes who got to make their versions!!

If you have any questions or comments Id love to hear from you

Thanks again Paula and Katie

x

Tuesday 2 August 2011

Oh Christmas Tree

This card is lovely to make as well as to look at

And oh so simple to do

Its a kit from http://www.lynzeysplace.com/ and is called UNDER THE TREE

I attached the easel sheet to card stock and then cut it out and score the folds.

After cutting out the many pieces of decoupage - and believe me you can use as many or as few pieces as you want and still get a great result - I attached them using double sided sticky pads

I shaped the top layers before adding them then came the fun part of decorating the tree

I used PEARLIDOODLES on the 2nd piece up as it dries with a shine and also its dimensional as well as the odd spot of glitter glue

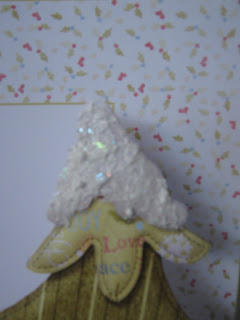
The fun part for me was the snowy top of the tree which I used for the first time - FANTASY SNOW by DELTA - its a thick paste that you stir in the pot then use on your project with a knife, paint brush, sponge or whatever method you wish - I used a finger dauber and dotted it - the finished result was a raised rough looking glistening panel - it really does look like sunshine on the fresh snow

I did take a photo but this was using my old camera which doesnt like close up work so its a little bleary - will retyr when I bring my new camera upstairs - but you get the idea!!

One last thing to add - there is a lovely box cone envelope to match!!!

I will certainly be doing more of these this year!!


Relax

As promised I have a few new cards to share with you

This first one is by talented designer Karen Briggs - and is a lovely card - although not too sure I like the name of it

Doll House Bathroom Pop Up kit - CUP number 220266_68

I have made numerous mistakes on this card - so reprinted and will have another go - knowing now where I went wrong!!!

So back to the card of errors....

I didnt ready the instructions before I started - had I done so I wouldnt have then stuck the card inside to a sheet of quality cardstock followed by the card outside onto a 2nd sheet of quality card - only after doing all that did I realise I needed then together - this made it really thick and unworkable

So now I have the outer - then card - then card - then inside

I cut out all the decoupage and attached the outside pieces tyhen went to do the inside

DOH!!!!

I noticed then that I hadnt cut out the pop out sections that were needed to hold the candles and the towel bale!!!

So after talking with some ladies in class it was decided I should just cut through all layers - which I did - and folded them before finally adding the pop up candles and towels.

All looked pretty good considering - UNTIL - I closed the gatefold doors - and clear to see was the cut out parts which looked fine inside - outside showed gapping holes as you can see in the card photo

Oh well - as I said - I will make no mistakes on the next one....

I had to use a paper clip to hold the doors together for the photo - and as you can also clearly see in the photo, when I used the Crafters Companion adhesive spray to hold the printed sheets to the cardstock - I didnt add enough around the edges!!!

Having pointed out all my errors I do hope if you decide to have a go at this card you will get it right first time!!!

Oh and before I forget - there is a matching envelope in this kit which really does finish the kit perfectly

Monday 1 August 2011

Boring - but more bag charms

I think it is safe to say - I am well and truly addicted to making these bag charms

And whats more - people actually like them!!!!

So here is what I have been up to over the last few days

I decided to make them up in 2's but every charm is different - I make the beads up in a batch then start to add them to the key chain

The last job is the charms so if its a bag order I ask what charms are wanted

Otherwise I make a selection as in all these show today...

I really do hope they sell well as I need to make money for my chosen charity - that used to come through buys on Crafts You Print but that went off so sadly it doesn't bring more than a few pounds a month in which is still a help but as with all charities they need as much as we can all provide...

And I am spending a fortune on supplies which is another reason I need to sell them....

So if you have asked after one previously - don't worry - its all made as I had to get the definite orders made up first

And if you haven't asked but would like to buy one - please let me know your preferred colours, theme for charms - ie animals, sports, DIY, ladies etc - and if you see something here you would love to own - tell me!!!

Thanks for looking - hopefully a card will be added very soon too