I know its been a few days since I posted the last project and with that was a promise to do you a step by step on how to do a Waterfall Card
You will need - waterfall sheet, 4mm double sided tape, 2 brads, pricking mat and tool - then glitter or embellishment to finish!
So better late than never - here it is...just hope my explanation is easy to follow - but I did do plenty of photos to go with it so here goes....
This is a shop bought sheet with almost all you need for your waterfall card - there is a small card blank, the waterfall mechanism, the square panels, overlay bar and a sentiment
Start by removing from the sheet and smoothing off all the tabs (if there are any) then lay your pieces out so you can identify each one
You have 3 score lines on the mechanism - score these sharply - and ideally score on front and back, then fold over on the centre score line with the coloured part on the inside as in the photo
Next you need some double sided tape, I use 3mm or 4mm usually - place a piece on just BELOW the 3 score lines (I have written TAPE to help you) and also add tape across the long bar at the bottom - this has the hole at either side of the mechanism
So far so good I hope... so now we are up to making up the waterfall - don't panic as it really is straight forward - and once you have made one - you wont forget!!!
Right - now take remove the backing paper from the bar, rub your PRITT STICK across the sticky double sided tape (this is so if you don't line up correctly you can easily remove and try again) then press the coloured piece securely onto the DST as in the above photo
Remove a piece of DST from under the lowest score line and position the 1st square panel so it sits straight on the mechanism
Continue this way till you have added all the square panels - by now you can clearly see you have your own waterfall workings - but it needs finishing
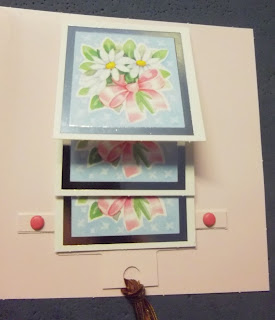
Our next steps are to punch a small hole in the bottom pull tab - and thread some ribbon or fibres and secure in place. Place the whole mechanism onto the card - this is a matter of personal preference as to how you line it up. Once you are happy with the position you need to make 2 holes on the bar - one either side of the mechanism - go through the bar and the card front. Then take a contrasting brad and press through one of the holes and secure on the back of the card front - do the same at the other side - the above picture shows I have attached at one side, I moved it down so you could see it is only held in place with the brad - so NOT add any DST or FOAM as this will stop your waterfall working!!!
So now we have our waterfall made and attached to the card
Yippee - pull the tab with ribbon towards you gently and watch the square panels start to flip over!!!
The photo here shows what is on the reverse of the card front - just the legs from 2 small brads - these will not be seen once an insert is added!!!
And this is my card all done - well except for the sentiment!!!
How easy was that then?
This sheet was by RED HOT BED - you can buy waterfall sheets from most craft shops - or online sites - eBay - crafts u print etc!!!
I also have the basic measurements for you to make yours from scratch whether it be for a card or an ATC .... will post those measurements very soon!!!
If you would like to know HOW TO MAKE something - please leave me a message - if I know how to do it I will happily do a step by step with photos for you!!!
Thank you for looking - and sorry the photographs weren't too good this time - I cant get back to the correct settings - AGAIN!!!!!


No comments:
Post a Comment