Thursday 28 February 2013

Lovely Gift Up For Grabs!!!

I really cannot believe that I am now just over 500 views off the 20,000 mark

So I will be keeping a good eye on the view-o-meter and I will send a lovely gift to the person who is the 20,000th viewer

I still only have 33 followers but I would like to say a huge thank you to the people on that list that do comment either on the blog or via emails...

It is knowing you all like what I share that keeps me going!

So a HUGE thank you – and don't forget a thank you gift of the 20,000th view.

No cut fold back lilies

Hello my blogger friends
Yet again I have a lovely card to share but sadly I cannot find the original sheet to give you any details
But I am pretty sure it was called something like no cut fold back lilies
Its an unusual card in that it had pyramage on the fold back front and then decoupage on the inside!
It was lovely to make and especially as I love it when butterflies can be attached just by their bodies making the wings fly free as I have done with this card.
So materials for this card I used ….
Heat mat to work on and protect your surface – I always use it...
1 sheet A4 purple card
The printed main design sheet & decoupage sheet
A5 piece of lilac heart kings foils
Sticky pads
Eazi Score Board & tool
Tonic 8” guillotine
Scissors
Tweezers
Shaping tool from www.dimensionstamps.com
Foam shaping mat – stamping mat or even a mouse mat
To make the card …
I sprayed with crafters companion, stick and stay, the reverse of the main card only and stuck that to the purple card and cut it out
Next I scored the card in the 2 places shown and folded the card to create the no cut fold back.
I cut out the pyramage sheets and stuck to the card front with large sticky pads.
On the back of the pyramage panel I covered what was showing with the lilac hearts kings foils paper
Now it was the decoupage elements to cut out for the inside of the card – it had a little bit of cutting out but it was easy to do.
The pieces were built with large sticky pads.
All that remained were the pretty butterflies so they were cut out and I used narrow double sided tape to attach just the bodies to the card – the wing remained free of all adhesive.
For the decoration it was simply glamour dust in gold for all the lilies and then iridescent glamour dust for the butterfly wings.
A happy birthday banner was cut off the sheet and added on the top inside right corner – it was touched with the quickie glue pen and covered with glamour dust before being attached with foam tape.
All the butterfly wings were folded lightly to make them stand out!
I love this card – its a mix between the colours, design and of course the gorgeous lilies used!!!
I do hope this is as appealing to you on the screen as it is to me sat there at my side!!!
Thanks for dropping by
This is another card for the “use or sell” box.
x

Wednesday 27 February 2013

Envelope Card

Hello my blogger friends
I really hope today's card pleases you as much as it does me.
Its one of those that I just keep on looking at and smiling..its so pretty.
Sadly I have no idea of the designer or the sheet number but it did come from crafts you print.
The sheet didn't look much at all really but I do like to try vary the themes and styles of sheets I use so when I saw this as an envelope card I printed it and set about making it up
And am I pleased I did!
So materials for this card I used ….
Heat mat to work on and protect your surface – I always use it...
1 sheet A4 black card
The printed main design sheet
A5 piece of silver mirri card
some clear AB gems
die cut butterfly using Marianne designs die
Sticky pads
Eazi Score Board & tool
Tonic 8” guillotine
Scissors
Tweezers
Shaping tool from www.dimensionstamps.com
Foam shaping mat – stamping mat or even a mouse mat
To make the card …
The black card was folded to create the A5 card blank...next the silver mirri card was cut to fit leaving the narrow all round border – I punched the 4 corners with a small corner punch then attached to the black card with double sided tape.
The main image was cut from the sheet and like the silver card, the corners were punched then this was stuck to the mirri card again to leave a border.
It was then down to the endless decoupage – I cut this out over a couple of days as it did get pretty boring doing the same thing over and again – there are 5 layers to this image.
The decoupage elements were added using mini sticky pads.
Once the decoupage was all done it was the sentiment – there were 3 different to chose from, I decided on Happy Birthday so added this with sticky pads too.
I added the pretty clear AB gems down the envelope at either side of the card front and a single gem in the centre
To the end of the sentiment I placed another gem and finished by popping one in each of the lower corners.
The top part of the envelope flap looked empty so I tied a few bows in different colour, widths, sizes but they didn't look right so in the end I cut out a pretty butterfly using a Marianne butterfly die and the cuttlebug.
I used Tim Holtz Victorian Velvet ink pad to lightly colour the butterfly top and underneath then sprayed the top with Crafters Companion Stick & Stay, waiting a few moments then dropped the butterfly into the tub of glamour dust
Once the glue had dried I used a little Cosmic Shimmer PVA to hold the butterfly in place – I left the wings unglued and slightly shaped with my fingers to finish.
So there you have it! One very pretty birthday card that females of almost all ages would be happy to receive if only for the glitter and glitz on show!
See you back here again soon then
Thanks for dropping by
This is another card for the “use or sell” box.
x

Tuesday 26 February 2013

Hugs & Wishes

Hello again my blogger friends
Yippee I have a card for you today – and what's more this is my entry to the CD Sunday Challenge Blog – the theme this week is Hugs & Wishes
My Katy Sue/Flowersoft CD arrived – its called Fabulous Shoes – and it is just that – F A B U L O U S
The cd is filled with wonderful shoe designs made from all sorts of beautiful flowers.
I was truly spoilt for choice but in the end it just had to be the lovely purple shoe!!
The backing paper was from another new cd I got yesterday, its a Funky Hand called wishes and kisses...it has the most beautiful collection of backing sheets – same designs in around 15 different colour ways – the paper I chose was perfect for this card!
So materials for this card I used ….
Heat mat to work on and protect your surface – I always use it...
1 sheet A4 lilac card
The printed main shoe sheet
A5 piece of matching backing paper
A5 piece of heavy weight acetate
A lot of blue gems
Sticky pads
Eazi Score Board & tool
Tonic 8” guillotine
Scissors
Tweezers
Shaping tool from www.dimensionstamps.com
Foam shaping mat – stamping mat or even a mouse mat
To make the card …
I scored and folded the lilac card then cut away the front leaving just 2cm or so on the fold this was then trimmed with a fancy edge trimmer – I then added the sheet of acetate securing it to that 2cm piece using double sided tape.
Next I used the fancy edge trimmer to trim off the right and left sides cutting through the acetate and lilac card stock.
The backing paper was trimmed and then glue to the back of the card blank with double sided tape
While looking for some suitable peel offs to decorate the lilac flap I knocked over a box and out rolled the lovely sticky backed decorative strip I use...it was made for the job!!!
Once I cut out the shaped base layer of decoupage I added cosmic shimmer PVA to the outer edge then covered with purple glitter.
While the PVA was drying I cut out the rest of the decoupage and used small sticky pads to build the design.
As I had the lilac card left that had been trimmed from the card front I stuck my base image to it with double sided tape then cut out to leave an all round border.
I attached the whole panel to the acetate with double sided tape.
The pretty flowers in the background had dark blue dots on the end so I used some AB gems to cover and give some glitz to the card.
To finiah off I found a lovely oval diamanté buckle with a black ribbon bow so stuck to the bottom right hand corner.
A pale lilac home made punched flower was glittered and stuck on the shoe for added decoration and the card was finished with a couple of sentiments!
I took this card to class so I could finish it off and everyone loved it and knew someone that would also love to receive it!!
I've printed off 12 of the 20 different sheets so far – but can see me doing the rest then having a shoe making session!
So go on – tell me you like it and you know someone this would be perfect for!!
Thanks for dropping by
See you again tomorrow friends!
x

Monday 25 February 2013

Jumpers & Booties

Hello bloggers
I really hoped to get a card made for today but sadly it wasn't to be
At the community building where I am the Chair we now run a Why Weight? Group on a Monday which is 11am – 12noon – however I always end up there around 10.15am to get set up and it around 12.15pm when I get back home so it really messes my day up...by the time I am home and done a little lunch, had that and a cuppa half the afternoon has gone.
And I did have a big knitting order for one of the ladies in class..she wanted booties in white with coloured ribbons as well as coloured wool with matching ribbons
Then some mini jumpers to go with them...
I haven't done too badly really – I have managed to knit 12 single booties, got the whole of the booties order sewn up and ribbon bows and hangers done and so far got 5 of the jumpers made – so after this and my long soak in the bath I just have another 5 jumpers to knit – and when I get them all bagged up I will pop the beads for the end of the jumper sticks into a bag so she can add them as and when she uses the jumpers – saves the beads falling off and her crawling along the floor looking for them!!!
So now for anyone who doesn't know about my mini knits let me tell you a little about them.


The booties are not a lot bigger than a 2p piece so perfect for cards, scrap-booking or as my class lady is using them – exploding boxes for baby
2 booties to the pair which can be bought as a single pair or the norm is 3 pairs to a pack.
They are generally knitted in white wool but can hang pink, white or blue ribbons added
Or as my lady wanted this time – a pack knitted in blue with blue ribbons and a pack knitted in pink with pink ribbons – added to that a pack of white knits with pink ribbons and white knits with blue ribbons
The mini jumpers are knitted on needles then transferred to cocktail sticks with a small ball of wool pushed onto the stick – I added contrasting beads to the outer end of the sticks but because my lady is buying so many I will pop the relevant beads into a bag for her
These mini jumpers can again be used for cards, scrap-books and exploding boxes as they are a perfect size.
And on that note I am going to love ya and leave ya!!!
My bath is a calling me!!!
Hope you like my lovely mini knits – if you would like to know how to order or how much please email me or leave a message with your email address
See you next time
x

Sunday 24 February 2013

Tag Swaps

Hello bloggers
What happened to Saturday?
Hubby & I went off to visit a few garden centres with Uluka (the Bengal Eagle Owl) in the hope of a few bookings
On the way out I popped to drop off birthday cards with Katie then on our way
Had a super few hours – we don't do gardening – in fact we got rid of all grass and soil last year and went with paving stones and gravel – but these days Garden Centres are places filled with anything and everything – some are like bigger versions of the pound shops with garden centre price tags where as others are a joy to view!!!
Its a well know fact these days that once I sit down if I have nothing in my hands – like knitting or sheets to cut out – I fall to sleep.
And that what I did in the car on the way home – got in around 4pm, had a coffee and soon fell back to sleep again...
Hubby woke me with our meal and no sooner had I finished than I dozed off again so in the end decided early bath – 7pm – sat down and felt myself nodding so went off to bed!
And that was it until I woke up around midnight – I had managed to miss 2 lots of meds so became restless and super quickly too...it was a case of take meds then wait for them to kick in – which they did around 5am – I was just so exhausted – fell to sleep and it was just before 10.30am when I woke up.
I hadn't thought about the blog until I came to sort out whet to share today – so apologises for sleeping through yesterday!

And so on to today's shared project – I had signed up for a stamped tag swap on a yahoo group Stampers UK and received 2 lovely tags a few days ago from Sandra – so today I decided to make mine for her
I started off with the Kraft Card which I chopped down to tag size.
The edges were inked with 3 different Tim Holtz distress inks – cant tell you which now as I have put everything away – sorry.
The theme I chose was haberdashery so I used stamps from Inkilicious, Indigo Blu, Debbi Moore and a little set that came free with a magazine
I stamped a tailors dummy on one using memento cocoa ink, then stamped a corset with versamark and covered with clear embossing powder onto magic foil – heated it and then cut it out and placed over the dummy with sticky pads
I stamped a few words of advertising – a tap measure along the bottom and another corset onto the tag – then using a scrap of spare kraft card stamped another corset and embossed with clear embossing powder, cut it out and stuck over the base corset.
The tape measure was stamped with brown ink onto white paper, cut out and folded here and there then stuck to the tag.
To finish this tag I added 3 tiny buttons, 2 gem set brads in different sizes and a heart brad in copper. A hole was punched and an eyelet used so the brown gingham ribbon could be slotted through. I rubbed a brown Docrafts Artiste ink pad along all the edges then dipped into gold glamour dust for a sparkly finish.
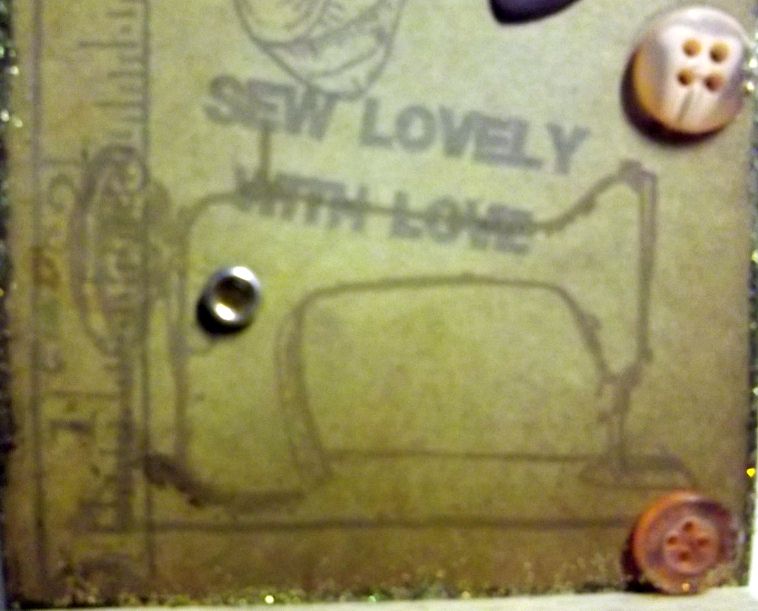
The other tag was very similar in colour but I stamped a sewing machine, scissors and rolled tape measure.
The I added one of the foiled corsets as in the 1st tag, a couple of buttons and brads to finish.
I keep looking at my efforts and have to say they look pretty naff compared to what I had sent to me – I thought about redoing them but in all honesty I think they will still end up similar.
Had I not had my swaps arrive yet I would have been happy to post mine off – its just seeing how much more talented at stamping my partner is compared to me
Oh well – we all have to start somewhere don't we?
See you again tomorrow then
x

Friday 22 February 2013

Ye Olde Garden Shoppe

Hello again my blogger friends
I just had to share a super card that I got made up this evening..
Its from the new Debbi Moore Garden Bookazine
Its really quite simple to do once you get your head around the folds.
The pattern is over 2 sheets – one is the shop front and the other the shop back
The downside is lots of cutting out to do – but hey its got to be worth it – even if you cut out a few bits now and then if you think it too much of a challenge to do in one go.
The more I look at this bookazine the more I get to wanting the full set of new Shabby Chic cds to arrive!
I must mention this is NOT my design - its from the projects in the bookazine - but I have changed how things went to make it my card.
So materials for this card I used ….
Heat mat to work on and protect your surface – I always use it...
2 sheets A4 white card
The printed main sheet
A5 piece of matching backing paper
A few gems
Glossy accents
Sticky pads
Eazi Score Board & tool
Tonic 8” guillotine
Scissors
Tweezers
Shaping tool from www.dimensionstamps.com
Foam shaping mat – stamping mat or even a mouse mat
To make the card …
I started by transferring the markings from the template to the 2 sheets of A4 card
I scored all the relevant score lines then carefully cut away the windows
The centre fold has the semi circle cut out for some reason – it also had 2 small tabs to cut out – these held the card front to the card back
To be sure I had the folds the right way I used a couple of paper clips to hold front and back in place.
Next I added the pink scallop trim to the top of the card and the green shabby effect border strip to the bottom – I used photo glue so I would have time to get them straight.
Then it was down to adding the many elements that were on the sheet...
I cut 2 panels of matching paper the same size as the shelves and they were stuck to the left side of the shelves.
I used a strip of matching paper with a small pattern down the last panel and hung a Green Fingers plaque to it1
To the door I added an Open sigh, drew in a faux hanger and then used pretty gems as a nail for the hanger and also where the hanger would go into the plaque.
On the shelves were plant pots, gloves, trowels, carrots, seed packets etc – they were random placed across the 2 sets of shelves.
The wheelbarrow was propped up again the “wall” and a pair of wellies left again some pretty shrubs.
I had a mishap with the shop name plaque – so ended up having to cut it right down then matted it onto a scrap of cerise mirri card...because I had cut parts of the flower corners off I used some pink flower shaped gems in the corners
And that's as far as I have got – I will finish it off with flower soft in the wheelbarrow and either glitter or add stickles to the flowers in all the shrubs and maybe some glossy accents on the plant pots!
The great thing with this card is is closes up to fit into an A6 envelope – such a nice change having a big card that actually fits into a small envelope!
Would love to hear comments on this card please....
Thanks for dropping by
See you again tomorrow friends!
x