Hiya
For anyone
who has either followed me from the start or spent time looking back
at what I have made in the past this card will look familiar.
But only
when the card is open!!
I used
Cupcake Bloomilicious and its set 13 should anyone else fancy having
a go at it!
Have to
say this is one cd I would hate to lose from my collection!
So
materials for this card I used ….
Heat mat
to work on and protect your surface – I always use it...
white a4
card
patterned
silver mirri card
main image
and backing paper.
Shaped
nestability die
Victorian
Velvet ink pad & brush
Small
piece pink ribbon
Sticky
pads
Eazi Score
Board & tool
Tonic 8”
guillotine
Scissors
Tweezers
Shaping
tool from www.dimensionstamps.com
Foam
shaping mat – stamping mat or even a mouse mat
To
make the card …
To
start with I folded the white card in half making my A5 card blank. I
used the blending brush and Tim Holtz Victorian Velvet ink pad which
coloured the edges of the card front.
Using
the Cuttlebug and shaped die I cut out a panel from one half of the
patterned backing paper, then using double sided tape I stuck this
centrally on the card front.
The
main image sheet was an easy to cut out pyramid design so using my
paper trimmer I cut out the 5 pieces and matted them on top of each
other using large sticky pads.
Next
I cut a piece of patterned silver mirri card to fit as a mat for the
design.
Using
the nipped corner punch I used it on the main pyramid and the silver
mirri mat
Large
sticky pads were placed on the back of the silver mat and then this
panel was secured to the card front.
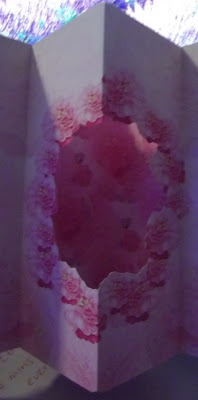
Onto
the insert now – I started by removing all the white area in the
centre, then folded in half and then the front and back in half again
as in a gatefold card.
I
added double sided tape to the outer most pieces and put to one side
for now.
Taking
the left over backing paper I folded it in half, added double sided
tape to the outer edges, placed into the fold of the card, removed
one piece of backing from the tape then turned the whole card over
and removed the other backing.
This
now partly covered the very inside centre.
So
back to the main insert with the cut out centre, I lined up the left
hand side, removed backing tape and secured in place.
I
closed the card and pressed firmly so the insert stuck.
Opening
the card up again I was able to remove the last piece of backing
paper from double sided tape and secured the insert firmly in place.
And that's
the card completed.
The inside
of the card looks so pretty with the paper in the inside centre and
the pop out cut out centre of the insert – not forgetting the
contrasting Birthday sentiment
I have a
baw ready to go on the card front and may add a touch of glitter or
some glossy accents – as yet I haven't decided.
This is
this weeks class project so I hope the ladies will enjoy making it!
This is
another card that will be in the to use or for sale box.
Catch you
again next time – same place folks
x


What a great insert idea Angie. A very pretty pink card........well I would like the pink wouldn't I lol Hugs Wynn xx
ReplyDeleteWhat gorgeous card Angie - inside and out. Thank you for joining CD Sunday again this week.
ReplyDeleteBeryl xx
CD Sunday DT
A beautiful card & I love the insert. Haven't made one like that for ages.
ReplyDeleteGloria x
GDT for May @ CD Sunday
A beautiful card Angela, Cupcake certainly knew how to do lovely floral CD's. Thanks for joining in at CD Sunday this week.
ReplyDeleteSue T x
CD Sunday DT
Nice to see you again and with such a beautiful creation, it really is a lovely card.
ReplyDeletesue-b xx
CD Sunday DT
A beautiful creation Angela, I love the image and the insert is fabulous.
ReplyDeleteChristine xx
CD Sunday DT
Another lovely card Angela. No problems with more than one.
ReplyDeleteThank you for joining in again.
Carol x
Cd Sunday DT
Beautiful card, love your style and layout
ReplyDeleteMargaret
Lovely card, inside and out.
ReplyDeleteJocelyn x
CD Sunday DT
fabulous card Angela, thanks for sharing at CD Sunday x
ReplyDelete