Thursday, 31 January 2013

The Dresser

Evening
This is another I made up from the lovely new Joanna Sheen Holly Pond Hill
This time I'm back to the normal A5 sized card – and what a card it is!!!
I know I have said it before – but this set of cds are stunning!!!
So materials for this card I used ….
Heat mat to work on and protect your surface – I always use it...
A4 sheet pale pink adorable scorable card
Printed sheet & decoupage, printed backing sheet
Gold edged burgundy sparkle ribbon
Sticky pads
Eazi Score Board & tool
Tonic 8” guillotine
Scissors
Tweezers
Shaping tool from www.dimensionstamps.com
Foam shaping mat – stamping mat or even a mouse mat
To make the card …
I scored and folded the lovely pink adorable scorable card to create the card blank
Trimmed the sheet of backing paper to fit the card front leaving the all round border
Cut a length of ribbon to go around the backing paper – secured it at the back then stuck the backing paper to the card using double sided tape.
I cut out the base layer of decoupage and this was positioned over the ribbon and stuck in place with double sided tape
Then it was down to the decoupage – what I feel I must add is if you don't like cutting out – or struggle with it – this design is not for you
It took me a few hours to actually cut out all the elements – they were so fiddly and some tiny parts too...but because I loved the design I just plodded on!
I had to use tiny sticky pads to build up the decoupage as it had so many small sections
My advise is – take your time – cut carefully – and more so with the sticky pads!
And that's it all done!
Every time I look at this card I think its so realistic – you can almost imagine the doors opening – the 3d art work is top class which is why the cd has to be a winner!
So far I haven't added any glitter or glaze and left off a sentiment as who knows when this will be used – or for what occasion as its another of those cads that would be lovely for most events!!!
Its another card in my “to use or sell” box
See you again tomorrow friends!
x

Wednesday, 30 January 2013

Its Tidy Time

Evening
As promised back to the cards again now
This is another I made up from the lovely new Joanna Sheen Holly Pond Hill
Its another big card – I am quite enjoying working on the larger cards – goes from one extreme to the other – I love ATCs which are just2.5”x3.5” and then these cards are usually 8x8 but then this card is bigger still at 8”x10”
So materials for this card I used ….
Heat mat to work on and protect your surface – I always use it...
8x10” card blank & envelope
Pink and Lilac A4 card
Printed sheet & decoupage, printed backing sheet
Pretty pink ribbon to match
Silver diamanté heart ribbon slider
Clear AB gems
Sticky pads
Eazi Score Board & tool
Tonic 8” guillotine
Scissors
Tweezers
Shaping tool from www.dimensionstamps.com
Foam shaping mat – stamping mat or even a mouse mat
To make the card …
I scored the 8x10 card blank then trimmed a sheet of lilac A4 card to cover the whole front.
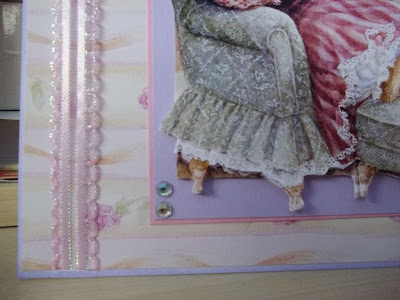
I trimmed the backing paper to fit leaving a narrow border all round and made sure the printed plates decoration were on the right hand side. Before gluing in place I cut a length of pretty pink ribbon, slotted it through the lovely silver diamanté heart ribbon slider and secured the ends at the back of the paper.
This was the attached to the card with double sided tape.
I cut out the base image from the 1st sheet and matted it onto lilac card then pink card leaving the border on each mat.
This was then attached to the card centrally and was now ready for the decoupage which I have to say was a lot of cutting out – if I remember correctly there were 3 sheets in all but I only printed the 2 sheets thinking it would be enough – and I think I was right!
So I used small sticky pads to build the decoupage up, gently curving the top most pieces before adding them.
To finish I used a scrap of shiny pink paper as a mat for the Especially For You sentiment and stuck this to the bottom right of the main panel.
To embellish I kept it simple – I used clear AB gems – 2 in each of the corners of the main image – except the bottom right where I just added a single gem to the sentiment
And that's it all done!
Its a lovely cd to work with – you really don't need to have much imagination to use the cd as everything works – whether its the small cards you favour or these bigger card which would be great for times when lots of people need to sign it for someone!
Its another card in my “to use or sell” box
See you again tomorrow friends!
x

Tuesday, 29 January 2013

4 pints today please!

Hi
This is something I made up when I had my lovely peaceful day in the craft room on Sunday
The design was from a blog but I am so sorry I just cannot remember the name of it so cant give credit to the clever designer
It would make a fab pressie for someone with a new baby – pop a pair of socks, or mittens, a bib or dummy in each of the milk cartons...
Or maybe decorate with red roses and use for Valentines day with sweeties in the cartons and maybe a little note for your loved one
Then again why not use as a birthday gift – or christmas – in fact any event could be catered for just by the papers used!

 So materials for this card I used ….
Heat mat to work on and protect your surface – I always use it...
7 sheets White A4 card
An A5 sheet of backing will cover 2 cartons
Some ribbon to match
Houghie Board & Score tool
Crop-a-dile
Sticky pads
Eazi Score Board & tool
Tonic 8” guillotine
Scissors
Tweezers
Shaping tool from www.dimensionstamps.com
Foam shaping mat – stamping mat or even a mouse mat
To make the card …
Following the instructions you made up each carton – they are so easy to make ...the A4 card is cut down and scored in several places and then folded and glued..once I find the instructions I can tell you more..
Once the 4 cartons were finished I used my crop-a-dile to evenly punch holes for the ribbons to be slotted through
The high back was measured and cut out then I used a nestability to cut the aperture which is the carry handle.
The base was 2 sections the same – but had I read further on from the finished design – the designer gave details on how to do a single box layer to stand the four cartons in...
I used some lilac and some aqua coloured paper to cover parts of the carton fronts – I did intend on adding embellishments but gave up!
So there you have it – I will make some more but do the full base next time – plus I know where I made silly mistakes so will be sure to avoid those too.
It will be a card to share tomorrow – no more templates...
Right that's all for today – same place tomorrow!
x

Monday, 28 January 2013

Another Cardi

Hi
I am so far behind today and tomorrow have a busy day so I'm cheating and sharing another of the pretty baby cardigans.
This was the first one I made and I was so pleased with it
It was just in plain white card
With gold wavy peel off borders
Flower gems
And a little cotton lace!!!
Sorry its cut short...
Back to normal again tomorrow folks
x

Sunday, 27 January 2013

Hello Doily

Hi
I have had a lovely quiet day on the craft room and I am so pleased with my efforts too
I made something fab to share then looked at a blog challenge I joined once – and got 2nd place – to see what this weeks theme was and that was it – I made another this time to fit the theme!
The site is The Sunday Challenge – a theme is set and you have to design something to fit it – his week its Hello Doily – the only rule – it HAS to have something on it from a CD
So this is what I have made to submit...
So materials for this card I used ….
Heat mat to work on and protect your surface – I always use it...
White A4 card
Pink spotty backing paper from KANBAN SEASONS cd rom
A doily
Pink with gold trim wavy line peel offs
Waste peel off bits...hearts and lines
7 tiny dark pink buttons
Scrap white grosgrain ribbon and pink Baby Girl peel off
Tiny pink safety pin
New Baby tag
Sticky pads
Eazi Score Board & tool
Tonic 8” guillotine
Scissors
Tweezers
Shaping tool from www.dimensionstamps.com
Foam shaping mat – stamping mat or even a mouse mat
To make the card …
The backing paper was printed to 128gsm matt photo paper then the back was sprayed with Crafters Companion Stick & Stay then secured to the A4 white card
I scored the card on the Eazi Score board on t he A4 gatefold lines
I had the template for this in my box of templates so have no idea who designed it or where it came from – so traced the pattern and transferred it to the back of the card with a ball tool
The main cardigan shape was cut out then the sleeves were drawn and cut out – oh and the 2 pockets
I used a ball tool and the cm side of Houghie Board to score lines along the cuffs and fronts of the cardigan to act as welts
I used sticky pads along one side of the sleeve and secured to the card base then did the same with the other sleeve
I next cut 2 pieces of paper covered card measuring 2cm x 17cm and edged these with pink and gold edged peel offs – I used the peel offs on the sleeve ends and bottom of cardigan fronts too.
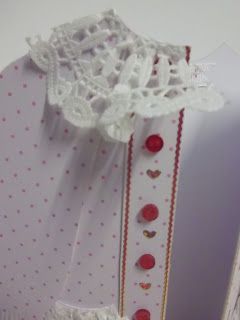
One the left side panel I added 7 evenly spaced tiny dark pink buttons and the tiny hearts which is left behind when the heart border peel off was used in between.
One the other panel I used small sections of wavy peel off to look like button holes
Just inside the card I added the small piece of grosgrain ribbon with pink Baby Girl on it.
The pockets were popped pattern side down on a foam mat and I used the shaping tool in a circular motion to plump up the pocket – I added a large sticky pad them attached to the card front
Now to the doily – I folded it in half then cut out the solid centre.
The frilly bit was then cut into 4 pieces.
I started with a piece of narrow red double sided tape and gathered the doily then attached to the collar – I repeated this with another piece of doily and added to the other side of the collar.
I had to cut the remaining 2 pieces down even more to use on the pockets but basically I did the same thing – used red tape and gathered the doily as I went along...then added to the top of the pockets
Finally I cut a small piece of white 3mm ribbon, thread it through a New Baby tag and attached to the lace collar with pink safety pin!
And that concluded the card of the day!
I think it looks fab – the 1st one I did was a different colour and was made differently so you will see it another time...
Ok – time for food!!!
Another card for the “to use or sell” box
Right that's all for today – same place tomorrow!
x

Saturday, 26 January 2013

Ship Ahoy...

Hello
Well I have to say I am spoilt for choice with a card for today...I have lots of super cards ready mainly from the latest cds I've had over the past week or two..
But today my stamped project kit arrived from
and I couldn't wait to have a go
Have to just add that this card is their design – but keep an eye out as I have so many ideas for this set of stamps
For anyone interested the stamped project club runs for 12 months – its £10 a month and when you first sign up you get a set of free stamps as a welcome gift as well as a membership card that gives you 25% off internet purchases, 20% of telephone purchases and 10% of any show purchases
As well as that you get an A5 set of stamps together with everything you need to make a card, the step by step instructions and also several photos and quick instructions for other projects.
The £10 a month is taken from your bank the same time each month which is when they despatch the stamps!
I have thought long and hard about joining but looking at all the stamps and cards made I knew it was a wise move!!!
And so to the card!
So materials for this card I used ….
Heat mat to work on and protect your surface – I always use it...
Project stamps & acrylic blocks
the project kit – card of different colours and the ribbon
Memento Tuxedo Black & Paris Dusk ink pads
Promarkers
Sticky pads
Eazi Score Board & tool
Tonic 8” guillotine
Scissors
Tweezers
Shaping tool from www.dimensionstamps.com
Foam shaping mat – stamping mat or even a mouse mat
To make the card …
I started by cutting the pale blue card down then stamped 2 anchors with intertwined rope and 2 ships wheels in the 4 corners and then the smaller lifebelts at the sides between the larger stamps using the Paris Dusk ink pad.
I trimmed a piece of white card down and stamped the lighthouse and the birds using the Tuxedo Black ink pad – I stamped the lighthouse again on the spare white card
I coloured the spare lighthouse using the Cool Grey promarkers and a yellow for the light.
This was then cut out and after adding sticky pads to the back it was laid on top of the original stamped lighthouse.
Going back to the light blue now stamped sheet, I wrapped the small blue gingham ribbon around the top left and bottom right corners securing with tape at the back.
Then the dark blue pearlescent card was stuck in the centre and finally the lighthouse panel placed on top.
This entire panel was then stuck to the main mid grey A5 card blank.
Have to say I really did enjoy making this card – the stamps are top quality so a real pleasure to stamp with
The stamp set came with several words relating to the sea but as yet I've not added anything.
This may well be a card to do in class as its not difficult but looks fab when finished!!!
Another card for the “to use or sell” box
Right that's all for today – same place tomorrow!
x

Friday, 25 January 2013

Holly Pond Hill - Friendship

Hello
Well the snow is back again – here in Hull we hadn't cleared the last lot so this will take a fair while to shift – so glad I'm in the warm – and not going anyway over the next few days.
I'm sharing a card from a wonderful double cd from Joanna Sheen called Holly Pond Hill
I just love the images, they are so easy to get creative with – and the backing papers make the cds well worth buying as you will always find something suitable on it!
For anyone who doesn't know of Joanna Sheen or her website click this link
So materials for this card I used ….
Heat mat to work on and protect your surface – I always use it...
The 2 sheets – that image and backing paper
8X8 scallop edge card blank by Craft work cards
Scrap of dark green and matt gold mirri card
Mown Grass Tim Holtz distress ink pad & applicator tool
wide green wired edge checked ribbon
Punched flower
Sticky pads
Eazi Score Board & tool
Tonic 8” guillotine
Scissors
Tweezers
Shaping tool from www.dimensionstamps.com
Foam shaping mat – stamping mat or even a mouse mat
To make the card …
After sharpening the fold line with a bone folder I used the applicator tool with Tim Holtz mowed grass ink pad to colour the edges of the card
The backing paper was trimmed down to fit the card leaving just a small border all round the card
I cut the largest of the toppers and matted this onto a scrap of matt gold mirri card then a mat of dark green card stock.
This panel was then stuck – using double sided tape – to the centre right of the card front – this way it left some space for the ribbon which I wrapped around the card and secured at the back with sticky tape.
I gathered the ribbon in the centre and stuck in place with tape.
Next I tied a big bow and used a piece of very narrow ribbon to hold the centre – the bow tails were cut into V shape at the bottom – the bog was stuck onto the ribbon border using a strong sticky pad
I used a tonic petal punch to make the flower – I used a pretty aqua coloured double sided paper and once I was happy with the flower I sprayed it quickly with Perfect Pearls Mist PEARL spray to give the shine
Lastly the sentiment – Treasuring Your Friendship – was added over the printed one on the backing paper – I used sticky pads so it stood off the paper
I have now made 4 or 5 lovely cards from this cd – as I said when I started the images are so easy to use as they lend themselves to all manner of shapes and sizes.
This card is ideal for most occasions from Hi There to Happy Birthday
Another card for the “to use or sell” box
Right that's all for today – same place tomorrow!
x

Thursday, 24 January 2013

More from Peerless Designs

Hi
I have a really sweet card to share today – its from one of the newest cds launched by Sarah Hallam of Peerless Designs fame. Sarah draws and paints all her artwork so we know when we buy one of her cds it really is all original. The cd I used today is Through The Lens Ladies Edition and you can find out more by checking the website through this link
http://www.peerlessdesigns.org/
On the sheet I printed I had 2 images the same but one was pyramage and the other 3d decoupage and not just basic shapes either – Sarah used a fancy label type shape on this set.
And the backing papers would be enough to make me want this cd.
So materials for this card I used ….
Heat mat to work on and protect your surface – I always use it...
The 2 sheets – that image and backing paper
6x6 Elegant square easel card blank by Craft work cards
A small piece of contrasting pink backing paper
A5 piece of burgundy card
Pink gingham ribbon
Tonic scallop flowers border punch
A strip of silver foiled dotty card
A large silver foiled sentiment
A small silver die cut flourish
Assorted gems and pearls
Victorian velvet Tim Holtz distress ink pad & applicator tool
Sticky pads
Eazi Score Board & tool
Tonic 8” guillotine
Scissors
Tweezers
Shaping tool from www.dimensionstamps.com
Foam shaping mat – stamping mat or even a mouse mat
To make the card …
I folded and sharpened the pre scored card blank then used the ink pad and applicator tool to colour the shaped top of the card blank.
I trimmed the contrasting backing paper to fit the small front panel then punched along the bottom edge
Next I trimmed the burgundy card to fit the paper with a narrow all round border and stuck in place with double sided tape.
The backing paper was cut into 2 pieces – 1 was put away for the other card.
I cut a small panel from the top of the sheet and glued it to the panel I was building earlier
Before I stuck this to the card front I wrapped a piece of small gingham check pink ribbon around the panel and tied a bow to the right...then the panel was glued in place on the card top.
After cutting out the pieces of pyramage I used large sticky pads to put it together, I used the pink ink and applicator on the back as some of this would show above the card.
Once that was all done it was stuck to the panel on the front.
To do the easel base was simple – I trimmed the rest of the burgundy card and stuck it on the card base
The rest of the backing paper was cut and stuck in place
The strip of silver foiled spotty card was trimmed and had the corners rounded
The sentiment was trimmed slightly and I used a Smirk pink glitter pen to colour the edges, then using a sharp knife and a rule I put slits 1cm in at each end then slotted the spotty strip through it
This was my stopper so it was raised quite high using sticky pads – when I came to position the stopper I checked it would be below the pretty little girl on the backing paper.
Lastly a little embellishing...I stuck a small silver mirri card die cut flourish to the bottom right corner and added small pink pearls to the swirls and the same pearls went on the main pyramage image.
I used 5mm AB clear gems – 3 along the bottom left side of the base then 2 along the top card front either side of the image
And that completed this card. I have had both the images made up for a couple of days but just couldn't decide what to do with them – I didn't want to do just a plain A5 card as I think this image deserves something a little different
I was up all night again so when I was looking for an envelope I spotted the pack of cards and that was it everything fell into place!
Like most of the cards I make and show on here I don't have a use for – they simply get dropped into the box although occasionally I do get asked to sell them which I do
Right that's all for today – same place tomorrow!
x