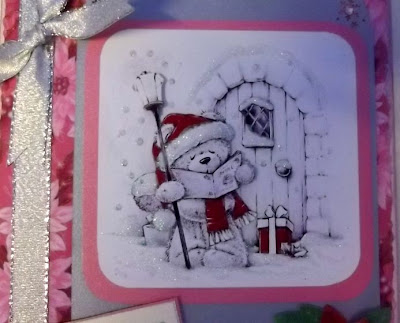
Hi
A good while
ago I was asked to make a large cute very special christmas card by a
young lady for her foster mum.
I have been
putting it off I suppose – I find it difficult sometimes to make
something “special” with no further info
She gave me
a hand written piece that she asked be printed to the left side of
the insert which I have done...
See what you
think to it....
So
materials for this card I used ….
Heat mat to
work on and protect your surface – I always use it...
White A4
card blank
Pink
poinsettia paper (Art Deco Christmas by Debbi Moore)
Image from
The Best Of La Pashe (new cd and fab!)
Victorian
Velvet distress ink pad by Tim Holtz
Silver matt
mirri card
silver
metallic ribbon
Poinsettia
and leaves were recycled just tidied up
Tiny clear
AB gems
Double sided
tape
Sticky pads
Eazi Score
Board & tool
Tonic 8”
guillotine
Scissors
Tweezers
Shaping tool
from www.dimensionstamps.com
Foam shaping
mat – stamping mat or even a mouse mat
To
make the card ...
As I said I
had put this off – another reason was the size of the card – its
a big space to fill – with what?
I used the
ink and a piece of cut & dry to ink all the edges on the front of
the card
Then I
covered the card front with the pretty poinsettia paper leaving just
a small all round border – I cut this with a deckle edge trimmer.
A length of
silver metallic ribbon was wrapped around the spine edge of the card
and secured at the back – a large bow was tied and added to the top
of the other ribbon.
Next I used
a piece of matt silver card and cut it large enough to punch the
corners with a snowflake punch from Martha Stewart and also to take
the image matted onto a piece of pink shimmer card.
Before
sticking the silver panel to the card I wrapped a piece of the same
silver ribbon around the bottom, just above the punched corners. And
secured it at the back.
After I had
cut the image out I rounded the corners, the pink shimmer card also
had the corners rounded – as with most of my matting & layering
I like to leave a border between layers.
Then the
large silver panel was stuck to the card – I positioned it sort of
to the top right of the card.
The
decoupage was cut out and had double sided sticky pads on the back
ready to build up the design – once all pieces were in place I used
the Cosmic Shimmer PVA glue to highlight everywhere I imagined snow –
then covered with glamour dust and tapped the excess away – I love
the way it makes the glittered sections look chunky!
Now to the
recycled poinsettia's and holly leaves – these were on a card I was
sent last year and I loved it...I kept all the cards but had to part
with some a while ago when I cleared the raft room – I recycled
and kept what I thought I could use.
I attached
these to the card with silicone and left to dry.....
Tiny clear
AB gems were added to the poinsettia centres and also in the gaps of
the snowflake that I had punched in the corners.
A simple
sentiment finished the card!
Oh when I
did the insert I had to use 2 sheets of A4 paper so I trimmed them
with the deckle edge and like the card front I inked the edges of the
card – and even did the back paper – mind you I had to as I has
managed to get a line of ink on it....
I gave the
card on Tuesday – the class ladies all raved about how lovely it
was I think the young girl was pleased with it
So – come
on then – would you say that passed as “special” or not?
Be honest –
I wont be hurt – and its comments that help me the next time round¬
See you all
again tomorrow
Keep warm
and safe
Oh and think
about me tomorrow as we have our Craft Day...I'm looking forward to
it but just know I will get stressed over it!
I will tell
you all about it next time ok..
x


No comments:
Post a Comment