Hello
Yesterday
I mentioned I had at long last made a start on something I had wanted
to do for ages but with christmas and the like it never got started
So
this is it!


It
is an A5 rubber stamp holder
I
actually bought the basic kit which is – the 2 pieces of board, 2
book rings, an oval cut out and around 6 sheets of thick acetate
punched to fit the album – from www.alysinkyfingers.co.uk
and intended on using it for the project club kits.
I
started by painting the board covers – one side is pink the other
is blue, and I used the lovely B&Q sample paint pots, funky
metallic effects, they are only cheap but just keep on going, I think
it was something like £2 for 3 pots.
Anyway
back to my stamp holder...
Once
the paint was all dry I put the book together – mainly so I didn't
misplace any of the pieces
I
randomly stamped a sheet of card using a Dimension stamp that had
swirls, hearts and flowers, I used some inks I had bought in the year
and never opened – a ColorBox wheel of Petal Point fluid chalk ink
pads – Blossom Pastels – in pinks and purples.
The
heat gun was quickly passed over the page just to be sure all the ink
was now dry then I used the Dimension Stamps plain alphabet to spell
Angie's stamps – they were stamped using black Versafine ink pad
and then cut out.
Now
the messy bits – I inked each letter well with Versamark ink pads
and covered the letters with clear embossing powder – heated then
up and repeated so each letter was triple embossed to give the super
shine and this also deepened the colour of the stamping too.
The
letters were all set aside to cool completely and while I was waiting
I painted the oval piece in purple metallic effects paint and put to
one side to dry.
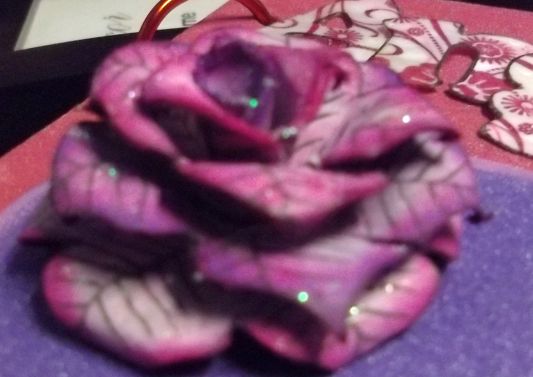
Onto
the large flower – I have never really made one of these before, I
have watched Roy from Dimension stamps lots of times and even have
one of his flowers in my craft room...
At
the last craft day we did at our building the ladies were taught how
to make these flowers and I watched – but that was all...then when
I gave the kits to people who hadn't made the day I did show them how
to make them up so I had a good idea.
I
used a sheet of 250gsm paper to start with, stamped my image 3 times
in black then stamped inside the petals using the stamps provided in
the set – I should add here that the flower was from
www.dimensionstamps.com
and the set is called Petal Passion, it has the large and medium
shaped petal flowers, a small smoother edge flower, 6 stamps to use
inside the petals as decoration, a lovely flower swirl with extra
flower and a wonderful Friendship verse – all for just £10
Back
to the paper flower – it didn't work!!! It was far too flimsy so I
started again using a 300gsm smooth white card which is what Roy
suggested on his You Tube video.
I
stamped veins into each petal this time using black versafine ink for
all the stamping
I
cut out the stamped flowers and then coloured them on the top and
bottom using the same petal point colours – lighter in the centre
working to darker around the outer edges.
I
then followed the tutorial on which segments to cut and how to curl
then make up the flower.
So
the flower was completed and as I used glossy accents as a glue I
used it to dot the petals and then sprinkled glitter of it.
Back
to the letters now, I laid them on the book front until I was happy
with them then used pin flare gel to stick the letters down.
With
the oval I rubbed the edges with my Tim Holtz sanding pad to distress
it lightly then used the Pin Flare gel to stick it between the
wording
The
flower was attached to one part of the oval with pin flare gel and
then I found a lovely white acetate label that was embossed with
white glitter around the edge and had this saying “Do All Things
With Love” so I thought it was perfect to go along side of the
flower – as it was acetate I used some invisi dots to hold it –
and was gutted to see they showed straight through....not sure what
if anything I can do now to cover them...I tried to take the label
off but it would have made a mess so left it...I'm thinking of maybe
trying to do an inner border of tiny gems as they would cover
majority of it and hopefully help...any suggestions please?
The
last thing I did was add a pretty acetate heart to the top right
corner – its glittered around the edge and has text printed through
the heart...the photo didn't show it properly as I was so close it
all blared
So
there we have it – so far – and I am so pleased with it...I wont
rush it as I want it right...
Would
love to know what you think to it please...
See
you all again next time
x
Love this Angie especially the flower. Think I'll get this for my group. What about putting tiny ribbon bows over the glue dots at the sides and heart gems top and bottom to link with the heart top right corner. Hope this helps. Xxx
ReplyDeleteThe above is from me Angie oops should have added my name. Hugs Wynn. Xxx
ReplyDelete