Tuesday, 12 March 2013

In The Jungle

Hello my blogger friends
Its my adorable grandson Laytons 5th Birthday this Thursday. Because he is having a party at one of the kiddies adventure play parks after school that day we wont get to see him but have been invited to tea on Wednesday so we can take his cards and presents then
Well presents are never hard to buy for 5year old boys – in fact we saw a lads construction type kit just after Christmas so bought that for him, then 2 weeks ago his mum asked would we buy him some more Lego – he wanted the fire station and 2 of the 3 fire engines – well the answer was simple – NO! We agreed to buy a fire engine and they bought the other – he had one bought fr christmas so now has the 3 – he can save any money he gets to buy the fire station which I believe is around £40.
Every year I have decided at the start of the year I will make the lad a really special card – but as with past years I put it off time and again until today I knew I had to do something.
So I browsed some folders and came up with a craftsuprint sheet – it was to be used as a basic 6x6 card or could be made into a shaker using the spare frame.
Well I didn't do the shaker and decided to make the card my way!
And this is what I did!!
So materials for this card I used ….
Heat mat to work on and protect your surface – I always use it...
brown a4 card
Printed sheet
A5 piece orange card
4 buttons
peel off letters and numbers
Martha Stewart bird on a branch border and corner punch set
ultra fine flowersoft in sand and toffee
Sticky pads
Eazi Score Board & tool
Tonic 8” guillotine
Scissors
Tweezers
Shaping tool from www.dimensionstamps.com
Foam shaping mat – stamping mat or even a mouse mat
To make the card …
The brown card was folded and scored then the orange card was trimmed down to fit the card front.
I punched the top 2 corners and then used the border punch to punch the bottom
The sheet was then stuck to the card with double sided tape.
I cut out the main area of the card, then all the decoupage and built that up with tiny sticky pads.
The extra frame was cut out and stuck onto the base frame using thick sticky pads.
This panel was then stuck to a sheet of mid brown card and them onto the orange card – I positioned the panel to fit just under the punched corners leaving room at the bottom for some peel offs.
I stuck the Happy Birthday Layton onto a scrap of gold cad then stuck across the top of the card using tiny sticky pads.
At the bottom of the card I stuck a large number 5 and the word TODAY next to it.
To decorate the card I added 2 green and 2 blue buttons that had a scrap of white ribbon in each – these were stuck in the card corners using Pinflair glue.
Once that set I used a Sakura quickie glue pen to outline the white fluffy clouds then covered with glamour dust – the same with the tiger and panda face.
PVA was added to the lions mane quite thickly then I covered with toffee ultra fine flowersoft.
I did the same for the sun but covered that with sand flowersoft.
All in all the card hasn't turned out too badly – has it?
And that's all there was to it!
I know I say I want to do a special card but have no ideas at all as to what I would want – then did this and just know he will like it – he takes a huge tiger to bed!
Will let you know what he though of it when I know
Catch you again tomorrow – same place folks
x

Monday, 11 March 2013

Decorated Plaque

Hi again bloggers
Yesterday I shared a card I had made as part of the swaps on Stampers UK – well this is part of another swap.
It was called Secret Object swap and the idea was the hostess sent out a secret item to all who signed up for up the swap.
She set up a database so we said what kind of thing we wanted – as in colour and theme – then she matched the object to the partner
My partner was Jan who chose purple and green and any theme
The secret item was fab and I really would have loved to decorate it for me....
I was so undecided as to what to do – have a long time till it needed to be sent off but I am still trying to clear up all my swaps so set to one night when I couldn't sleep...
I started by painted the front with the lovely B&Q Funky Metallics paint in purple really called VIVID and once dry coloured the back of it with a plain emulsion called WATER.
Once all the paint was dry I set about decorating it – starting with the back – I trimmed a pretty sheet of butterfly backing paper from Blissful Butterflies by Hinny Bop to fit and used red double sided tape to hold it.
Onto the front – I stamped a lovely verse using a stamp by Inkilicious in the middle and a swirly flourish under it
Then I got out my big bag of mixed pop up flowers from www.diannesdiecuts.co.uk and luckily had plenty in green and lilac so laid a few out on the board until I found what I was happy with
It was the lovely loopy flowers – so the base was in green – then lilac - then green again – I curled the petals under on each flower so it stood proud...I left the centre for the time being...but I did add a couple of die cut flourishes behind the flowers.
On the right hand side I stuck on a beautiful decorative design made up of clear rhinestones.
I had in mind butterflies so went through my box of die cuts people had kindly cut and sent me recently and found 3 pretty butterflies in white – so I decided to colour them using Cosmic Shimmer sprays and then dried it off with the heat gun then spray Radiance Rain Pearl Lilac for a wonderful shimmer.
I stuck just the bodies of the butterflies among the rhinestones.
For the hanging flowers I actually coloured them using Pro Markers – the greens all worked great but sadly the purple shades didn't I used lilac, lavender and amethyst but they all look washed out! So I did purple one side and green the other on all 3 flowers.
Using my favourite ribbons – the spotty ones from www.meiflower.com I opted for 2 pieces of sage green and one of purple – I slotted ribbon through the flower and then through the board and stuck together with red double sided tape so no real join marks.
It worked out I used purple coloured flowers and sage ribbon and the outer ends and the green flower with purple ribbon in the centre.
The flowers I used were similar to a lotus pop up – still from Dianne's, I had plenty o lilac but not green so they were coloured with mown lawn ink pads by Tim Holtz
For the centre of the flowers I used some lovely purple glittery embellishments I had been sent from Yvonne – they are flowers and butterflies in shades of lilacs and deep pinks...
So it was the glittery flowers I used in the centre of the flowers here as well as the larger loopy flower at the top.
I used clear AB flat back gems – added one to each of the petals on the wooden flowers and then tinier gems on the flowers of the stamped flourish
Because the back of the wooden flowers was just plain I sprayed a little of the Radiance Rain – doesn't look as nice as it did on the butterflies though!
I posted this off to my partner this morning so I'm hoping it reached her tomorrow and that she is pleased with it – would hate to think it would just be popped into a drawer or cupboard when I could have used it!!!
Will let you know what Jan thought of it when she gets it!!
Bye for now then
xxx

Sunday, 10 March 2013

Puffins...

Hi again bloggers
I belong to a stamping group as I think I have mentioned in the past – its a yahoo group called StampersUk and I love the challenges and swaps that are offered on there
Recently I took part in something new to me – an image mingle – so the idea was to use stamps you haven't used or rarely used from your own stash – stamp out a number of images and post them off to your partner
So next part – my partner sent me her stamped images and to say it was hard really doesn't cover it!
The images I was sent were either too small to do anything nice with or the best one - in my opinion – needed to be coloured
And that is were my problem lies....
I don't do colouring – at all!!
Because I can't!
And that was the reason I sold all my promarkers...
In the end I opted to do an image of 2 puffins – it was a small image but luckily it was central to the set size of the card
It still needed to be coloured but at least it was a minimal amount
I used a range of blue chalks for the sea and the sky – then added some pale yellow and pale pink chalks to the sky which really don't appear to show on the photographs
I used shades of green chalks for the land which blended in naturally with the sea and sky.
I ended up using an orange pro marker I borrowed from class to do the beaks and feet as well as highlight close to the wings.
Then a light grey pro marker to edge and add a light shadow.
That was the colouring part done
SO – for the card I used a pearly dark blue card to make my A5 card blank, I randomly stamped the edges of the card using a swirl stamp and versamark ink pad then sprinkled with gold sparkle embossing powder and heated it.
The image had the 4 corners punched with a lovely cut corner type punch, this was then matted onto a piece of lighter blue card then onto lemon glitter card – each time I punched the corners before gluing to the mat – and always leaving a border all round.
The matted panel was then attached to the left side of the card front using double sided tape.
Using the Tim Holtz rosette maker I created the rosette using orange card and added a plain brad to the centre – this was then stuck to the top right of the card with extra strong tape.
A Just For You sentiment had the corners cut then matted to a scrap of gold mirri card which I also cut the corners of – this panel was placed at an angle at the bottom right hand corner.
To decorate the card I added 3 shiny gold card candy at the top left corner and also the bottom right corner then finished with 2 amber AB gems which were glued to the main image.
Last thing – a sprinkling of glamour dust!!!
Well its all parcelled up ready to go in the post tomorrow – fingers crossed my partner will like it!!
Hope the weather is better with you than with us just now!!!
x

Saturday, 9 March 2013

Decorated Heart


Hi bloggers
As some of you already know, a few years ago a friend and I set up an online craft forum – Ukandocrafts – as the name suggests it is a UK based set up but we have one member who comments on my blog almost daily – Wynn – who lives in Cyprus.
So back to the forum – on here we do lots of swaps and challenges ATC swaps and recently swaps which have turned out to be great fun and a super way of working outside the box.
Another member of the forum and regular commenter on my blog is Pauline...she sets up some amazing themes for ATCs and challenges that to me make me stand back, look at my work and think WOW did I do that???
The last challenge Pauline set up was to decorate a heart shape – she cut the hearts herself and then sent them out to everyone who signed up for the swap
The idea was to decorate the heart in any way you wanted and once finished it had to be sent to the partner who's name Pauline messaged to us.
Well I looked at the heart for quite some time not getting any kind of inspiration from it!
So I started by painting one side pink the other purple – I used my favourite paints – B&Q funky metallics.
The painted heart sat on my work bench for almost 2 weeks until one night I picked it up determined it would be finished ready to post off
And this is what I eventually did....
I die cut some small leaves from white card and coloured them different greens Tim Holtz distress ink pads, then glued them to the Purple painted side of the heart and added some handmade flowers below them.
A die cut filigree heart was cut using a Memory Box die – again in white cad then coloured using pickled raspberry distress ink pad – this was then folded in half and just one half was stuck to the painted heart.
I had some beautiful glittered flowers and butterflies in shades of lilacs and purples – these were sent to my a lovely lady I met through facebook – Yvonne – they were perfect for this project – so I stuck a butterfly near the top inside the folded die cut heart and then the flower was sat on the point of both pieces.
That completed the purple side
Onto the pink side – for this is printed out one of the shaped pyramage sheets from Hinny Bop Blissful Butterflies cd rom, built the pyramid and then stuck it with pinflair gel to the centre of the heart.
I decorated the pyramage with glitter, glossy accents and cosmic shimmer coloured pva glue.
A small bow was tied and added using pale pink with white spot ribbon and added to the top right of the heart and to finish I used some of the self adhesive words by Tim Holtz...I tried to use words that I associate with butterflies and flight so used live, love, laugh, everyday.
A length of pretty lilac organza ribbon was folded then slotted through the hole as a hanger!
It went in the post on Monday and I found out today it had arrived safely and was now hanging in my good friend Caz' bedroom!
So job well done!
Pauline doesn't give us long to rest lol – I received the MDF Easter egg shape today – best get my thinking cap on....
Thanks for reading this far – now enjoy all the photos of the heart,


and see you again tomorrow
x

Was you my 20.000th viewer??

Ok....so who was the 20,000th viewer please?
 
I have no idea - just know I had a text from a follower to say we had busted throug the magic number
 
As promised I have a prize here waiting - I know you will have all looked at the counter knowing we were near
 
So please email me angmacw@googlemail.com with your name, address and what time approx you hit the magic number and I will post your gift ASAP
 
Thank you for all the support - long may it continue
 
Angie
x

Friday, 8 March 2013

Crisalis Collection

Hello my blogger friends
Today was the 1st craft day of the year for our community building and we can certainly say it was huge success
I get so uptight in t he week running up to the day – checking and double checking everything – and all for nothing – the day was a super one – it all ran to plan – and the ladies all loved their free goodie bags and all the projects!!
Now for the card – I used the wonderful new double cd set from Crafters Companion – Crisalis Collection...the 1st cd is Paintbox Poppets – this is based around young children and so very cute, it was all the additional artwork that wouldn't fit onto the last cds and the 2nd cd is the Crisalis classics – these are older children/young adults.
The cds are the kind you can use over and again for almost all occasions – and when you see one of the faces it immediately makes you think of someone you know.
As soon as I saw this particular image I knew I had to make it up – it was just crying out for soft fluffy feathers – well in my opinion it was!!!
So materials for this card I used ….
Heat mat to work on and protect your surface – I always use it...
8x8 scalloped card
Printed sheet
An 8x8 piece of contrasting backing paper
A piece of black and silver patterned mirri card
Memory Box decorative circle design – don't know what its called
white fluffy feathers
foiled sentiment.
Versamark ink pad and deep pink mica powder
Sticky pads
Eazi Score Board & tool
Tonic 8” guillotine
Scissors
Tweezers
Shaping tool from www.dimensionstamps.com
Foam shaping mat – stamping mat or even a mouse mat
To make the card …
The 8x8 card was folded and the crease sharpened with a bone folder.
I then dabbed the versamark ink pad randomly around the edges of the card and then picked up mica powder on a soft brush and rubbed it into the sticky area. Once I was happy I had the colour as I wanted it I sprayed with the cheapest hair spray to seal the colour and stop the powder brushing off when touched.
The backing paper was trimmed to fit – I used the top of the scallops as my guide line – it worked out lovely this way.
The main image was cut off the sheet and I laid it on top of lots of different colour and textured card before settling for the pretty black starburst card.
The image was stuck to the top part leaving the border around the sides and the top – I left a big empty space under the design – I kept the space empty as it worked so well.
The decoupage was now cut out and added to the main design using small sticky pads.
I am going through a bit if a rosette phase just now so folded and used a black rosette that had a velvet touch brad in the centre, I mounted this directly to a die cut from a Memory Box die – I don't know what the die was called but its like a lovely doily
Two big white fluffy feathers were stuck under the rosette and it was all placed in the top right hand corner of the card using a large sticky pad.
Last addition was a deep pink foiled sentiment panel that reads – May All Your Wishes Come True!
Glamour dust was added to the tutu hair decorations and posy
I am sure you are sat there thinking how lovely the card and artwork are...they are both even better in my hand I can tell you!
Another card in the “for use or for sale” box
Catch you again tomorrow – same place folks
Oh and I think we just need another 70 views to hit that magical number!!!
x

Thursday, 7 March 2013

For Grandma

Hello my blogger friends
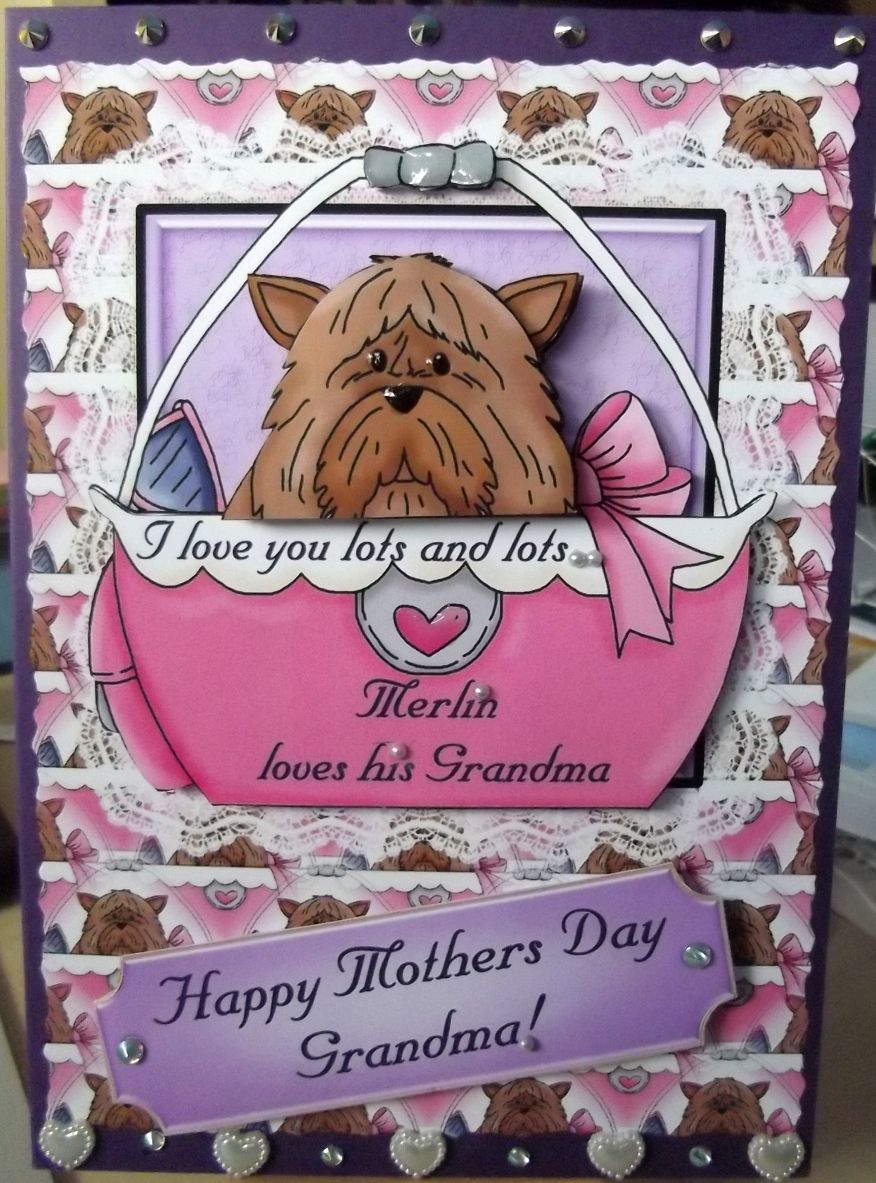
Ok so yesterday you saw the Mothers Day card for the lady at the falconry club – well she asked me on Monday night – would I make her a happy mothers day Grandma card for her mum from their dog!!!!
She asked if it could be a cutie card and it had to be sparkly and full of bling.
It didn't take more than a few minutes for me to find the sheet I had in mind to use...so lets not waste any more time...here's what I used and did!
So materials for this card I used ….
Heat mat to work on and protect your surface – I always use it...
A4 purple card
Printed sheet
An assortment of different size, shape and coloured gems
Sticky pads
Eazi Score Board & tool
Tonic 8” guillotine
Scissors
Tweezers
Shaping tool from www.dimensionstamps.com
Foam shaping mat – stamping mat or even a mouse mat
To make the card …
The A4 card was scored and folded in half making the basic A5 card blank.
The main image was cut off the printed sheet and attached to the card with double sided tape.
The very easy to cut decoupage was cut out and added to the design with tiny sticky pads
Because I had printed this sheet through Picasa I was able to add a personal sentiment which read “Happy Mothers Day Grandma” and then on the frill of the dog basket I added “I love you lots and lots” and then on the pink basket it says “Merlin loves his grandma”
I used some very tiny flat back pearls to stick on all the dots of the text like the dot of an “i”
To finish off the card I used silver pointed AB gems along the top of the card and pretty embossed heart gems and clear AB gems along the bottom.
The clear AB gems were also at either side of the sentiment label to look like brads.
Glossy accents were used on the eyes and nose as well as the basket handle.
So there you have it – a cute quick and easy card that could be used for any event...its suitable for crafters of any level too.
I am stopping here for today as we are having an all day craft day at the building and I still have a few things to get done!!!
Wonder if I will get my 20,000th viewer tonight!!!
Catch you again tomorrow – same place folks
x