Hello my friends
Thankfully I have felt much better today – I had a good night's sleep and came to an important decision last night after a chat with my pal Caz...so maybe a clear mind helped too!
And as promised I have finished a card and got piccies to share...so here goes!
It all done in shades of black with white....so its a white 5x7 scalloped edged card blank to start
Then I used an A4 sheet of black card, an A4 sheet of white card and an A5 piece of black patterned vellum.
I started by cutting a piece of black card to 7 x1 3, a piece of white at 7.5 x 13.5 then another black at 8 x 14cm – as well as a piece of the printed vellum at 6.5 x 12.5cms which I then wrapped a piece of black & white spotted ribbon around and secured at the back.
I matted them making sure the bottoms were all level which left a stepping mat at the top of this panel and stuck this to the left side of my card.
Next I used a piece of black 11 x 8, then white 10.5 x 7.5, black 10 x 7 and printed vellum at 9.5 x 6.5 cms – I matted them leaving an equal border all round, then wrapped spotted ribbon around this panel.
I wanted to position this across the top so used black foam pads except where it crossed on to the other panel – there I used double sided tape which meant it was all the same level.
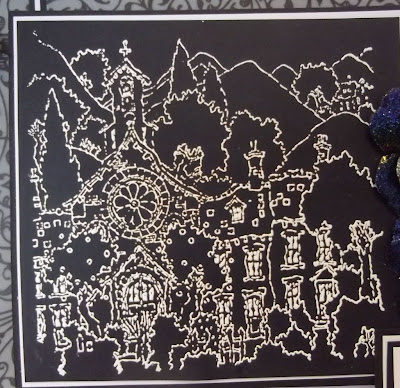
I used a stamp by Michael Powell called “Square Urban Stamp – The Chapel” I have to say I didn't like the look of this stamp as its coloured vividly on the packet – but saw this type of stamp done in one colour and it looked fab!
So I stamped onto black card using a Versamark ink pad then covered the image with Stampendous White Opaque embossing powder and heated it.
I cut the image down close to the edge of the design then matted onto white and then black card leaving a very narrow border each time.
Like the last panel, I used black sticky pads doubled up where it was direct to the card blank but then either double sided tape or single sticky pads to keep it all level...
I used a plain and simple Best Wishes sentiment which I matted onto scraps of black and white card just like the rest of the card and fixed it across the bottom with doubled up black sticky pads.
For the flowers I used Dovecraft White Paper Blossoms – I coloured them all with a black Promarker then rubbed the versamark pad over them, the large flowers were sprinkled with Stampendous Midnight black then Stardust and the effect was amazing – a beautiful black that shimmers purple, green, blue and so many shades in between – must just add here this was done accidentally – I spotted patches of the leaves I had now midnight black on and pour over powder before I realised it was the Stardust....
The smaller flowers were left white but I ran then versamark over them and covered well with Stampendous Marcasite Opaque and got the lovely black - grey look
I stuck these down the right side of the stamped image using Cosmic Shimmer PVA glue then added a black with white spots card candy to the centres with a black sticky pad.
To finish I made a pretty bow and attached it to the left hand panel
I was so pleased with the finished result – another way of using my stamps and not worrying about the colouring in
Hope you enjoyed this project!
Till tomorrow then....
x


No comments:
Post a Comment