Hello
Back
to reality now – just Pete & I...oh together with 2 dogs and 5
birds of prey, not forgetting the lovely ferret and 2 fish!!!
But
the lad has gone home and not coming to stay again for a few
weeks...but it was lovely having him here and the weather meant we
could do things rather than him have to stay and play indoors for 3
or 4 days and nights.
So
today I want to share something I had to do as part of a swap...on
my forum I signed up for the egg swap – so was sent an MDF egg that
I had to decorate and send off to my chosen partner, as it was an egg
and it was due to be sent out by Easter you can imagine what I was
going to do with it
But
things got in the way – firstly I went into hospital for the knee
surgery and not long out when we began packing for the big house move
So
sadly the egg just got moved from here to there and back again...I
did make a start before I moved – I painted it yellow!
But
as my partner had been so patient with me I decided last weekend as I
was on my own I would get it done and ready to send off
I
saw the perfect design for the egg shape
And
thats where the EGG part of it stopped...it is now an oval shape.
I
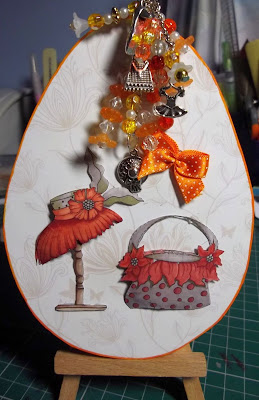
used the fabulous fashion cd from Katy Sue/House of Zandra and design
number 3.
Its
a beautiful orange design and it was the correct shape and size for
the oval...
So
I printed off the decoupage sheet and started by sticking the base
image to the oval shape and trimmed around it, the decoupage isn't
oval but the bottom part fitted perfect and the top was blank anyway.
I
cut out the sections of decoupage and added then using pinflare glue
– with the top few layers I carefully shaped them then added larger
blobs of pinflare so the dress had a rounded look to the skirt part.
For
the flip side I printed off a pretty lightly patterned backing paper
from the lovely Kanban Seasons cd, I went for a pale cream background
with coffee coloured pattern, I stuck this to the mdf using cosmic
shimmer PVA glue then as with the front I trimmed off the over hang
I
printed off a sheet of matching handbag toppers and a sheet of hat
toppers
The
toppers offered 6 different shapes but luckily the hat and the bag
were the same size in all 6 toppers so I just cut out 2 of each, used
one as the base image and made the 2nd decoupaged, again I
shaped the top piece to give a lovely effect.
So
now I had a mainly orange oval so I used a bright orange Aqua marker,
I edged the front and back of the oval and then carefully covered the
MDF too.
So
how to hang it now – I was going to simply slot ribbon through but
felt it needed something with a little WOW to it so out came the
jewellery making gear and I carefully put together a lovely handbag
charm in orange and yellow beads and then added charms to match the
theme so dress, hat, bag and a show...the bag charm could be used to
hang the oval or removed and used on a bag..
The
oval swap was finally sent to my partner Janice who sent me a message
to say it was well worth the wait...
Job
done!
I
thoroughly enjoyed making it in the end and its a good feeling when
the recipient likes it and knows how much thought and effort went
into making it for her.
Would
love your thoughts on this please
xxx


That's a WOW vote from me Angie. Lucky Janice getting that fab bag charm.....I'll say defo well worth the wait Hugs Wynn xx
ReplyDeleteIt's lovely! Thanks Angie - it was worth waiting for! Janice.
ReplyDeleteLovely egg Angie.
ReplyDeleteMargaret