Sunday, 30 June 2013

Welcome Baby Boy

Hello
I had a day to myself yesterday so managed to make 4 cards!!!
As you know I joined a couple of online monthly stamping project clubs and the stamp sets have been arriving and getting put into a drawer so yesterday I got a set out at random, made the card that is featured and went on to do another using the same set of stamps
This club is through Dimension Stamps and the set was all baby themed with the Royal arrival due any time now, the newsletter shows several different ways to use the stamps and I liked the simplicity of this one
I cut down my A4 card to make a DL card then used some pale blue satin ribbon, I cut 2 lengths and added them to the left side of the card front securing the ends inside the card.
I then cut 2 small pieces of the same ribbon and tied a single knot through each long piece – one at the top and the other on the 2nd strip and at the bottom.
A panel of pale blue card was cut and secured with double sided tape to the right hand side of the card front.
I used Memento inks, and stamped the bottle onto white card with a pale blue then sprinkled with clear embossing powder and heated.
I did 2 of the bottles then cut them out and added sticky pads, these were then stuck on the blue panel, one at the top the other at the bottom.
A scrap of colourful striped paper was used to stamp the bow onto twice using a dark blue ink, these were cut out and again using sticky pads were stuck over the initial bows.
The sentiment was stamped between the bottles in dark blue ink
Lastly I stamped out 2 little ducks using dark blue ink and blue card, they were then cut out and attached below the bottles.
To finish I found 4 matching buttons so added one to each of the bows then one top and one bottom of the blue panel.
Its a lovely clean fresh new baby card
Would be interested to know what you think
For sale if anyone's interested
x

Friday, 28 June 2013

Give the dog a bone...

Hello
Well thankfully I have removed the nail polish – I had a reply from the nail technician who said the nails had a gel coating which was set and the way to remove it was to file off the top coat then remove as usual with acetone nail polish remover
Well it did work but it was one hell of a job I can tell you, I used 4 big nail files and almost a packet of cotton pads and bottle of acetone
It took me around 3 hours to get it all removed and then I used a base coat, painted my nails, then repainted – then added a top coat so went to bed feeling happier with them
Got up and saw the nails in daylight and what a mess!!! I had polish all over my skin so ended up taking all that off and went with a base coat and just a pale pearlescent polish – they look ok now!!!
Right I have a card for you – it was a really quick and easy card but I just love it!
It was a kit I bought from printable heaven, it came with toppers in different sizes, a backing paper, then stripes of colour that when rolled created a tin of dog food, and others that went together and created the dog bone!
So to start I used a 5”x7” card blank, the backing paper had a wide green border so I trimmed the border so the backing would fit the card front and stuck it in place using double sided tape.
I used one of the larger toppers, trimmed it and attached to the card front on an angle again using double sided tape.
Below that I added a panel off the sheet of toppers, it was a cream centre with green border – it was attached at an angle also.
The kit offered a good selection of tags so I picked the Happy Birthday, punched a hole and added a small piece of green ribbon, stuck sticky pads to the back and fixed alongside the cream panel.
The long strip of paper was rolled up until it came to the end which I added a small blob of Cosmic Shimmer PVA to hold it together, then ran the glue along the roll and attached to the panel making sure the Dog Food label could be seen.
Next the bone – I tolled the wider strip of paper, added glue to hold in place then added a dot of glue to one end of that and attached a fine strip which was rolled around the wider, this was repeated at the other end thus creating the dog bone!
This bone was then stuck to the cream panel with the cosmic shimmer pva
And that's the card done
Its clean, plain and simple but the dog food can and bone really make this card into something different!
Its in my to use or to sell box
See you next time
x

Thursday, 27 June 2013

Nail advice needed

Hi
Sorry there wont be a card today – I have plenty made to share but I am in need of some advice and/or help so decided to give the card a miss – hope that's ok
As some of you know I have my nails done every 2 weeks, they are acrylics and I love them
This week when I had them done she added a top coat which meant I had to have my nails under a UV light for 60 seconds to set them
The top coat was to hold the shine and also stop the colour on the tips wearing away
Well I can only guess that she either added too much to some of the nails or it wasn't dry but I have like a solid bubble of shine on some of the nails and others have a slight smudged look to them
Tonight at class I have sat picking at my thumb nail and brought off some of the colour and the top coat
Once home I went straight for the bottle of pure acetone that I use to remove the polish and any broken nail and found it would not come off!
I have tried and tried but nothing is budging this top coat
Because the nails are bright pink and I have picked away at one and scrubbed hard on another the nails look a real mess now
So please help
What do I have need to?
I have sent a text to my technician but I am guessing it will be tomorrow when I hear back from her
Why did I have to moan about the colour wearing on the tips and occasionally marking card especially if I was wearing a dark red or something similar
All help/suggestions gratefully received
xx

Wednesday, 26 June 2013

Digger Time

Hi
Today I have had to make a few cards and among them was one for our 5 year old grandson Thomas
As Thomas lives in Shropshire we have limited contact so don't really know what kind of things he is into
So I went back to one of my favourite cds for kiddies cards
Its by Kraftyhands and called The Toy Box
Its filled with fab designs for boys and girls from tots to around 8 years old
We know our grandson Layton loves any kind of farm or road machinery I decided the digger would be perfect
The thing that I really do like with Kraftyhands cds are you get the decoupage sheet and also a scene sheet that is the right size so it really is a case of click – print – make!!!
I used a red card blank as the sentiment bubble was red
The decoupage is big and easy to cut out so ideal for any crafting ability
On the sheet was a panel to match the card so I used it on the front of a plain white envelope then added the name and address
There really isn't much more I can say about this card but if you have to make cards for children then invest in this cd!!
I'm to get to play with my new crafting toy tomorrow – I have drooled over the melting pot for around a year now, every time I get the money saved something crops up and the melting pot melts into my memory
To be fair had I not received this as a very early birthday present I know I wouldn't have got one this year other than asking for it for Christmas as I am now saving hard for 2 things, on 13th July my best friend Beth and I are going to the Summer Crafting show at Doncaster then late September early October we are both going on a tropical holiday together – we dont mind where – as long as it is hot and sunny – at the moment we are fancying Barbados, Dominican Republic but as we are going with a last minute booking we will see whats on offer – I know I cant wait – I love the sun and the thought of 2 weeks lazing in it – oh roll on September – and at at the end of August start of September we go to Malham on our annual crafting retreat
What a year this is going to be
Back again soon
x

Monday, 24 June 2013

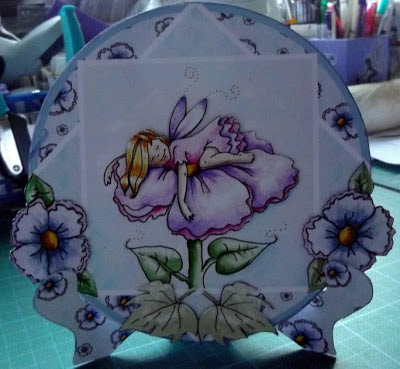
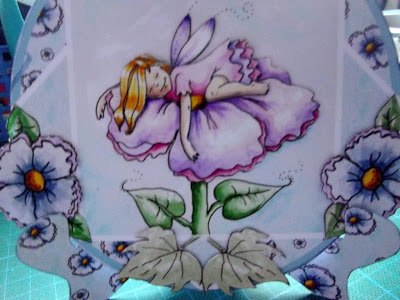
Snuggle Little Fairy

Hi
Today I am sharing a card I made from a cd by Creative Crafting which was previously known as Cupcake Crafting.
Its called At the bottom of the garden
Have to say the artwork is lovely and as you can imagine the designs are mostly fairy based.
So when you select the design you get lots of options like toppers, decoupage, digi stamps etc or as I chose this time a plate design
I simply printed off the 2 sheets and stuck one sheet to white card using Crafters Companion Stick & Stay then started cutting it all out
When I came to the back plate I realised my error – it had printed with ADD YOUR OWN TEXT HERE
Had I looked it this properly before printing out and before sticking it to card and before cutting out all the small bits I could have removed that text and either added something that would be printed on or just print the blank and stamps something
So I had to improvise – I traced the star shape and transferred the shape to white card, cut it out, stamped All Girls Are Princesses and a crown using stamps by Debbi Moore, then stuck the panel over the original – sorted!!!
All the decoupage was lightly shaped and added to the design.
The stand was perfect – I will use that in future for my bookatrix type cards – it doesn't matter that it is patterned because I can cover it up or just draw round it onto my chosen card.
This is such an easy card to make – only downside I can see is the excessive amount of flowers and leaves – I left 6 flowers and 4 leaves on the sheet as I already had more than I had space for.
And on a positive side it folds flat for posting – I used very thin sticky pads so if this was put into an A5 sized envelope it would go on a normal stamp!
Would love to know what you think to the card!!!
For the to use or to sell box
See you next time
x

Sunday, 23 June 2013

1950's Lady In Teal

Hi
Well the longest day has been and gone – but what about summer? Its not a lot we ask for is it...sunshine...daily...for more than just a few days!
And we would be happy with rain falling through the night so the gardens flourish!!!
Ok moan over
So to the card...I saw this as a mini kit on craftsuprint and just fell in love with it
I think its called 1950's lady with teal bird mini kit and was designed by Julie Hutchings
    I only buy the fancy edged 8x8 card so for this is used an A3 sheet of white card that I cut down to the 8x8 size I needed.
    The main image panel was cut out and stuck to the card front using double sided tape
    The decoupage was all cut out then shaped with my shaping tool from Dimension stamps and a foam mat
    The top layer of the skirt was shaped well and then I used an extra layer of sticky pads down the centre only to keep the shape
    The flowers for the top corners were tricky to cut in some places due to very narrow pieces – a tip for you – apply a strip of cellotape behind the problem areas and it makes a big difference mainly because it holds all those very fine pieces.
    So with all the decoupage in place it was time for the decorating, but really the card didn't need much as it is stunning anyway..but I added a little glitter to the centre of the flowers in the to corners and then used glossy accents on the green shoes, gloves and the top of the hat..
    And thats the card done – I have a sentiment to add but will do that and an insert when I know who the card is for.
    At the moment this is another for the use or sell box
    See you the next time
    x

Friday, 21 June 2013

Steampunk

Hi there
Well I am getting worse don't you think? I said I wanted to post every day and again I have missed a few – sorry to all my followers!
This card is what we did in my classes this week – have to be honest I wasn't too sure about it then when the ladies saw it their faces told me I had got it wrong
BUT
I have to say almost every one who made the card really enjoyed it!
Its a steam punk design made by using an embossing folder with clocks, kraft card, brown parcel paper, black card, silver card, backing paper then dies – we used assorted cogs, flourishes and a butterfly – oh and mica powders
The one thing they all struggled with was not using a cutter, scissors or knife except to cut down the A5 card into a square!
So the card was a square, the backing paper was torn to fit the card front and stuck in place.
I then torn the A5 black card into half and one of those in half again.
The large black and just one of the small pieces were then embossed – I used several pieces of the brown parcel paper together to emboss as one piece just tore...
To get all the die cutting and embossing done in one go I used the kraft card and some silver to cut out cogs – think I used about 7 in all, then cut the butterfly from the silver and finally some flourishes from the black card that was left over.
I used 2 different mica powders – a gold and a copper, I just lightly brushed the mica over the black embossed pieces, then after tapping off any excess I sprayed lightly with the cheapest possible hair spray to set the powder.
To make up my card I toe the edges of the largest black piece so it would fit nicely on the card, the smaller piece I tore into 2 triangles which were used as corners – so all the black work was glued in place, then the parcel paper was torn down and added to the black piece and smaller still with the silver - the pieces were stuck on with cosmic shimmer pva glue.
Now the cog – I popped a brad through the centre and folded the legs back then stuck in place with pinflare gel – most of the ladies actually put the brad right through the card
Then it was just a case of stamp the small sentiment onto a scrap of black card then mat onto either the brown paper or the kraft card and fix to the front of the card
Card done!!
So I have had 15 people using the same ingredients and their OWN imagination so every card was unique and I loved it all...some used bright pinks and blues in the micas others used greens and browns – but every card looked great
And as the class ended I got so many lovely comments on how they had thoroughly enjoyed the class and the chance to try things they had only seen in the past.
On my card I actually cut up a pepsi can and used that to cut the cogs and embossed it for the front but decided for safety in class we would have to use some matt mirri card...it worked every bit as good
Thanks for stopping by – would love to know what you think of this card
Its going in the use or sell box – just don't know who I could send it to
See you next time
x

Tuesday, 18 June 2013

Glittered Slipper

Hi there
Sorry I wasn't around yesterday – I had the card pictures cropped and resized and just forgot!
But no worries, I have it here for you today
Its another stamped card – I made this for one of the lovely ladies at the new card class as it was her birthday today
The stamp I used was from www.chloescreativecards.co.uk
and was simply the basic shoe stamp
To look at the stamp it doesn't appear to have a lot going for it – but add some bling and get the WOW factor..
For this card I used a white fancy edged 8x8 card blank then coloured the edges with a Tim Holtz distress ink pad
I had a pad of textured card stock in 8x8 with a large scalloped edge in dusty pink so used a Crafters Companion 8x8 embossing folder then gently rubbed the embossed surface to give an aged look.
Next I used a sheet of the same textured card stock in black, put it through the Grand Calibur with a lovely ornate square die then it went through the embossing folder and again had a light sanding over.
And then I used a die 2 sizes small and die cut the shape from the same dusty pink card, embossed and sanded it
The layers were all stuck to the card front with Pinflare gel.
I used a smaller version of dies to cut a square in silver and one in white, I left the die is place on the white and used Victorian Velvet distress ink pad to colour the card almost to the centre
I used a simple birthday stamp again from Chloe's Stamps to stamp on the white edged die cut shape then matted it to the silver and finally stuck that to the top right corner.
The shoe was stamped twice onto white card, I used a versamark ink pad and black embossing powder just on the heel and the sole, I embossed them 3 times in all to get a good shine – then used Pinflare gel to hold them in place on the full stamped shoe which had been cut out.
Next I used cosmic shimmer PVA glue and lathered it onto the outside of the shoe design then covered with Stampendous silver halo mix glitter and left it for an hour to dry before tapping off the excess.
The shoe was put in place with Pinflare gel and a small purple glittered flower was placed on the top of the shoe to finish it off.
I tied a neat bow and added that to the top left hand corner with a sticky pad then used 4 pretty clear AB flat back gems to add to the corners of the sentiment panel.
So then – what do you think to this card? Its pretty and girly isnt it?
Hope the lady I sent it to liked it as much as I do!
See you next time
x

Sunday, 16 June 2013

A New Dress

Hi there
I know I have shared cards made using the wonderful cd Fabulous Fashion but I just love it!
This is a card I put together in parts really
I started by cutting out the decoupage and building it up, the topper then got left on my other desk until one day I went to get a paper pad and decided to have another go with it
So I found some backing paper that had the same sort of colours as the dress only problem was my topper needed an A5 card at least and the paper was 6x6
Luckily I had 2 sheets of it so used a sheet of A4 cream card to make my A5 card blank
Then I trimmed the candy striped paper down to fit and made sure both matched when I stuck them down with double sided tape
Another brick wall – so the card got relegated again to the other desk
After a few days I picked the card up again and decided a glittered wavy peel off may just work to disguise the join of the 2 papers – it worked quite well – in fact better than I imagined it would.
So while I had the peel offs out I used a fine silver wavy border all around the edge of the backing paper with small ornate peel off corners.
So far so good
Don't know why but I just couldn't find a sentiment to suit the card
I didn't even know what event to make this for so again it went to the other desk
While having a clear up I knocked over a box of sentiments and there it was – the pretty flower shaped foiled sentiment!!!
It wasn't the right colour but that's what distress ink pads are for so I easily coloured it to match the card, as in shaded lilac around the edges and Victorian velvet in the centre.
To decorate the card I used my Cosmic Shimmer coloured PVA glues – it was the lovely purple I went with and dropped a blob in each of the segments of the sentiment and then I added a smaller blob to the centre of the flowers on the dress
And that my friends is another lovely and fully usable card – its perfect for any occasion don't you think?
See you again tomorrow
x

Saturday, 15 June 2013

Quack Quack...

Hi there
I just love everything about this card – and thinking about it almost all of the cd too
This is taken from the new cd from Joanna Sheen called Shirley Barber who's artwork is truly stunning
To make the card was quite quick and easy, because it was just the topper, backing sheet and bookmark it was ideal for letting imagination run wild.
So I used a brown sheet of card and created my A5 card blank. I adore this feather effect paper so trimmed it so I kept the patterned right edge and then I punched the left side of the sheet.
Before sticking the sheet to the card I used a piece of beige ribbon that was stitched at both sides – I stuck the ribbon inside the patterned border of the backing paper then stuck the ends down with some strong sticky tape.
The panel was then stuck to the card and ready to work with.
I cut out the topper and nipped the corners with a corner punch, then matted onto brown card and again nipped the corners
I stuck the topper so it didnt cover the punched border but did sit on the ribbon border.
A small topper was cut out and matted onto brown card, then I stuck this at the bottom of the ribbon border, I lifted the main topper and managed to stick the small topper corner under it.
The downside of these sheets in my opinion was the lack of sentiments so I used one from a sheet I printed from the last La Pashe cd rom..
The sentiment was a Happy Birthday and after trimming down I matted it onto brown card and stuck under the topper.
After cutting out the book mark I stuck one piece onto brown card then stuck the other piece on the reverse, it needed a little trimming to get both sides the same.
Because there was space on the reverse of the bookmark to write or even print on before sending to the printer I simply stamped a lovely verse.
I haven't decorated the card as yet – I could add flowersoft to the flowers and either glitter or glossy accents to the water...for now I am as happy with it as it is!
So what do you think to the Shirley Barber cd and artwork now?
Another card for this bulging box or to use or to sell cards
Till tomorrow then
x

Friday, 14 June 2013

Thank you - Postcard

Hi there
You may remember a few days ago I mentioned that I rang a craft shop online to ask after a set of Kanban stamps and the guy very kindly popped the set of stamps in the post to me and asked I send payment when I had received the stamps
Well they arrived and I love them so as a thank you I made this very very quick and easy card so I could send cash without it appearing that cash was enclosed.
So I used a pre scored card blank that I had picked up on a visit to the Kanban warehouse when it was open.
I stamped onto plain white card then used a Tim Holtz distress ink pad to age the edges
Using watercolour pencils I coloured the seats in the car and also the tyres
A simple Thank You was stamped on to white card and aged with the same ink pad.
I then matted both the image and the thank you onto dark blue shimmer card, the main panel was stuck centrally on the card and the sentiment had the blue corners pinched with the corner punch then was secured across the top left corner of the image with double sided tape
I guess this card took me around 10 minutes to make which is why I said it was a very very quick and easy card
The stamp used was a La Blanche but it doesn't have a name that I can see...I can highly recommend these stamps though – I have a few in my collect these days!
And that's your lot for today folks
Till the next card ..x.. ..x.. ..x..

Thursday, 13 June 2013

Stamped and Shaded

Hi there
Today's card is another stamped effort – I do enjoy stamping and I am finding more ways to make my card look interesting without having to colour it
For this card I used a set of Kanban stamps that I love
I started by creating my square card – in case you have forgotten how – using the blue eazi-score board I scored the white card on line 7, folded it and smoothed over the score, then turned it 90 degrees and scored on line 7 again, chop off the waste and there you have your 6x6 white card.
Using a piece of smooth white card I created my background by using a blending brush and 3 Tim Holtz distress ink pads – peacock feathers, peeled paint and shaded lilac.
I started added a little colour and working it on then moving onto the next colour and so on until I was happy with it – then I used a fine spray of water which made the colours merge more then rolled over it with a kitchen roll to blot up excess water and also give a lovely pattern...as I had to stamp on the panel I used my heat gun to dry off the paper.
I used the main image – 3 beautiful full headed flowers with long slender stems – the were stamped with black memento ink in the centre of the panel.
Under that I used part of another stamp – I only wanted a small part of the flower so laid a sheet of plain paper over the bottom of the card so I stamped onto the paper and the card.
Using the nipped corner punch I did the 4 corners of the image then matted it to a piece of black care.
This was then secured to the white square card blank with double sided tape – it was positioned centrally top and bottom but then over to the left hand side.
Searching through some stamps I came across a Best Wishes stamps that was a lovely font to match the card so stamped it onto a piece of scrap white card then trimmed it and matted onto a scrap of black card – this was then secured to the bottom right of the card with thick sticky pads.
Just under the sentiment I added a knotted piece of green ribbon which was stuck in place with a blob of pinflare gel.
And to finish I added 3 black AB flat back gems to the to right corner of the card then 1 in each of the corners of the stamped panel
I was really pleased with the finished card and have had lots of lovely comments on it too
Another for the bulging to use or sell box
See you tomorrow
x