Tuesday, 6 January 2015

Poorly Doggy Wil


Hello
This is just a quick post – can I ask you all to send love and healing thoughts to my beautiful black broken coated Lurcher Wil
He is now 12 years old and has sadly started to sink health wise, I have strapped his front leg up as it has become very swollen and he can no longer put weight on it. He has cataracts in both eyes but up to mid December he was happy enough.
He has now stopped eating and most of the time I need to use a syringe to get water down him, but the biggest problem is he has developed a horrid smell about him, he sleeps almost 24 hours a day and only gets as far as our garage (about 12 steps from the door) before his legs give way.
The photo was taken about an hour ago, I have to lift him up onto my sloppy chair in my craft room.
Tomorrow he is at the vets – and although I can’t bear to think of this – I feel he will have to be put to rest.
We have had Wil since he was 4 or 5 weeks old – he was advertised on the internet and we travelled rom Hull to Willenhall in the West Midlands, he was obviously far too young to leave his mum but the conditions he was living in were disgusting – all but him and another put had gone so we bought Wil...his first food was a double cheeseburger from McDonalds on the way home.
He was all matted and smelly, had worms and fleas, and really was in a mess, but after a lovely warm bath with puppy flea shampoo and then a visit to the vets we soon got him built up, worm and flea free and a happy puppy.
We have so many lovely memories of Will but it will break both our hearts if he doesn’t come home again and I honestly don’t know how the other Lurcher Fern will be without him, she is 2 years younger than him but still has boundless energy just like a puppy – but the 2 dogs have always been together...she will take some time to get used to being on her own.
I will of course keep you all updated on Wil’s visit to the vets
Love n Hugs
Angie
x


Meadow Love


Good Evening

I bought a lovely new bundle of kits yesterday from The Printable Craft Shop
If you want value for money, excellent choice and perfect print outs time and again then I recommend you take a look – be warned – there is so much to chose from it might take you some time!
The bundle I bought this time was the Asymmetric Bundle, here is link direct to it
I couldn’t wait to get started and my 1st card was Meadow Love, it has 6 sheets in all, a backing paper, envelope back and front, card base sheet, insert sheet and finally the decoupage elements
Because my printer doesn’t print onto heavy card I have to print the sheet, trim it off a little then use Crafters Companion stick and spray to cover the back with adhesive, then I stick the sheet to my 300gsm white card.

Its then that I start to cut out the base card, once cut out I used my X-Cut V Trimmer to score the card – because it’s an Asymmetric card it seemed odd scoring but I have to say I am addicted to them now.
Once the card was scored I trimmed the insert to fit and used double sided tape to stick it to the card, I also used double sided tape to stick the panel that fitted on the reverse of the image.

Next I was sticking the side panel in place – I am finding it difficult to get the right sticky pads, I did a search of my adhesive drawers and got excited when I found 15 sheets of rectangle sticky pads, not something I would normally use but as I was covering a large area these were perfect – except, they had no sticky left on them, so rather than just bin them I put a blob of Cosmic Shimmer pva onto my glass cutting mat and used a paint brush to lightly apply pva to the pads then stuck the panel in place.
Next it was the main panel for the card front so again I used the non sticky sticky pads and pva glue

When it came to sticking the decoupage elements to the card I used small sticky pads.
For the butterfly I used a little pva to stick the body in place and the bee was stuck in place with sticky pads but I cut the wings and left them unstuck so both the bee and the butterfly look as though they are in flight – I need to glitter the wings and other parts of the design but the light wasn’t so good so better to leave then to spoil.

I like the idea that the cards come with matching envelopes, and they are so easy to make up – I printed the 2 sheets and cut out. The envelope back has 2 score lines which are the sides, and the front of the envelope has 2 score lines, the bottom and the fold over at the top!
I used Cosmic Shimmer pva glue to make the envelope as it gave me the option to slide around until I was happy it was in place!

So there we have a lovely cute card that is suitable for any age and any occasion, I love it.
I have printed out my next set so will work on that this evening.
Before I go I would like to point out the photos were taken just after I finished make the card and you can see where I have used the pva on the panels, this is not noticeable now it’s completely dry.
If you like the look of this bundle just follow the link above – and it’s worth mentioning you get loyalty points for all purchases so simply register and get shopping...I did and not looked back!
See you again tomorrow
Hugs
Angie
x

Monday, 5 January 2015

Black & White Calendar


Hi...

Something different today, and it’s not a card!

I joined Aly’s Inky Fingers project club when she 1st started it up – this is project 23 and I have loved all the projects so far, but I think this is my favourite now.

The calendar is made up as in Aly’s instructions so technically its not my work... but I had to share all the same!

I started by covering a piece of heavy board with some lovely chandelier backing paper then punched 2 holes at the top and added black eyelets – I used my crop-o-dile to punch holes and add inserts, it’s a must have piece of kit in my opinion.

The piece of black glitter card was glued to the base card using both double sided tape and cosmic shimmer pva glue.

The fancy shape in white came in the kit so I used a versamark ink pad and a scroll stamp to stamp all round the topper then covered with jet black embossing powder by Cosmic Shimmer, then heated from the back until all the powder melted and left a lovely background – I know there are a few mistakes but that’s what makes it personal to me.

Next I stamped the young lady onto white card using a black memento ink pad and then cut her out. I coloured her skin with Promarker Blush and for her hair I used 2 Promarkers but sadly didn’t think to take note of the colours.

So to give my lady a dress – I used Glossy Accents to draw an outline to the dress then filled in the space, next I covered the glossy accents with Stampendous Frantage Silver Halo Mix Glitter, this is quite expensive at £5.95 for a small pot but the effect is fantastic.

Once the dress had dried I tapped away the excess glitter and used the glossy accents again this time to the belt that was across  her waist and the 2 dangly ends, I covered this with black mix glitter and once dry tapped off the excess.
I used glossy accents and bright red glitter for the shoes.

The topper was stuck to the black glitter card with glossy accents and pva then the lady was added to the topper using small glue pads.

All that remained was to add the calendar tab to the bottom of the card and the length of silver trim across the top of the card, and finally threaded the black organza through the eyelets and secured it at the back with sticky tape.

I have to say the calendar looks great on my craft room wall especially when they sun hits it!

See you tomorrow with something new
Hugs
Angie
x

Sunday, 4 January 2015

Eat - Drink - and be Merry


Hello..

Today I am sharing a lovely card; I printed the sheet out a few days ago but that was as far as I got.

Then yesterday a group I belong to said that the card was to be a Trifold...I was so pleased as the sheet was for a trifold card

The sheet was by Janet Briggs and purchased from www.craftsuprint.com and the item number should anyone want it is cup87524_68

So to make the card I started by trimming the printed sheet down a little then used Crafters Companion Stick and Stay on the back and stuck the sheet to a sheet of white 300gsm card


The card was then cut out – its 3 tag shaped panels that are amusing as one dog says Eat... the middle panel the dog says Drink... and the last panel the dog says And Be Merry...

 
Once I had all the tag shapes cut out I used my V trimmer with the scoring blade to score the 2 lines which enabled me to fold into the trifold card.
 
I punched a hole through all 3 tags using the Crop-o-dile and added a black eyelet to each hole, then realised I should have had a backing sheet on the back of the tags so did a search on my PC and it came up with lots of different sheets but I chose a grey with black paw print paper.
 
Printed it out then stuck to the back of the tags and cut out, I pushed a pokey tool through the eyelets to break the paper on the back then added a length of lovely green and cream fibres to each tag.
 
On the back I decided to die-cut a fancy square of card and then stamped “Good friends make hearts lighter xxx” and coloured the square lightly with pale blue Pan Pastel


To finish I cut out the 3 bones with bows and stuck one under each eyelet on the back

And that’s my card finished, I just need to pop it in an envelope and get it sent out to my swap partner.

Ok...it’s about coffee and cake time so bye for now...
See you tomorrow with another card

Hugs
Angie
x

Saturday, 3 January 2015

New Home


Good Morning

Today it’s my Birthday and I have received some amazing handmade cards from friends, when they come down I will take some photo’s and share on here as you may well get some ideas from them.

Today’s cards is a New Home card that I finally finished putting together yesterday, it’s for my best friend’s daughter who moved from a flat into a lovely 2 bedroom house in the next village.

The sheet was bought from www.craftsuprint.com but sorry I cannot remember who made the sheet.


I printed the sheet and cut out the base image, this was trimmed to 7”x7” I folded my 16”x7” in half then trimmed the edges more to tidy them up.

I then used Tim Holtz distress ink pad in Spruce to colour the edges of the card – and although I didn’t take a photo, the back was coloured lightly too.

The base image was stuck to the card using red double sided tape and Cosmic Shimmer pva as tape alone doesn’t tend to stick to card that has been coloured with inks. 

There wasn’t a great deal of decoupage to do, just the 3 owls really so after cutting out the elements I used small sticky pads to build up the card.

Once that was done I used Ice Stickles in Silver Ice for the bees wings and centre of the flowers then Ice Stickles Strawberry Ice was used thickly on the main owl to make her pop out.

And that my friends was my card for today....what will I do for tomorrow, who knows, but if you pop in you will find out what it is and how I made it!!!

See you all tomorrow

Love n hugs
Angie
x

Friday, 2 January 2015

2015 Bear Card & ATC


Hi

Today’s card is one I made to send to my sister-in-law as I managed to miss sending Christmas cards due to being ill.
I know it should have been posted by now but I decided against it rather than have it sat in some depot for days.
I used a kit designed by Janet Briggs, it was bought from www.craftsuprint.com
Its called New Year Bear 2015 and its an 8x8 kit but I usually print one size down as the 8x8 topper only just fits onto the 8x8 card and I like to have a bit of a border.

So I started by folding my 16x8 card in half to make my 8x8 card, I then trimmed it down to 7.7” x 7.7” and the backing paper is brown with cream spots and came from a lovely 12x12 Christmas paper pad that I have used so many times for general cards and rarely for any Christmas cards.
I trimmed the paper to approx 7.5”x 7.5” and stuck it to the card blank using double sided tape
Then I stuck the base topper to the card again using double sided tape.
I like the way this image base is done as it looks to have lots of matting and layering when in fact it has none!
I cut out all the decoupage elements and also the sentiment which I thought went well – From our House to Yours, I glued the sentiment across the top left corner.

Not sure about anyone else but I am having a hard time finding tint sticky pads – I know I can get plenty that are on the thick side but I prefer the 1mm thickness – so if anyone knows where I can get some from please let me know!
Anyway back to the decoupage, I used the flattest pads I could find and built up the design, for the last paws I used a shaper tool (which I can’t craft without) and a foam mat and gave the paws some shape then added them to the bear.
Now it’s down to finishing off, I kept it very simple and used some beautiful flat back AB gems that I ordered from Ebay over Christmas and I love them...here is the link for anyone who like me loves to collect gems and pearls
I simply stick one in each of the main layer corners and then on the inner layer and couldn’t not decorate that lovely top hat so added a gem either side of the 2015.

I had some of the decoupage layers left over as I felt to use them all would just make the card too thick to post as a large letter so I used them to make an atc which i will use when I send out my January swaps, I used a piece of cream hammered card and wanted to try out some gilding wax that I bought in the summer, as I've never used it before I didn't really know what it should be like, this was hard and to be honest I wasn't impressed, but I will read up on it as I think it should be softer so easier to use...if anyone out there knows about the Creative Expressions Metallic Gilding Wax please let know.
Hope you enjoyed today's card
Now what shall I do for tomorrow???
Take care and keep warm
xxx

Thursday, 1 January 2015

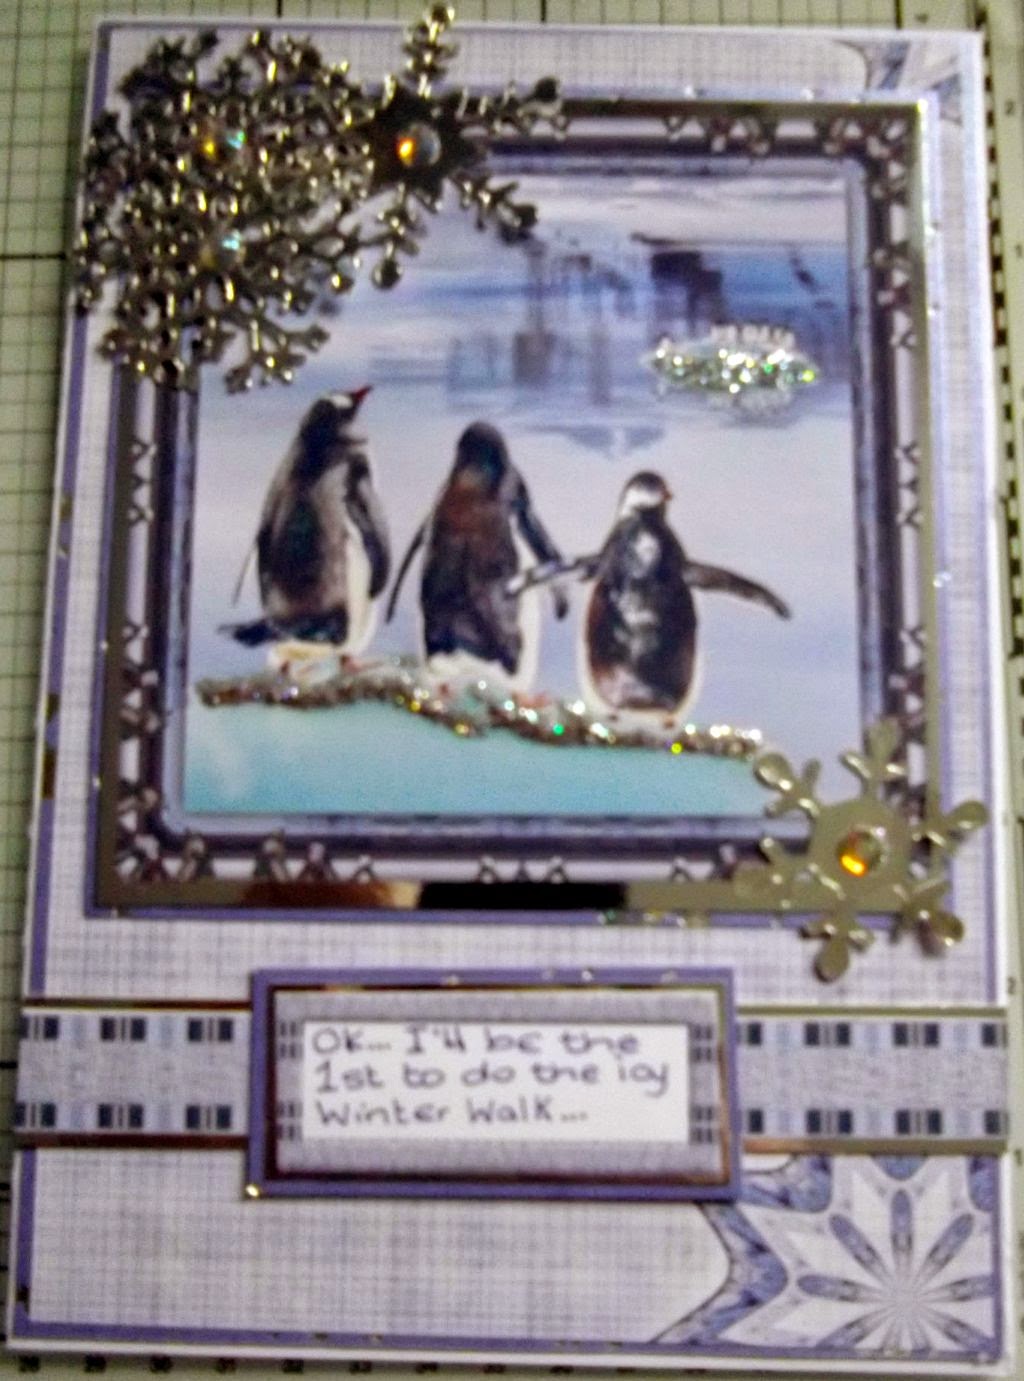
Winter Walk - Brrr its cold!


Happy New Year

I wish you all the very best of health and wealth for 2015.

Today I have a card that I made for the CD Sunday Challenge Blog
The theme is Winter Walk

And so this is my take on it, I used a lovely cd by Creative Crafting World called Pollyanna Pickering’s Snow & Ice

There are so many images on this cd that would fit the theme but I settled for some Penguins which I thought were so cute, the sheet was interactive so I typed in my message and printed – but the message didn’t print so I tried again, this time I tried saving then printing but still no sentiment so I ended up writing it in which may well have spoilt the card as my hand writing isn’t the neatest.

I folded my A4 white card in half to make my A5 card then used some lovely lilac card that had silver chunks embedded in it, I covered the card front then used a sheet of paper from the cd, I liked this as it had a printed snowflake in the bottom corner.
The image was trimmed and matted onto silver mirri card then the same lilac card used on the card.
The matted image was placed at the top of the card as I wanted to leave as much of the printed snowflake on show as possible.
Next I cut a length of border from the sheet and matted that onto silver mirri card leaving a border at the top and bottom but not at the ends. This was stuck across the card below the image and only covering a little of the backing paper

Then I wrote “Ok...I’ll be the 1st to do the icy Winter Walk...” and matted it onto silver mirri and an off cut of the lilac card then stuck this in the centre of the border.
To finish the card I die cut several different Marianne snowflakes using silver mirri card and stuck them in the top corner of the image and a smaller one at the bottom right of the topper.
Large ab clear gems were stuck in the snowflake centres and then I used 2 different colours of Stickles to add sparkle to the tint island as well and where the main penguins were stood.

I also printed the matching insert and although I tried using the interactive again for a verse it didn’t work so I gave up and used a lovely sentiment stamp by Inkilicious

And that is my card finished.
If you would like this card please just comment and say yes to card and I will put all names in the hat and send to the winner

Love and hugs to you all
Angie
xxx