Thursday, 7 March 2013

For Grandma

Hello my blogger friends
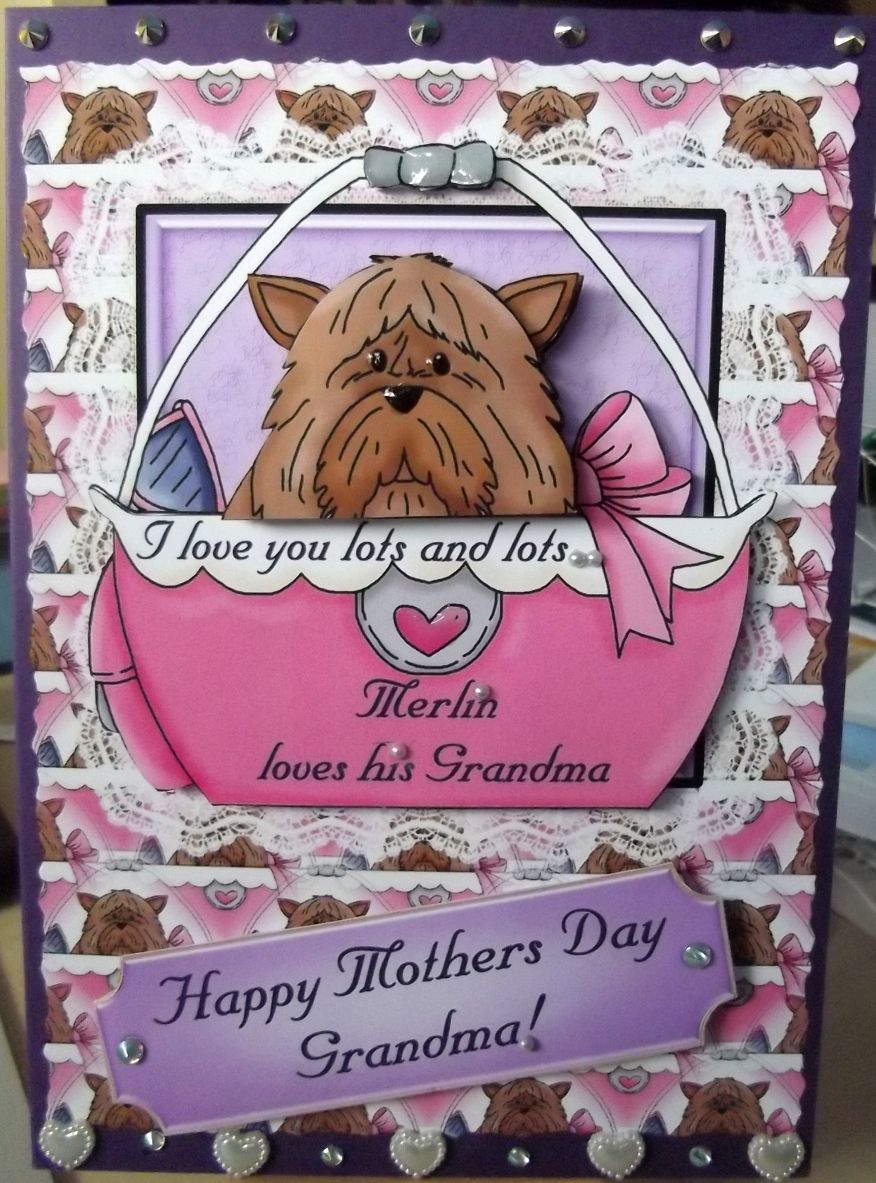
Ok so yesterday you saw the Mothers Day card for the lady at the falconry club – well she asked me on Monday night – would I make her a happy mothers day Grandma card for her mum from their dog!!!!
She asked if it could be a cutie card and it had to be sparkly and full of bling.
It didn't take more than a few minutes for me to find the sheet I had in mind to use...so lets not waste any more time...here's what I used and did!
So materials for this card I used ….
Heat mat to work on and protect your surface – I always use it...
A4 purple card
Printed sheet
An assortment of different size, shape and coloured gems
Sticky pads
Eazi Score Board & tool
Tonic 8” guillotine
Scissors
Tweezers
Shaping tool from www.dimensionstamps.com
Foam shaping mat – stamping mat or even a mouse mat
To make the card …
The A4 card was scored and folded in half making the basic A5 card blank.
The main image was cut off the printed sheet and attached to the card with double sided tape.
The very easy to cut decoupage was cut out and added to the design with tiny sticky pads
Because I had printed this sheet through Picasa I was able to add a personal sentiment which read “Happy Mothers Day Grandma” and then on the frill of the dog basket I added “I love you lots and lots” and then on the pink basket it says “Merlin loves his grandma”
I used some very tiny flat back pearls to stick on all the dots of the text like the dot of an “i”
To finish off the card I used silver pointed AB gems along the top of the card and pretty embossed heart gems and clear AB gems along the bottom.
The clear AB gems were also at either side of the sentiment label to look like brads.
Glossy accents were used on the eyes and nose as well as the basket handle.
So there you have it – a cute quick and easy card that could be used for any event...its suitable for crafters of any level too.
I am stopping here for today as we are having an all day craft day at the building and I still have a few things to get done!!!
Wonder if I will get my 20,000th viewer tonight!!!
Catch you again tomorrow – same place folks
x

Wednesday, 6 March 2013

For MUM

Hello my blogger friends
I had a message through facebook a few days ago from a lady who goes to the Falconry Club to ask if I would do her a card for her mum for Mothers Day...normally I complain about short notice orders – she needed it for Tuesday night – but as I didn't have a great deal on I said I would do it.
The info I had was floral, bright, sparkly and bling!
I had just the card in mind...
Now I cant find – because I haven't looked – the designer – nor the name of the kit – but I feel sure its a Sandie Burchell kit.
But never mind – I'm quite sure it would be easy to find should anyone really need the info!
So materials for this card I used ….
Heat mat to work on and protect your surface – I always use it...
8x8 scalloped card blank
The printed main design sheet and insert sheet
Tim Holtz shaded lilac ink pad & applicator tool
lots of tiny AB pearls
An assortment of different gems
Sticky pads
Eazi Score Board & tool
Tonic 8” guillotine
Scissors
Tweezers
Shaping tool from www.dimensionstamps.com
Foam shaping mat – stamping mat or even a mouse mat
To make the card …
After folding the card blank and sharpening the edge I coloured all sides of the card with the applicator tool and ink pad
The main image was cut out and simply stuck to the card front with double sided tape
The pyramage pieces were cut out and built up using large sticky pads.
That was the card made basically so it was down to the embellishing.
I started by running the Sakura quickie glue pen all over the edges of the “lace” then covered with glamour dust, the excess was tapped away.
Using lilac heart shaped gems and Cosmic Shimmer PVA they were attached to the outer corners of the design.
Next the clear AB gems were secured to the corners of the outer edge of the “lace”
On to the inner corners of the “lace” and I used clear normal gems.
Finally the biggest job was to add a tiny AB pearl to the printed hole in the lace – it was so fiddly I regretted it when I was only half way down one side – but stuck with it – literally – and it was well worth it.
The inside left of the card had a small version of the design stuck to it and finally the insert was added
I added a sentimental verse prior to printing out – this panel was stuck centrally on the inside right of the card
I had another message from the same lady to ask would I make a 2nd card – this was on Monday evening – I wont give anything away just yet as it will be the next card I share!!!
Hope you liked the card – I am sure the lady who ordered it was pleased with it!
Wonder if I have my 20,000th view yet!!!
Catch you again tomorrow – same place folks
x

Tuesday, 5 March 2013

Butterfly Bliss

Hi bloggers
Today I am sharing my entry for the CD Sunday Challenge Blog
The theme for this week is Butterflies!
What a fab theme to work with...
I had so many ideas buzzing around in my head and even knew just the cd I was going to use!


For my project I used Blissful Butterflies by Hinny Bop...it has the most beautiful backing papers so worth buying just for those...
I didn't do a card this week but decided to do a wall hanging – I suppose its a version of a dream catcher design
So I printed the sheet of shakers in the pretty lilac design, cut out the centres of the top pieces to create the aperture, then used a good weight acetate to cover the aperture.
Normally when I do shakers I use double sided sticky pads but they always leak somewhere no matter how careful I am
So this time I used Pinflare gel – a nice even layer onto the edge of the acetate then the confetti bits – I use a tiny spoon for my glitters and confetti – they used to be in cafés as stirrers but most places these days use either wood of a strip of plastic. So just a flat spoon is the ideal amount for the top two shakers and it was reduced to about half a spoon for the small one – and the last shaker had glamour dust added – but I did remember to swipe the anti static bag over the acetate first so the glitter didn't stick to it!
I set the 4 shakers to one side to set for around 4 hours
Once they had set and I checked I didn't have any leaks I cut a long length of narrow lilac ribbon, formed a loop to act as a hanger then stuck the ribbon along the backs of the shakers using double sided tape.
I left a long piece of ribbon on both sides for now...then covered the shaker back with pretty backing paper from the Blissful Butterflies cd – this also covered the ribbon at the back of each shaker.
With the lengths of ribbon I simply added some small coloured glittery pony beads with knots between each set of 5 beads and finished these off with a lovely butterfly Tibetan charm.
It was then down to adding a small colourful butterfly to each of the shakers and a small lilac bow to finish.
This is such a pretty gift so could be given as a card and gift all in one...simply by adding a verse to the reverse of the top shaker and a sentiment to the front of one of the shakers.
I hope you like this as much as I do – sorry about the photographs, it was difficult knowing the best way to display the hanging...but I think they look ok and you can get the idea...
See you tomorrow – not sure what number view we are up to just now but we really must be nearing that 20,000 now
Bye and thanks for dropping by and supporting me
x

Monday, 4 March 2013

Teabag Christmas

Hello my blogger friends
The card for today is a Christmas Teabag card
I have a few new crafters in class so I decided to show a few techniques so we have the iris folding to come but last week it was teabags
And as its already almost a ¼ through the year I decided it was time to start with christmas.
The card was from www.craftsuprint.com and was designed by Dawn Hill.
On the sheet it shows the square card with the teabag tiles but I decided it was to be an A5 so this is what I did!!!
So materials for this card I used ….
Heat mat to work on and protect your surface – I always use it...
1 sheet A4 blue card
The printed main design sheet
small panel of silver card
brad
piece of ribbon and pearl ribbon slider
Martha Stewart snowflake border punch
Red stickles
Sticky pads
Eazi Score Board & tool
Tonic 8” guillotine
Scissors
Tweezers
Shaping tool from www.dimensionstamps.com
Foam shaping mat – stamping mat or even a mouse mat
To make the card …
The blue card was scored and folded in half.
After cutting out the main square from the sheet I used very thin double sided tape to cover all the edges, removed the backing and covered with glamour dust, shook off the excess then did the same on the pre printed shape where the teabag medallion was to go.
The main panel was then stuck to the card front using double sided tape.
I folded the teabag tiles to create the medallion, sticking each piece as I went along, once the last piece was in I added the brad, sprayed the medallion with Crafters Companion Spray and Sparkle then glued the medallion in place on the design sheet.
Using the oddment of silver mirri card I used the snowflake border punch on both edges and kept all the snowflakes it punched out.
The ribbo9n was slotted through the ribbon slider then the ribbon was stuck to the silver card – I laid it down the silver card and then tucked the ends behind the card and glued them – that way the slider can be moved up and down the ribbon until you are happy with it!
This panel was then stuck onto the right hand side of the card using thick foam tape.
The snowflakes from the punched border were randomly stuck on the card using PVA
When that was all finished I used the red stickles to add a blog of sparkly colour inside the snowflake cut outs on the border and the berries on the holly.
And that's the Christmas card finished!
The ribbon I used for this project is beautiful – I have it in a collection of colours now – its from a store called BOYES if anyone has one near them – its in the clearance ribbon box at 25p for around 3metres!!
If you are the 20,000th viewer on my blog you can expect some in your winning prize!!!
Having looked at the counter on the blog we only need around 240 more views!
Thanks for dropping by
This is another card for the “use or sell” box once the project has been done in class...watch out for the other version too
x

Sunday, 3 March 2013

The Update!

Hello bloggers
I had resized a couple of cards so I could make my mind up as to which I was sharing with you today, but have decided this is an information/catch up day instead
Confused?
Well cast your mind back to start of December 2012 I posted on my blog about one of my class lady's who had received an unexpected phone call telling her to check her emails
Well she did as she was told and found out her son Lee – who lives in Australia had won a round the world trip, a new car and a huge amount of cash
The last round of the competition was what was on the video clip and Suzanne kindly allowed me to share the video with you my friends
The presenter who confirmed Lee as the winner did a very short interview with Lee and his girlfriend Jodie – and as is the normal these days when people win money and are in a relationship – Lee was asked would there be wedding bells
Well by now you will have guessed – yes that's right.,
Lee & Jodie tied the knot on Valentines Day in Australia


The round the world trip then took them off to Las Vegas for honeymoon
This week coming they will be flying to the UK, starting with a few days in London then next Friday they arrive here in Hull for a weeks stay with Suzanne & Dave
As Suzanne hasn't been too well of late this is something that will really book her up – its all she can talk about now – but then if we didn't see our sons and daughters for 4 years I think we would all be the same.
Suzanne has kindly shared a few photographs and given me permission to share them with you
So I will finish with a simple message
Congratulations to Lee & Jodie
not just on the big win – but on tying the knot!
Have a long and happy life together
x

Saturday, 2 March 2013

Scottie Dog

Hello my blogger friends
I am so happy I just have to share some good news with you all!!
As you will know if you follow my blog I try to take part in the CD Sunday Challenge – well I submitted a 6x6 page for the Spring Is In The Air and it got 1st place!!!
Have to say I was thrilled to bits with that page when it was finished and reluctantly sent it off as part of a swap!
Look on my blog for the badge stating I made the top 3....
And on to today
I am working hard on putting together projects for class to do when I am off “sick” and as I have some new ladies not only new to class but new to crafting in general I thought we should start on some different techniques and styles...I taught myself to craft and started with 3d decoupage (which is probably why I still love it so much) but did learn iris folding, teabag folding, quilling and dabble with stamping, encaustic etc
This week we did teabag folding and it was well received – we have next weeks project all ready to do so this is for a future week – its iris folding.
I have 100's of patterns which include 4 cds but when I saw these on crafts you print I thought they would make life easy!
So the sheet features the chart and the card front on one sheet – simple cut the aperture, turn over and start adding the strips – the sheet is by Margaret Jones and is called a No Trace Background Card – Scottie Dog.
So materials for this card I used ….
Heat mat to work on and protect your surface – I always use it...
1 sheet A4 deep green card
The printed main design sheet
A5 piece of red card stock
Charm and jump rings
Brad
Sentiment
Florist ribbon instead of papers
Sticky pads
Eazi Score Board & tool
Tonic 8” guillotine
Scissors
Tweezers
Shaping tool from www.dimensionstamps.com
Foam shaping mat – stamping mat or even a mouse mat
To make the card …
The deep green card was scored and folded in half to start with.
The red card was measured to fit the printed card front, trimmed the excess...punched the 4 corners with nicked edge punch then glued the red card in place.
I cut the main card front from the printed sheet then carefully cut away the dog to leave the aperture.
Turning the card front over I lined the aperture with the pattern and just held in place with low tack tape.
I used black florist ribbon – because its so wide I just cut off a piece around 18” then tore into 2 length ways. This gives 36” of usable ribbon now.
So the ribbon is folded in half length ways and the fold goes up to the line as the ribbon covers number one – a small piece of double sided tape held the ribbon in place.
Then onto number two – three – four etc until all the numbers have been covered – a piece of silver mirri board was placed in the centre to act as the eye!
Once I was happy with the iris folding I used a broad cellotape to cover the back so that the strips didn't come undone...
The printed front was then stuck direct to the red card leaving the border.
The “faux” ribbon were cut out and stuck into two corners with sticky pads
A simple Best Wishes was stuck along the top left corner and to decorate the space along the right hand side I used a simple circular charm and 4 different sized jump rings – a red heart brad was pushed over the rings to hold in place!
I'm pleased with how the card goes together and that its ideal for newbies – but have to say I really don't like the printed ribbons but as they were printed on the sheet I had no choice but to build up with the only elements on the sheet!
Thanks for dropping by
This is another card for the “use or sell” box once the project has been done in class...watch out for the other version too
x

Friday, 1 March 2013

Butterflies Everywhere

Hello bloggers
I have got a few cards made up to be shared but I thought you might like to see the butterfly fat book page I received from Colette who I sent my creation to a few weeks ago.
It all came about when I joined the Stampers Uk group – check it out here if you enjoy stamping – you can be new to it or experienced, and you must be willing to join in
So the theme was butterflies and if you can get back to 6th February you will see the fat book page I made and sent out
When this lovely page arrived I loved it the minute it popped out of the envelope!!!
The page has a pale blue back colour that the camera didn't pick up – and the main design has been stamped and heat embossed which gives a lovely sheen when the light hits it
The green butterflies are beautiful and I'm not sure if they are done with a die and cutting machine or a punch – I love the blue and green mix
Along the right hand side is a lovely punched border
It has been punched onto pale blue textured card – one butterfly is missing and the next is a pop up – this continues along the border
Colette has added a little green ink around the edges and finished off using a Dream a little dream sentiment that was on white and edged with blue, then held in place with sticky pads.
This is my first fat book page for the Stampers Uk book I will be making
So its a huge thank you to Colette for a fab starting page!
I do hope you like this as much as I do – even the non stampers among us must agree this is pretty!!!
Catch up tomorrow folks!
x