Wednesday, 31 October 2012

Chocolate Heaven!!!!


Hi

I've still a way to go to get back to 100% health but I feel I am on the right track now

A huge thank you to all of you that sent me cards, gifts, emails, texts and best wishes – its great having friends!!!

I was going to share a card but then decided I would hang in to those for now

So as it was my wonderful hubby's birthday on Sunday I asked a lovely young lady to make me a cake for him

The lady in question is RUTH – its my good friend Ann's daughter

Now she isn't a trained cake maker – I gave her a free reign on what to do – all I wanted was a price

It was all arranged that Ruth would deliver the cake to me early on Saturday morning

I was asked did I want a sneak preview of the cake on Friday evening but I said no...

Well when I saw it I was so so pleased...it was perfect!

The shape of an owl – and of course as majority of you know we do have 3 owls and 2 hawks so a great start

It was covered with white milky buttons and also chocolate buttons

I will not hesitate to ask Ruth to make my cakes in future, when it was cut the sponge so light and fluffy

And the chocolate that was used all around the cake was heavenly...

Pete loved the cake as we all did..

So thank you Ruth!!!

Its a real shame the pc isn't capable of sending out the smell of the photos – when I look at it I can just imagine how chocolatey it smells....

Back tomorrow folks

x


Monday, 29 October 2012

I've been unwell


Hi everyone

I bet you all thought I had given up with the blog didn't you?

Well you will be pleased – I hope – to hear the blog will be returning hopefully in the next few days

Almost 2 weeks ago I came down ill – I had shared a card then came over all sickly...

Ended up going to bed and fell into a deep sleep – I know I had appalling sickness but in all honesty I cannot remember getting in and out of bed for the bathroom

Thankfully after a week the sickness stopped but even now I feel very weak – everything is an effort – and if I try do the simplest things it really takes it out of me

Today I tried to spend time in my craft room as I wanted – no – needed to get a couple of cards made – well nothing went right for me so after 3 or so hours I went downstairs and laid of the settee again – fell to sleep and was woke to say I had slept around 4 hours...

My appetite is still zero – I have lost a stone and a half in the 2 weeks...

My best day for eating was Saturday when family came for my hubby's birthday – I had a slice of roast chicken and a boiled potato

Sunday I had one piece of a bounty

Today I have had an apple...

And I still ache head to foot – so need to get myself to see the doctor – easier said than done with our surgery...

Wont bore you any more but hope to be back soon

Take care

x

Tuesday, 16 October 2012

Twisted Easel


Evening

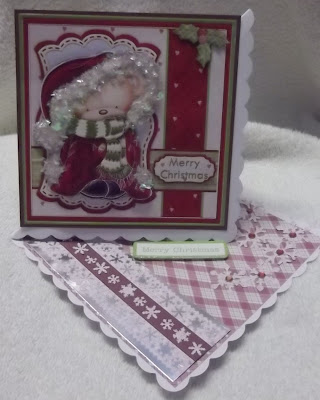
I have made this image up many times and I think I may have shared it 2 or 3 times too – always doing something different with it – the sheet is by Janet Briggs and was bought from www.craftsuprint.com

Well here it is again – something different – as in a twisted easel – a first for me!

I really enjoyed making it up too so maybe I will end up making lots of my favourite images up as twisted easels!


So materials for this card I used ….

Heat mat to work on and protect your surface – I always use it...

6x6 scallop edge card blank

A5 burgundy card stock

Decoupage sheet

Silver mirri card

2 a5 sheets of backing paper

chipboard sentiment

snowflake border and corner punch

shaved ice mica fragments

snowflake punch

red AB gems

Cosmic Shimmer PVA glue

Double sided tape

Sticky pads

Eazi Score Board & tool

Tonic 8” guillotine

Scissors

Tweezers

Shaping tool from www.dimensionstamps.com

Foam shaping mat – stamping mat or even a mouse mat

To make the card ...

I folded the scallop card along its pre-scored crease then using the eazi score board I scored a line from bottom left corner through to top right corner of the card front – folded it and this created the twisted easel base.

I cut out the main image and also the few pieces of decoupage then made them up using small double sided sticky pads

The image was then matted onto a piece if the burgundy card then attached with double sided sticky tape to the card front

I trimmed one of the backing papers to fit the base of the easel leaving the all around border

A piece of silver mirri card was cut to fit across the card then a piece of the 2nd backing paper was trimmed to fit inside it – then had the long edges punched out using the Martha Stewart snowflake border punch

The punched panel was stuck to the silver mirri panel and then a narrow strip of burgundy card was stuck across the centre

I then used a dot of pva on the back of some of the snowflakes that had been punched out the borders and stuck them onto the burgundy strip randomly.

A glittered chipboard sentiment was attached to the card with sticky pads to act as a stopper so was positioned where I wanted the main image to stop.

Finally I punched out a few larger snowflakes using some punches and the 2nd backing paper – I stuck them in the corner of the base card then added red AB gems to the centres.

To decorate I covered all the fur on the hat scarf and cuffs with pva glue then covered with the lovely shaved ice mica fragments – and they look amazing!!!

As I said this is my first attempt at the twisted easel but wont be the last.

I'm so pleased it worked in practice as I had it in my head – ideas don't always work – thankfully this one did!!!!

Until the next card then....

x

Monday, 15 October 2012

Sectioned Tree


Hi

Today's card is another I took to Malham with me but don't think I actually made it up there

Its a lovely card and something different

The tree really looks as thought it was just added to the background – but it was printed out that way.

So the sheet was bought from www.craftsuprint.com and this is what I did with it....


So materials for this card I used ….

Heat mat to work on and protect your surface – I always use it...

A4 grey card stock

Decoupage sheet

Silver mirri card

Scraps of blue mirri card

Silver card candy

Crafters Companion Spray & Sparkle glitter

Crop-a-dile Corner Chomper

Double sided tape

Sticky pads

Eazi Score Board & tool

Tonic 8” guillotine

Scissors

Tweezers

Shaping tool from www.dimensionstamps.com

Foam shaping mat – stamping mat or even a mouse mat

To make the card ...

I folded the grey card to create the A5 card blank then rounded the 4 corners using the corner chomper

I cut a piece of silver mirri card to fit the front of the card leaving a border then rounded the corners – added double sided tape to the back – peeled away the backing and secured to the card blank.

The base image was cut from the sheet then had the corners rounded and double sided tape fixed along the back. The sections of decoupage were all cut out and built up on the base image using double sided sticky pads.

Once all the decoupage was done I sprayed the whole of the card with Crafters Companion spray & sparkle and left a few minutes to dry.

While waiting for that I cut a simple sentiment and matted it to a small scrap of silver mirri card

A scrap of blue holographic mirri card was cut to fit the space that would be left under the image – I used a Tonic fancy corner punch to do the 4 corners then stuck a length of silver & white printed christmas ribbon to it using double sided tape for the ribbon.

When the spray glitter was dry I stuck the panel onto the silver mirri panel – I put it at the top of the card which left room at the bottom for the blue mirri panel to be added.

The small simple sentiment was added at an angle in the top left of the card.

To finish the card silver metallic card candi was fixed into the 4 corners of the main image and 1 at each side of the printed ribbon on the blue mirri.

Al lot of friends have seen this card and commented on how nice it looks – some even said when they saw the sheet they passed it as it didn't appeal to them...so I am pleased I made it up now as I know at least 3 others have made it now too!

Until the next card then....

x

Sunday, 14 October 2012

How on earth....


Hi

Last year I bought a fab new cd by Ella Designs called 12 cards of christmas and have to say the card were amazing – especially this one I am sharing today

Take a look at the website


The cards are printed over a few sheets usually and there is also an easy to understand tutorial for each project.

The reason I put this one together today is I gave a kit with everything needed to make the card to a friend of mine and she has been in touch a few times to say she really cannot get to grips with how the card is made up

As she is coming through to see me tomorrow I thought I would make it up for her to see what it looks like finished!!!!

So materials for this card I used ….

Heat mat to work on and protect your surface – I always use it...

A4 white card stock

Decoupage sheets

Instruction sheets

Double sided tape

Sticky pads

Eazi Score Board & tool

Tonic 8” guillotine

Scissors

Tweezers

Shaping tool from www.dimensionstamps.com

Foam shaping mat – stamping mat or even a mouse mat

To make the card ...

I would love to share how to make the card step by step but that wouldn't be fair to the designer – because once you know how to make this the style could easily be copied – now if you have the cd rom yourself it is fine to put your own slant on it – that is stated in the instructions

So I will give you a rough idea

The card stock is cut down slightly and the eazi score board and tool are used to mark the card layout – this is one of the few cards I have ever made where the score board is used to score lots of lines throughout the card.

So once its all scored and cut it is time to build the card – for mine I used Tim Holtz Vintage Photo ink pad and ink tool to colour the edges of the entire card

Using double sided tape I added the 2 side panels to the card and then the 2 inner side panels....

Next I cut out the decoupage and built it up with small sticky pads, then stuck this panel to an off cut of kraft card and cut to leave a very narrow border all round.

When this panel was ready to attach to the back of the card I used double sided tape on the left hand side only – this is so its held in place but will fold flat to be posted.

On the back of the card I added the 2 square panels printed with TO and FROM

The last thing to be added was the month element which was stuck along the bottom only as the top didn't actually fit against anything so would have stuck to the main back panel when closed

To decorate I used cosmic shimmer pva glue to all areas of the card that had snow – then sprinkled glamour dust and shook off the excess

Glossy accents were added to the candle and the number 25 of the calendar.


I am sure you will love this card – I do!
 
I have taken photos from different angles so from above - a side, the back etc so you see how unusual the shape is

Once you have made the 1st one you will be fine – it does take some working out in places – but I like the challenge!

Don't forget now you can pop on over to Ella's website and see her cd collection...

Until the next card then....

x

Saturday, 13 October 2012

Robin In A Bauble


Hello

This is a lovely traditional christmas card – I know it was bought from www.craftsuprint.com but have no idea as to who designed it – it looks like an Ann-Marie Vaux to me but I could be totally wrong.

Its one of the many sheets I printed out to take with me when we went off to Malham last month but I only got around to making it up a few days ago...and that was mainly because I was 1 card short for the parcel of cards I was asked to make.


So materials for this card I used ….

Heat mat to work on and protect your surface – I always use it...

A4 red card stock

Decoupage sheet

Gold mirri card

Crafters Companion Spray & Sparkle Iridescent

Double sided tape

Sticky pads

Eazi Score Board & tool

Tonic 8” guillotine

Scissors

Tweezers

Shaping tool from www.dimensionstamps.com

Foam shaping mat – stamping mat or even a mouse mat

To make the card ...

Using the eazi score board I scored the red card on line 7 to create an A5 card but this design needed a 6x6 card so after folding into the A5 card I put it back on the board and score the card on line 7 again and cut away the card which was below the line – so now I have my 6x6 card blank.

I trimmed a piece of gold mirri card to fit on the card front but leaving a border of red all around it – this panel was stuck in place with double sided tape.

The image was cut out and then had double sided tape added to the back – the paper backing was removed and this panel was attached to the gold mirri panel.

On to the decoupage – I started out really good with cutting the branches but it all got too much so in the end I cut around them removing as much of the white back ground as I could

The decoupage layers were then covered on the back with tiny double sided sticky pads - the backings were removed and the decoupage positioned and pressed down firmly.

Rather than highlight the many places that needed to be glittered I chose to use the Crafters Companion Spray and Sparkle glitter spray – I covered the entire front of the card in 2 or 3 short sprays

Once it was dry I added a red christmas sentiment to the bottom right corner to finish.

If you have a lot of cards to make up for Christmas then these are the idea sheets to use as its very little printing – its fairly easy to cut out – depending on your print settings you can print smaller so use smaller than 6x6 cards.

Whatever size – whatever colour main card and however you chose to decorate the finished card it will look super – just as this card does!

Did you manage to spot the deliberate error in yesterdays write up?

See you next time …

x

Friday, 12 October 2012

Wash Day


Hi

Sorry but its back to the Crafters Companion Beatrix Potter 10 cd set again

This card is what we did in class on Thursday – the images are from

Mrs Tiggy Winkle – I printed 3 different sheets but all along the same theme

Wash Day....

So materials for this card I used ….

Heat mat to work on and protect your surface – I always use it...

A4 white card stock

Decoupage sheet

Backing paper

Floral border from the cd

Gold mirri card

Piece of pink card stock

Martha Stewart bubble bath border punch

length pink spotty ribbon

4 silk flowers in 2 sizes

2 brads for flowers

punches leaves

printed sentiment

Sakura quickie glue pen

Glamour dust

Double sided tape

Sticky pads

Eazi Score Board & tool

Tonic 8” guillotine

Scissors

Tweezers

Shaping tool from www.dimensionstamps.com

Foam shaping mat – stamping mat or even a mouse mat
 

To make the card ...

After folding the cream card stock in half using the eazi score board and tool I cut a piece of gold mirri card to fit the card front leaving a border all round. This was stuck in place using double sided tape

Then I cut a piece if backing paper to cover the mirri again leaving a border – this too was stuck in place with double sided tape.

The gold mirri card left had a piece cut from it approx 4.5cm wide – attached this to the left of the card – it was positioned so it was lined up with the mirri on the base.

The pink card was also cut to 4.5cm and then punched down both long sides using the lovely bubble bath border punch – a piece of wider double sided tape was attached along the solid part of the panel and stuck on top of the gold mirri panel

I cut the floral paper so it was cut to either side of the flowers and attached with double sided tape to the centre of the panel

I tied a neat bow in the pink spotty ribbon and stuck to the top of the panel just added – I used a small length of red double sided tape – I cut it and stuck on my finger – started to remove the backing then folded the tape to attach on the reverse of the bow.

Now I cut the base layer from the decoupage sheet – I saved the decoupage as it can be used to create another card – then matted the base image onto gold mirri and cut to leave a border.

This was then attached to the card with double sided tape – it went nearer the bottom and the right hand side but did overlap the border panel at the left

A simple sentiment was matted onto a scrap of gold mirri and added at an angle at the bottom right side.

The silk flowers I used were from Poundland – they were bright red so I toned then down using a white ink pad – as the petals had grains it was ideal for inking them...

When I had done the 4 flowers I split into 2 flowers – 1 large and 1 small which had a pink brad pushed through to hold them together

It was Pinflare silicone gel that held these in place at the top right of the card – a few punched leaves in green card were slipped in here and there to finish.

Lastly I highlighted parts of the image with Sakura quickie glue pen then sprinkled with glamour dust.

Now let's see who pays attention to what I write!

I have made a deliberate mistake somewhere on this sheet – I will send one of these cards to the person who finds my error!!!!

See you the next time....

x

Thursday, 11 October 2012

Beer Shack


Hi

This is such a cute card – its a kit that was bought from

www.card-making-downloads.com

and was designed by Macatelier

The kit contains 4 sheets, the card base, decoupage and 2 sheets for the envelope.


So materials for this card I used ….

Heat mat to work on and protect your surface – I always use it...

A4 dark blue card stock

The 4 printed sheets

PVA glue – I use Cosmic Shimmer

Sakura quickie glue pen

Glamour dust

Glossy Accents

Crafters Companion Stick & Stay

Double sided tape

Sticky pads

Eazi Score Board & tool

Tonic 8” guillotine

Scissors

Tweezers

Shaping tool from www.dimensionstamps.com

Foam shaping mat – stamping mat or even a mouse mat

To make the card ...

I roughly cut out the base image then sprayed the back of the sheet and after 30 seconds pressed it onto the sheet of dark blue card then carefully cut the design out

I scored along the centre line using the eazi score and tool the folded the card and ran the tool along it to sharpen the fold.

I cut out all the decoupage and used large sticky pads for the large areas and smaller ones for the fiddly areas.

Once the decoupage was added it was done to the sentiments and decorating the card which I did using glossy accents for sections of the bear, then black enamel accents for the nails all over the shed and finally quickie glue pen and glamour dust for the flower and other areas that seemed to scream glitter me lol

The kit came with lots of different sentiments which makes the card suitable for any occasion – we all say its hard to make a nice man's card – not with this kit I say!!!!

I know I cut back on the method but it really was quite straight forward plus my PC is being naughty and the rice pudding is smelling done....

See you the next time....

x