Thursday, 31 May 2012

The Mechanic


Evening all


So what has happened to the sun? Really thought summer was here to stay but really should have known better – after all it is a Bank Holiday weekend and we rarely get decent weather do we?

The community building we hold our card classes at is holding a Jubilee/Open/Fun Day next Tuesday so we have all been busy making men's cards – in the past when we have sold cards people always want men's – and with Father's Day not too far away now it makes sense to have them ready! Amazing my friend Katie and I have done several cards the same yet didn't realise until today – this is one that has been duplicated

Today I have a card made using a sheet from


The sheet was created by one of my favourite designers Janet Briggs

The sheet number should you wish to check the sheet out is 320817_68

So to make this card I used an A4 sheet of mid blue card which I folded to create my A5 card but then scored again on the A5 line to create my 6x6 card blank.

I cut the base layer – had to trim more than expected off the printed border in order it fit my card blank and leave the small all round border.

Next I cut out all the decoupage which on the whole was big and easy to cut pieces

I used small sticky pads to build the design and shaped lightly the top most pieces.

Once done I embellished the headlights, mirrors and all the silver tools with Glossy Accents
After cutting out the sentiment I matted it onto a piece of green mirri card that had the corners snipped away

A clear pointed AB gem was stuck to either side of the sentiment.

The card is lovely to make and perfect for males teens and up I should think..

Bright and cheerful – sure to put a smile on anyone's face!

See you tomorrow then friends

x

Wednesday, 30 May 2012

Pomeranian Poppy!


Hi friends


Thanks for dropping by again to see what I have to tempt you with today

Well I have used a sweet cd by Jems Designs for this card – the cd is called A Puppy's Tale

Visit the website if you want to know more about the cd rom its


So this particular design is called Pomeranian Poppy

I was a bit stuck with how to actually create something with this set I have to say – so cut out the decoupage then thought well I am going to have to cover my 8x8 card blank with backing paper and then add the decoupage to it

Had I searched the folder for Poppy I would have spotted there was actually a sheet with several toppers – the largest being the perfect base for this decoupage – mental note to one's self – next time use the topper sheet as well as the decoupage sheets!!!

Anyway

I managed to ruckle to the top right corner of the card – when trying to remove the backing to try again I tore it!!!

Sooooo

I came up with the idea of cutting off the corner and popped a section of lovely holographic heart mirri board behind it!

It worked out ok – at least I didn't have to throw the whole card away.

After making up the decoupage I positioned it over to the right hand side of the card and then added a length of cerise grosgrain ribbon around the spine and finished off with a lovely knot and fancy pointed tales to the ribbon ends!

I had a few printed tags lying around so threaded narrow white ribbon through one and stuck it to the top left of the card with a sticky pad.

I embellished the card with spray glitters and glossy accent as well as pretty flower soft here and there in the poppies!

A pretty enough card that didn't take a lot of thought – but did need a lot of cutting out in places!!!

And remember – if you try one of these – use the topper sheet too – makes life easier!

x

Tuesday, 29 May 2012

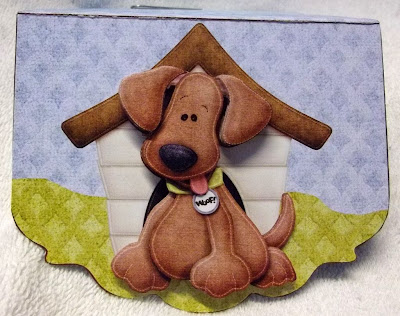
Woof Woof!!!


Hi friends
Today I was tempted into buying a set of 10 fab new kits

They are called Gatefold Envy's – when you see the finished card all will make sense...

I bought the bundle of kits from www.cardmakingworld.com

The biggest decision was which kit to do 1st – no contest really as I go for dogs every time!

So to the card – in the kit there are 4 sheets and a backing paper as well as 2 sheets to make up the envy box....

I printed all sheets and then stuck the card front to a piece of card then cut it out – I used card to strengthen this as the card will need to be stood up to display it and the matt photo paper alone just wouldn't work!

The kit has a panel to attach to the front – you have a choice of pre printed sentiment or blank – I chose the blank this time – I cut it out and attached using double sided tape.

I covered the back of the main card with the backing paper – attaching this with Collall photo glue so I could move it around until I was happy it was right.

The envelope flap was also covered on the back with the backing paper and then scored and secured to the card with red double sided tape – this is much stronger so ideal with the flap being moved a lot

Then it was all down to the decoupage which I cut out and fixed into place with small double sided sticky pads – shaping the top layers before putting into place.

The decoupage was the dog itself on the flap and also both paw prints on the gatefold doors.

The envelope box was cut out and scored on 2 lines at each side as well as the top and bottom

Strong tape was used to attach the pieces together

This is a lovely fun card to make – I did realise when making it where I could change things next time to make it neater etc – but all in all – I really like these – well worth all the printing – which I will add may be over 4 sheets but it only part covers each sheet!

Watch out for more of these lovely kits coming your way

x

Monday, 28 May 2012

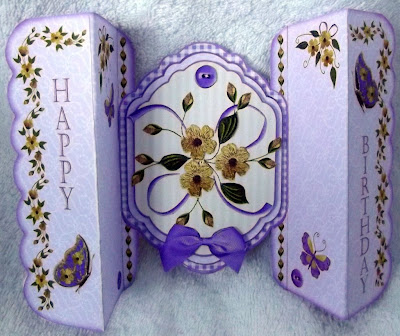
Buttercups & Butterflies!


Thanks for dropping by again


This is another of the card I made yesterday after buying the kits from Card Making Downloads


This kit is by Dizzy Designs and is called

Buttercups & Butterflies


There are 4 sheets and a backing paper (which I didn't use) as well as an envelope which came over a single sheet


I printed the sheets – including the backing paper – but decided to stick the main panel direct to a lovely textured purple card stock, cut it all out and then thought it was pretty enough on the reverse to just add the panels and leave purple card showing rather than the pale lilac patterned paper!


The card is so easy to do – literally stick the main panel to card and score on the 2 score lines either side of the centre


Then add the pyramage elements to the central design on the front followed by the few decoupaged flowers and leaves.


On the reverse it needed the outer door panels fitting and then 2 stripes of border


After that simply stick the central panel and that's it!!


The envelope was cut out and scored and folded – then stuck using double sided tape!


Another good thing about this card – it folds to around A6 size – not that it would still go through the cheap postage slot!


Have to say its a lovely card and quick to do – it could be better on paper though as I think the pieces would easily fit onto 3 sheets at most!!


You should have a go at this card – its great for the Opps I forgot last minute cards!!!

x

Sunday, 27 May 2012

Pocket Full Of Pansies


Hi

As you will have guessed, I spent the whole day out in the garden – enjoying the sun again... so now extra frazzled... I really am my own worst enemy, I feel I am burning but just sit there for another 5 mins which is really the rest of the day


But this afternoon after taking half hour to check emails etc on the computer I was so tempted by the 20% off offered by Card Making Downloads so had a little nosey and bought some lovely kits


So I set to and printed off some of them, took them back out in the garden and cut them all out...


When we decided to finish for a while I made up the kits and so here is the one I think is my favourite so far


Its called Pocket Full Of Pansies for obvious reasons really


Sadly the kit doesn't have a number or a designers mark so I cant offer more than the title, sorry


The kit has 5 sheets in all, 3 are for the card itself and the other 2 for the lovely matching envelope.


I printed all sheets onto matt photo paper 128gsm and cut the pieces out


When I came to make up I was tempted to stick to card stock but by the time the front and back where stuck together it seemed pretty firm enough, but I did stick the domed Just for You panel to pink card stock as that is the one piece that will be handled a lot


So after sticking the front and back together with Collall photo glue I scored down the 2 fold panels and then cut the slits in them – these were clearly marked,


The posies of pansies came in 3 sizes and although it looks like I gave up with the cutting out and left a white border, that it how it was on the sheet – there was a pink line to cut – in hindsight maybe I should have ignored that and just cut round the flowers – will make a mental note for next time!!!


This is so easy to make up – simply fold the flaps back on the largest posy and stick to the card, the middle size is stuck to the largest and then the smallest to middle size!


The domed panel pocket is slipped through one of the slits and secured at the back – I used double sided tape – the other side is left open so the card will go flat to be posted and also fit in the envelope – I will just need to add a how to note to the panel should I use this card!


The envelope is very straightforward – simply cut out, score on score lines, fold over and then stick the top and bottom together!


I love the idea of this card – the fact it lays flat and has its over envelope are other good points


I should have printed a verse on the middle section at the back but have plenty of lovely sentiment stamps that can be used when needed!


Hope you like this pretty card!


x

Saturday, 26 May 2012

Get Well Bear


Hi


Well the weather has been spot on again today hasn't it? For people who know me personally they know I just love the sun – and I take full advantage whenever it comes out – and this week has been great!

As I am finally – after some 4 years – getting my gardens all sorted I have had to be outside to supervise – so have managed to catch up with new crafty magazines and finished a book I had been reading for a while....


Today I spent so long outside I have burnt to a frazzle – I just know I will suffer for it but hey ho its well worth it for me!!


What I haven't actually done is any crafting – so I am once more falling back on cards I have made in recent weeks!


This is a card I made for my friend Pat who was taken ill with a heart problem a short time ago – I made it in the hope it would brighten her day – I think it did do...


So this sheet was from crafts you print but sadly I cannot find any item number for you – will keep searching and get back to you with it!


I used Craft Work Cards blank 6x6 scallop edge card – the base image was a perfect fit to the card leaving a narrow all round border


I cut out and built up the decoupage which was so easy to cut out that the sheet would be great for even new crafters!


The sheet had paper buttons for embellishments I believe but I decided to use tiny baby buttons and slotted very thin ribbon through them and tied in a knot at the top


The buttons where put in place with Pinflare glue so they didn't fall off.


To embellish the card I used metallic pink card candy in the corners, added a little glitter here and there and some glossy accents to highlight sections


The last things I did were mat a sentiment onto matching card stock and attach then used flower soft in the centre of the big flowers!


A great card that doesn't take too long to put together


See you tomorrow

x

Friday, 25 May 2012

Trucking...


Good evening again friends


Some of you may recall some time ago I asked for help with a card order I had


My friend Ann asked if I would make her a birthday card for her good friend Martin – she said he loved Eddie Stobart© and everything to do with it!

Well I searched all my sheets with no luck – contacted lot of my crafty friends and they had nothing either – mainly because the Eddie Stobart© is copyrighted

So in the end I googled and found a suitable image to work with – took it into PSP and created a pyramage sheet, a few different backing papers and an insert!


All that was left was to make the card now


I used a dark green A4 sheet of card, folded and created the A5 card blank


A piece of bright red card was added to the card leaving a narrow all round border


Onto that went a piece of one of the backing papers – again leaving a narrow border


After cutting out the layers for the pyramage I built the design using large sticky pads – then matted the whole image onto red card then green mirri card


That was stuck to the card front on an angle with Cosmic Shimmer PVA and just below that was a printed and foiled Birthday sentiment.


As I had a lovely sentiment stamp I wanted to use I opted for a white shaped label that had been cut using nestabilities – using a dreamweaver stencil brush I added Tim Holtz Bundled Sage distress ink pad to the edges then stamped the sentiment in black to the centre of it!


This was secured to the bottom of the card with Cosmic Shimmer PVA


I printed a verse to the insert before printing


Ann was really pleased with the card and said she knew Martin would love it too!!!


See you next time folks


x

Thursday, 24 May 2012

For ANN


Good evening again friends


Just to fill you in on the One Direction card I made – it was loved by all!! I have had a great response to it by the lady's family & friends – I have been asked if I will make cards for this and that – and also told to make up a box of mixed cards to leave at the salon which is great news!!!!


I am going back to my favourite stamps again for today's card...they are the flowers, leaves and butterflies from Chloe's Creative Cards


I made this card through the night last night – I had actually stamped and embossed all the flowers a week or two ago so it was just a case of make up the card


I decided I wanted to make and send something nice and unexpected to my lovely friend Ann, she has had a tough week this week so I thought a nice card would make her day – judging by the reply I had in text I think I may have made her month!!! I gave the card to her hubby to take to her this evening when he dropped off my Avon from her!


The flowers, branches and butterflies were stamped with Versamark clear embossing pad and stamped onto a dusty pink pearl double sided heavy weight paper then sprinkled with silver glitter embossing powder and heated


So to the card – I used a plain white A5 card blank and covered the front with a piece of pastel pink backing paper – this is something I had printed from a Flower Soft cd rom some time ago....

I stamped a lovely sentiment by Lindsay Mason onto a shaped piece of card – I believe it is something I cut out with a nestability – once stamped I coloured the edges with Tim Holtz distress ink pad in Victorian Velvet then used a pink pro marker to draw in fake stitch marks.


This panel was then attached to the bottom right of the card and one of the butterflies was stuck slightly over the top right hand corner of it at an angle with another butterfly attached just by the body – the Cosmic Shimmer PVA glue is ideal for such things as it is super strong!


Next I shaped 6 large and 6 small flowers and built them up so 2 large and 2 small make one flower – they were attached to the card with the Cosmic Shimmer across the top starting at the top right corner dropping to around half way down the left side!

Next I cut out a couple of branches and stuck them along the left edge


I searched the internet for a nice verse and the one I used was perfect for Ann....


I really hope you like my card....and if you want more info on the stamps here you go....


and the stamps I used for this

and the other stamped cards were

MAR008 – Leaves - £3.99

NOV003 – Half Butterfly - £3.99

NOV004 – Large Flower - £5.99

NOV005 – Small Flower - £3.99


See you tomorrow


x