Wednesday, 31 December 2014

Pale Blue Delights


Good Morning Everyone

Its a very very cold day, yesterday the hard frost we woke to find didn’t clear all day and with temperatures dropping again through the night the frost looks hazardous today...not that I had to go out but it would stop me anyway as have big concerns about falling
Enough of the weather for now
I had such a good card making day yesterday, I’ve got 2 cards to share today, these are both for swaps one theme was pale blue and the other was anything of my own choice.
Let’s start with the pale blue card, it was a sheet I bought from www.craftsuprint.com and is by Sue Douglas and called the Floral Collection

So for the card I started by folding a sheet of whit 16”x8” card to create an 8x8 card then coloured around the edges of the card with light blue pan pastels then a light touch of lemon which softened the blue.
When I laid the base image against the card, the card was far too big so I chopped it down, I matted the image onto a square of pale blue glitter embedded card then that went onto the card base.
There wasn’t a great deal of decoupage to the card – just the flowers which I lightly shaped and added to the image using tiny sticky pads.
The finishing touches were glitter – the 3 butterflies were only stuck along the body so the wings were free, I used a quickie glue pen to highlight the veins and sprinkled with iridescent glitter, pale blue glitter was used in the centres of the ovals around the bottom and a slightly darker blue was used on the inside of the flowers.


Next card was also from www.craftsuprint.com but this time by Elaine Sheldrake.

It is a charming blue plate with a lovely summery look to the design.
I printed the single sheet, cut away the circular plate and stand and using Crafters Companion Stick & Stay I sprayed the back and secured them to strong white card and cut them out.
I used a mid blue pro marker to run around the plate and stand.
Because there was no decoupage apart from the ribbon I decided to gie the plate a WOW factor using glitters so it was light gold glitter on the thatched roof and the fence bordering it.

A lovely green glittered was used to outline the trees and then a silvery blue was used on the porch roofs
A bronze finished off the plate when it was added to the brown trees.
I printed a general verse and this was stuck to the back of the plate

I hope you like the 2 pale blue cards – and more so that the 2 lady’s I am posting these to like them!

I would like to wish everyone a very very Happy New Year
Stay safe and enjoy yourself
I for one hope 2015 will be a good year

So until the next card....
Bye for now
Hugs
xxx

Tuesday, 30 December 2014

Narcissus Collection


Hello again

I hope you all had a lovely Christmas and were good all year so Santa visited and left you some yummy gifts.
We were invited to our daughters and had a great day despite me not been well at all...but I wouldn’t have missed seeing them for anything.

And so on to this set which includes card, bookmark and a box which I have made today ready to be swapped with a partner in a group I belong to.
I used an old Cupcake cd for the sheets, it’s called Bloomilicious and I used set 16
To make the card i folded a sheet of white A4 card in half to make an A5 card. I had printed off 2 sheets of backing paper so I chose the sheet with a small pattern and covered the front of the card folding about 2 cm round the spine and gluing into place. Next I cut out the pyramage pieces and built them into my topper with I them stuck to the top right of my card. I used a length of plain white 3mm satin ribbon and coloured it using a yellow pro marker, once it dried I tied into a small bow, left long lengths dangling and stuck to top left of the card with a sticky dot. 
Next I cut out the full page of teabag squares and folded and stuck them into a medallion, pushed a glittered star brad through then stuck the medallion onto the bottom left of the card and a small best Wished sentiment finished the card front.

For the inside I decided to use an insert which needed the centre cutting away, the insert was so badly faded, I printed it on different settings and different papers but nothing changed – I then decided to contact Cupcake to ask why it wasn’t printing correctly and was shocked to find that although Creative Crafting took over Cupcake they had nothing to do with Cupcake – I had thought they just decided to change the name but never mind, it looks ok now.
I trimmed down the other backing paper and folded in half and stuck into the centre of the card.
Next I folded the insert in half then folded into gatefold. I used double sided tape to stick in place.
I have a few teabag squares left so cut then down to 4.5 x4.5 cm, folded as the front medallion but this time I added a large ab clear gem to the centre and a length of he yellow ribbon was attached to the back and then into the top fold of the insert.

I used Picasa to add some text to the bookmark, on the reverse I added some info that I didn’t want to share hence the piece of patterned paper across it. I cut out the front and back and stuck to a piece of 300gsm card, rounded the corners then used the yellow promarker to colour the edges, punch a hole and added a length of thick chenille thread to it.

And finally the box = I printed it out then stuck the sheet to 300gsm white card then cut out all the pieces.

I scored the fold lines and added double sided tape to the tabs but didn’t remove the backing as this box will need to be flat to go in the post, the lid was cut out and corners scored and folded and like the box sides I added a piece of double sided tape to the corners

Once the box reaches my partner all she will need to do is peel off the backing paper and stick everything together.

I do hope you like this set as much as I do.
I know I say this over and again but I will be getting back into making things and sharing them on here
I hope some of you find the step by step instructions helpful and inspire you to have a go yourself!
So until the next time...
Love and Hugs
xxx

Monday, 8 December 2014

Village Christmas Card


Hi
Today’s card is another I have made for the Christmas Craft Day workshop, it’s not my own design as I saw this is a magazine and just loved it so did a variation of it.
I started by folding my white card into a landscape card (like a tent) then added a piece of checked paper leaving a narrow all round border.
This card is made up of matting and layering so the next mat was a piece of brownish embossed paper and then on top of that some lovely snowflake paper in shades of brown.

Doesn’t seem right making a Christmas card using mainly brown but I think it has worked well.
So back to the card....
I used a piece of quality very wide satin ribbon and placed it across the centre of the card securing it inside the card with sellotape.
Next I chose a lovely shaped die in 2 sizes and using the larger of the dies I cut a mat from double sided heavy coloured vellum. I used it brown side up as when I put the red on the brown mats it looked dreadful.
I used double sided tape to stick the brown mat in place – because adhesive tends to show through I placed the tape about 1cm in, that was then covered by the last mat.
Using a size smaller die I cut out one panel in white and another in pale blue
The white panel was then torn towards me to represent the rolling hills, I watered down some pva and painted the white with it then covered the panel with bright white glitter.
Next was the decorations needed for the main card, using Kraft card I die cut a village scene (this was a Marianne die and it is lovely)
I also die cut the fence which came with the village scene, and then using some dark green card I cut out 8 mini Christmas trees,
Making the card up was easy as I had the snowy panel to work with.
I glittered the roof’s of the houses and then glued the house panel to the card so I could work around the background,
The trees were highlighted with glitter then tucked behind the houses and a couple on the front,
The fence was simply added to look as though it was surrounding the houses.


So that was the main card sorted all I then needed to do was add a small deep green bow to the left side of the toppers and below the die cut panels I added a Christmas sentiment with a gold AB gem to each side of it.
Insert is in so that’s my card done for today
See you again soon
xx

Acetate Aperture


Hello

Yet again I am starting my blog with apologises i know I said last time I wanted to get back into more regular posting on my blog don’t know where the time goes, or my days feel as though they are crammed full so once again it the blog that suffers.

We are holding an all day Christmas workshop on Tuesday so I thought I would share the 2 cards I had to make, so will post one now and the other tomorrow (it’s now almost 2.30am on Monday and you will have guessed I am not sleeping too well again.

This card is based on one I made my hubby several years ago but I have scaled it down so it now fits into an A5 envelope.


So to start with i printed my decoupage sheet from Joanna Sheen’s Nostalgia CD, the decoupage was cut out and then I used mini sticky pads to build up the design,.

Making the card consisted on folding a sheet of white card in half to create the A5 blank.
Onto the white I stuck on a piece of dark blue card, next it was shiny silver
So far so good....

I used a sheet of acetate that was slightly wider than the main image, this was to allow for the image to be matted onto shiny silver and then the acetate to bow.

Using a fancy shaped Nestability and my Big Shot I found the centre of the acetate and cut out an aperture, not sure if it was thick acetate or wrong sandwich but I had to have a double shim for the acetate to eventually cut through...

Now I cut out a mat of blue printed paper which was slightly smaller than the shiny silver I used a few steps ago, using the super sticky red tape, I stuck the acetate across the left side (short side) and left that to one side again


Back to the image, I matted this onto shiny silver mirri card leaving a wide border all around; now this was stuck onto the blue backing paper. Once this was all in place I stuck it down but for now I left the short sides unstuck, this was so I could position the acetate and get it stuck in place.

When I was happy the acetate was all lined up and straight I peeled away the backing from the red tape and pressed securely

The bow of my acetate makes it stand proud by around 2cms this is a matter of taste, it could be 0.5cms through to around 3cms, just bear in mind that the higher the acetate stands the deeper the box you will have to make for it.

To finish off the card I lightly glittered the snowy scene, the roof tops had a thicker covering as did the taller of the trees.
The acetate can be left clear but I decided to add some peel offs that I have had in my bits box....so a couple of small silver trees then lots of small silver stars and snowflakes.


Last thing was to stick the sentiment on the top of the acetate; it’s not really a sentiment it’s the first few lines of Silent Night

So there we have a lovely and unusual Christmas card it could be used a special card or just an every day one.

And now for something new.... you have the opportunity to buy the kit so you can create the card in your on time or you can buy the card already made up. You can pay through PayPal or bank transfer. For more information please email me
See you next time
xxx

Sunday, 7 September 2014

New Home Plaque


Hello
I am pretty sure you all thought I had given up with my blog didn’t you? It seems that way to me too...
So many events and health issues have been going on in my life and most of the time I struggle to do normal day to day things even though I do keep on pushing myself!
Anyway I have decided I need to get back into my blog as I miss it and I often have texts or emails from followers asking if I will be posting again soon.
I think the reason I have decided to start today is because of a recent event basically when we moved to the bungalow there was a fridge freezer in the garage, it was working but shabby looking so after speaking to my landlady she said I was ok to part with it, I used a local selling site through facebook and within a few minutes of posting I had a message from a lovely lady asking could she have it, we exchanged a few face book messages and it turned out she was actually moving into the village but more than that just 4 doors away from me!!!
Here removal date changed and last Friday she, hubby and son moved in!
As though that wasn’t good enough turns out she is into crafts too so I am keen to encourage her to join one or 2 of the classes I run with my friend Erica.


So I decided I would make a new home card then changed my mind and went for an MDF plaque which I could see in my mind what it would look like when finished.
I covered the front of the plaque with a shabby lilac sheet of paper from the Do Crafts Tilly Daydream A4 paper pad and the same paper in pink for the back.
Once the front was covered I used a scalpel to trim close to the edge them went around it with a Maroon pro marker.
The large alphabet stamps from Dimension Stamps were used to stamp out New Home then I randomly picked a couple of small floral stamps and ink pads in red, blue & purple and randomly stamped the letters, cut them out then dabbed with versamark and covered with detail clear embossing powder...I repeated this 3 times on each letter to get a good glaze.
I put them to one side to set and stamped a pretty bunch of flowers to the right hand side using purple Versafine ink, used a quickie glue pen to highlight the middles of the flowers then added a pretty AB gem using Cosmic Shimmer pva glue.
The letters were all set so I used Cosmic Shimmer pva glue to stick them to the plaque
I punched out some leaves in green and then lots of petals in different colours which I made into pretty flowers which were then randomly stuck onto the leaves. A small AB gem was placed in the centre of the flowers and the plaque was put to one side for everything to set.
The reverse of the plaque was edged in the same pro marker as the front.
I stamped a lovely verse I had bought from Inkilicious some time ago into the centre using red Versafine ink then sprinkled with detail clear embossing powder and heated until the red stamping really jumped out.
I reluctantly used peel offs to add the names Kenny & Samantha as i couldn’t find my small letter stamps...because there was no & in the pink letters i used i ended up using the symbol from a different set and colouring it with a promarker to match the edges of the plaque.
Again using peel offs I added the date they moved into their new home.
To finish I punched out some butterflies in lemon glitter card and stuck them randomly around the verse.
I hope you like the plaque and more to the point I hope they will...i will pass it on when they come for the fridge freezer.
I will do my best to post daily again or every other day at worst.
Take care everyone
Love n hugs
Angie
xxx

Saturday, 31 May 2014

Tots To Teens


Hello
Here is this week’s entry made for the Cd Sunday Challenge and the theme is Tots To teens
I used the fab Polka Doodles cd Work & Play 3 for all the images as well as a few papers, the rest were from my scrap box.
As usual it’s a last minute entry I forgot about it until late last night but already had in mind what I was hoping to do!

So to start I cut 5 pieces of mount board type card to measure approx 14cm x 10cm and started by covering both sides of 3 pages and just one side of the other 2

The front page has a fab train front with cute driver and in the yellow flash I wrote TOTS TO TEEN EXPRESS
And using my red tape I added HOLD ON TIGHT
On the 1st page I trimmed down the policeman, nipped the corners with a punch and then stuck the picture on using cosmic shimmer PVA glue.
On the reverse of that page I added a police lady.

Next page it was a handsome doctor with a lady doctor on the other side.


A cowboy was next now I can’t think there are too many children that really want to be a cowboy but it could go as acting or line dancing or YMCA sorry couldn’t help myself there lol.

On the reverse bet you guessed it a cow girl, yeehaa!!!

And on the last page a very efficient looking secretary...

So going back to the front page with the train on the reverse of that I just wrote a few words about Tots to Teens as a tot writing and on the back page, the reverse of the secretary I added words as a teenager.

I punched a chunky hole in the top left corner of all pages and used a book ring to hold in place.
I do hope you like this little book I have yet to get it all embellished so will add to my blog again when its all finished.
Have a lovely weekend
Angie
x

Friday, 23 May 2014

One For The Boys


Hello
Here is this week’s entry made for the Cd Sunday Challenge and the theme is one for the boys I think my card fits the title well
The card is an easel card and with a super fast red sports car on the front it’s perfect for “boys” of all ages!
I used a kit that was purchased from Craftsuprint, it came with the main card front and a page of decoupage, the kit was designed by John Methven.
Rather than do a straightforward card I opted for an easel card.
To start with I cut out the main image and decoupage, made up the design using small sticky pads then matted it onto a piece of red mirri card which I rounded the corners using my corner chomper.
The backing papers one is behind the main image panel and the other is on the base of the easel came from a lovely cd I have used a lot and actually won on the CD Sunday Challenge, it’s called Men in Mind by LexCraft.

The card is an 8x8 card so ideal for showing off the shiny red car.
So for the base of the card I used a fab paper that has a chequered flag design, I stuck it to the card then cut a length of black card, added thick foam tape from a roll and placed where it would best work for the stopper.
A Martha Stewart deep border punch was used with red mirri card to create an unusual border that again fitted with the card well
And lastly I got the chance to use some brilliant sentiments which I believe were from Craftwork Cards they spell out Happy Birthday but look like registration plates as they have numbers here and there instead of letters.
I do hope you like this card, I enjoyed making it and fingers crossed it will sell too
Take care and thanks for popping in
Angie
x

Wednesday, 14 May 2014

Victorian Beauties


Good Morning
I have spent the past few days working on another of my favourite books made from loo roll insides!
This is for the CD Sunday challenge blog with the theme Victorian Beauties and I think this works well.
To start with I ironed well steam pressed the loo rolls and then covered 4 with some paper I had from Papermania, I chose it because it has an old sort of look to it.

The cds I used were all from Peerless Designs Vintage Ladies Collection and a few bits from the Vintage Men’s Collection.

I cut out lots of beautiful female images and inked the edges with Paris Trunk ink in Sepia, then stuck them flat to the pages of the book and on some I added a few words I felt worked well with the images.

I chose my favourite lady for the front cover before I fixed that into place I laid a length of brown/red wide ribbon in place, and then stuck the image down.

On the back of the pages I added die-cuts gems and some smaller advertising from the sheets.
For the back cover I stuck the ribbon down then used a couple of advertising toppers.

Next I cut myself 4 tags, punched the top 2 corners and then inked all the edges on both sides of the tag, then punched a hole through the tags with a Crop-o-dile and secured some vintage eyelets followed by a small length of brown organza ribbon.

On the front side of the tags I used a pretty lady topper which were all inked around the edges....and on the reverse of the tags I added some old coin pictures, words and adverts.

For the spine I used a piece of wallpaper taken from a wallpaper sample book, the edges were punched and then wrapped it around the spine using red tape to keep it attached.

Finally I went over the pages and tags adding some peel off jewels here and there the coloured 2 sets of leaves with sepia ink and 3 handmade flowers.
So there we have it my Victorian Beauties Book.
Thanks for stopping by would love to hear what you think if you get a minute please leave me a message
Enjoy your day and the sunshine
Hugs
Angie
x

Friday, 9 May 2014

Ribbon, Lace & Gems


Hello again
Well I am still far from sharing daily but I think it’s getting better don’t you agree?
Today I am sharing a book type card that I want to enter into the CD Sunday challenge blog under the theme Ribbon, Lace & gems.
To start the card I used 2 A5 card blanks and stuck them together to form the book card.
I used Sharon Duncan Embossilibilty Elegant to print off 5 different backing papers and then Kanban Seasons to print 2 sheets which were used for verses.
The other cd I used was Katy Sue Fabulous Fashion and I printed the Hat decoupage, the Dress decoupage and then the hat & dress decoupage together
I started the book by adding a different embossed paper to the front, opened the book and a sheet to the 3 inside pieces and then once the right hand flap was closed I put the last paper onto there,

I made up the 3 decoupage sheets and added the hat & dress topper to the centre panel, then the hat decoupage to the left and the dress decoupage to the left.

Then I printed my 2 favourite verses onto my 2 Kanban papers in brown ink, I trimmed them down and when I was happy with the size I used a Martha Stewart decorative border punch down both long sides, which left the pretty printed design showing along the top and bottom.

Both pieces were then stuck to the card, the main verse to the card front then as the card is opened it shows the back of the right hand side and that was where the 2nd verse was placed.

The theme of the challenge was ribbon, lace and gems so on the front of the card I used a lovely big bow in one corner and a beautiful and delicate lace butterfly in the bottom left corner.
Opening the book to the other verse I placed another of the lace butterflies to the top left of the card.

And that left the gems so I used some unusual pink epoxy glittered blobs don’t really know how to describe them sorry anyway they went in the corners of the centre page and I popped one on the hat too

Along the same lines I had a bigger red epoxy blob that I popped onto the decorative band of the hat.
Lastly I used some 7mm clear AB gems in the shaped corners of the 2 decoupage panels to finish.

I have only just finished the card so the verse sheets are still in the drying stage as I use Cosmic Shimmer glues to hold them so the photo shows the glue lines I know it will dry perfectly!!!
As yet I haven’t decided how I will fasten the card but will most likely wrap a wide organza ribbon around it with a lovely floppy bow at the front...
I hope you like my book card I have so enjoyed making it, and will get lots of pleasure when I send it out
See you again soon...
Hugs
Angie
x

Thursday, 1 May 2014

For Someone Special


Hello again

Today I am sharing a creation I have made for one of my lovely class ladies she is celebrating a birthday tomorrow so I thought seen as I was making something special for someone special I should enter it into the CD Sunday Blog Challenge.

I used an empty Graze box oh how I love the contents but the empty box even more!!!

I started out painting the 4 compartment section with B&Q Funky Colour Metallic Effect paint in Vivid...sadly the photos don’t show what a fab purple it is. I gave the front and back of the panel 2 coats, setting to a side to dry between coats.

I used a Debbi Moore cd but can’t remember which it was but I also used my all time favourite cd Kanban Seasons if you haven’t this cd in your collection you really NEED to get it!!!

So I started on the box by covering the top, bottom and then inside with different papers from the Seasons cd, they are all in shades of lilac but again the camera hasn’t picked that up.
Once the paper was on I used strips of matching patterned paper in purple to go around the outer edges then used a dark purple ProMarker to run along all the edges.

A length of purple with white scrolls and black borders was stuck along the centre of the box lid

I cut out just the base image of the pretty lady in purple and stuck this to the left. I punched out several large flowers from purple holographic card, doubled them up and stuck them in the bottom right corner, in the centre of the flowers I used a pretty lilac flower shaped button, a few hearts were cut and pushed under the flowers here and there. A birthday sentiment was cut out and matted onto the holographic card and cut leaving a narrow border. This was stuck at an angle above the cluster of flowers. To finish the front I added a 2 tone glittered flower with gem centre and a rhinestone butterfly.

Inside the box lid I matted a pretty purple topper onto silver card, and then used purple metallic card candy in each corner.
Three different sized loopy flowers that came from www.diannesdiecuts.co.uk were shaped and sat inside each other the colours ranged from deep purple base through to lilac top, I used a plain lilac brad to hold the flowers together then used a blob of Pinflare gel to hold it in place, a pearlescent swirl was simply tucked under the flowers.

The compartment section was all dry so I punched lots of the holographic hearts and made them into a simple flower which sat in the centre, a pretty glittered flower in the centre of it. In each corner a purple glittered butterfly was placed.

On to the inside base in the top left a large die cut Happy Birthday was coloured in shades of purple, the top right has a beautiful crushee ribbon double bow that is shimmer lilac in colour, it was stuck in place with Pinflare gel.

Bottom right has a cluster of 3 large burgundy silk flowers with a few leaves from it

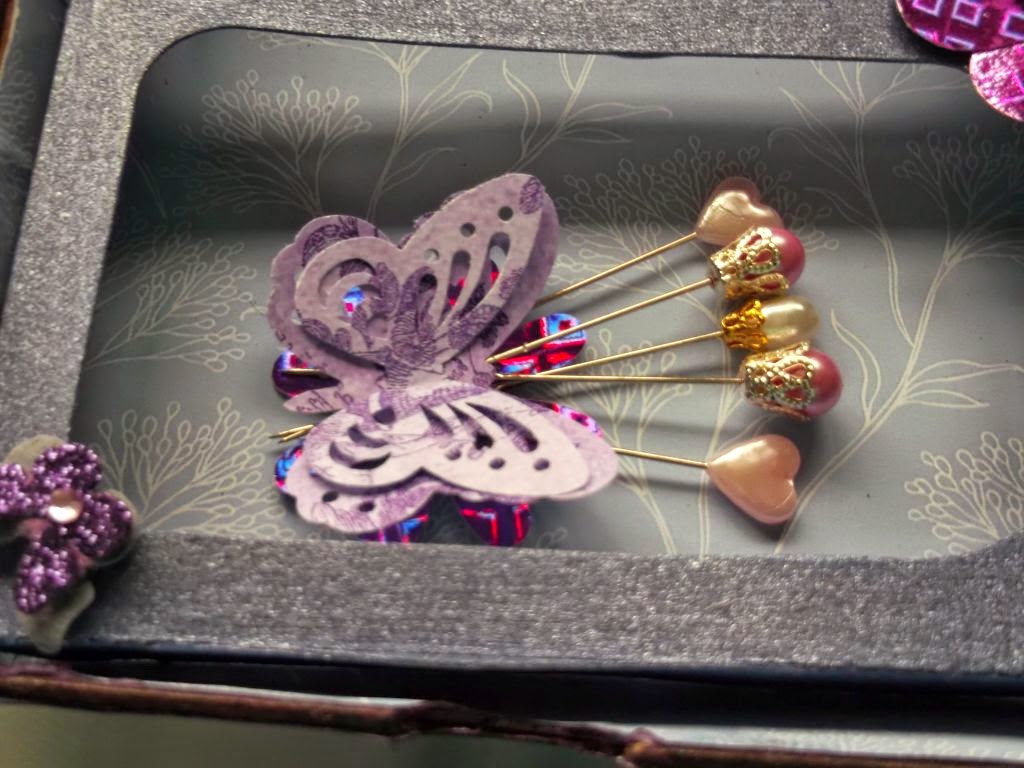
And finally a punched out flower held 5 hat pins in place and then 2 punched out butterflies were stuck on top to hide the pin ends.
My verse was printed onto printed paper and stuck under the box.
I can’t wait to give this out as I know the lady will love and cherish it!
Hope you liked it too....
Hugs
Angie
x