Saturday, 30 June 2012

Lavender Scalloped Card


Hi again

Today's card is made from a kit that was purchased from www.cardmakingdownloads.com and is called Lavender Scalloped Card Kit, and it was designed by Sammy aka scrapbookingmad

This kit consists of 2 different backing papers, 2 sheets for the envelope, a sheet of assorted tags, a main card, main insert and a sheet with the pyramid layers

Have to say I wasn't overly happy with the kit as had to print the main card and the envelope front several times as they came through as so faint it was like printing as draft quality – in the end I had to print – reprint – and reprint again on the same sheet to get a decent look...

I roughly trimmed the main card sheet then sprayed with Crafters Companion stick and stay and stuck this to a sheet of A4 lilac card stock, added a sheet of backing to the reverse – then cut it out, scored and folded – my base card complete.

I decided to stick the sheet of pyramid layers to card stock too as I thought they would fit better on the front knowing the tags slipped into them – I thought without the card backing the tags could end up tearing the paper pockets

So once stuck to card I cut out all the pieces – including the 2 chosen tags – both were supplied with the kit but I added the name Joan to one as this is a card order for my good friend Ann.

To make the card up was pretty straight forward – its just a case of glueing each pocket on top of the other ensuring an opening was left unstuck so the tags could be slipped in.

I found a lilac button, threaded a piece of lilac ribbon through it and tied in a knot before cutting the ends at an angle – the button was attached to the card back with silicone glue.

The insert was left blank as Ann had requested that – she wants the card as a general card so a verse wasn't needed. It gives plenty of free writing space now.

I edged the scallops and the text on the tags with lilac glitter using a quickie glue pen – I know the photographs look untidy with the glitter but they were taken before the glue had dried so I didn't brush off the excess in fear I would smudge the glitter

Now its all dried I have used a large soft blusher brush to remove all loose glitter for the card and tags

As I mentioned earlier I was asked to make this card by my friend Ann – I had made a card for her to send to her aunt Joan in the past so she thought it might be nice to send her one with a Lavender theme...

I hope you like the card Ann

And of course all you lovely people who kindly follow my blog!

Thanks for dropping by

See you tomorrow?

x

Oh Christmas Tree UPDATE


Just thought you might like to see yesterdays card now its complete with pretty AB gems!
I used larger ones for the big swirls - well 5mm size
and for the smaller swirls it was 3mm pinted ab gems!
Really needed these to complete it I think
x

Friday, 29 June 2012

Oh Christmas Tree...


Hi.....

Well my lovely new stamps arrived yesterday from


and I just couldn't wait to have a play!

The new stamps were from her lovely newly released christmas collection

I have used Starry Tree JUN007 and Snowflake cluster JUN012

The sentiment stamp used on the card was from Personal Impressions Snow Is Falling PICSA6155 designed by Lindsay Mason

I started by folding a sheet of bright white card in half to create my A5 card blank

Using a sheet of the same card I cut it into 2 pieces then rubbed an antistatic bag all over one piece

The snowflake cluster stamp was positioned on a small acrylic block then using a versamark pad I covered the stamp and began randomly stamping the card – inking up the stamp each time.

Once I felt I had enough of the snowflakes covering my card I covered the whole card with WOW Silver Sparkle embossing powder and tipped the excess back into a tidy tray

I then heated with a heat gun until all the powder was melted then set this to a side until it was needed.

The tree was placed on a large clarity stamps handle and again I inked up with a versamark pad and stamped the tree onto a piece of the white card – covered with the same WOW embossing powder – tipped off the excess and heated.

Finally I stamped out the sentiment and again heat embossed

I was now ready to start building up my card.

It was now that I realised I didn't have enough of the background snowflakes so added more – stamping and embossing until I was happy with it.

Taking a sheet of silver mirri card I matted the snowflakes background to it leaving a border then attached to the front of my card with double sided tape.

The tree was matted onto silver mirri card then bright white card leaving narrow borders each time – this was attached to the card with large sticky pads.

Under the tree I placed the sentiment that had been matted onto silver mirri then bright white card – this was also attached with large sticky pads.

Finally I found a length of pretty white wired organza ribbon that had silver snowflakes on it so I added it around the spine and tied into a neat knot then cut away the excess.

And that gives me the pretty finished card...

But is it finished?

I am thinking that I might just add some clear ab gems to the centre of all the swirls on the tree – what do you think please?

Don't be shy – leave me a comment – I used to get them but they have well and truly dried up these days I think!!!!

x

Thursday, 28 June 2012

Pirate Ahead!


Evening friends

I am sharing a card I have a feeling I may have shared before – I say that because I just love making Pirate cards for little boys

Today is Petes' grandson Thomas' 4th birthday

So I thought a good excuse to make a shaped pirate card

The card is designed by Evelyn Watts and was bought from www.cardmakingdownloads.com

The kit – as with most of these shaped cards kits consists of lots of sheets – 2 to make the envelope, 1 for backing, 1 for decoupage, 1 is the main card and then 1 more for the insert

But as I say time and again these kits are well worth all the printing and cutting out!

I started by spraying the back of the main card sheet with Crafters Companion Stick & Stay – fixed this to a sheet of mid blue card then sprayed the back of the backing paper and stuck that to the reverse of the blue card giving the main card a patterned reverse!

I then cut out the card and scored and folded it

Next I cut out the insert – I had added a verse before it was printed – so after cutting it was scored then folded and stuck inside the card.

Only the decoupage to do – this was so easy as it was huge pieces – I decided to use large sticky pads or I would have spent as long added the tiny ones I normally use and removing their backs as I did making the whole card!!!!

I cut the 2 pieces that make up the envelope, scored and folded where stated then made up using double sided tape – to avoid making a mistake and wasting the sheets I rubbed a glue stick over the tape so I could remove and reposition if I had to!!!

All in all it went together perfectly!

One silly error I made was spotted before I added – it was on the insert – I made a spelling mistake – but luckily when I scored and folded I opened it to check it was right and saw the mistake – all I had to do was reprint and cut it out again.

I took the photo's before I embellished the card so you will have to trust me on this – I used glossy accents on the skull and crossbones as well as the one on the hat, then the nose and bottle cork.

I used a quickie glue pen to edge the gold coins then covered with gold glitter to make it all shiny

In the photo's you will see the envelope has a blank area – that is because I added the name and address before I printed it and didn't want to show that on here!!!

Pete & I loved the card – shame I cant say the same for his daughter... she just said it arrived but he isn't in to pirates!!!! Seems I cannot win no matter what so may as well just do what I like anyway!!!

See you tomorrow folks...

x

Wednesday, 27 June 2012

Stamped Steampunk?


Hi

Something totally out of my comfort zone for today folks....

I bought myself some lovely new stamps from Kanban – they are the Jasper set – steampunkish really

So for the card I fancied browns and orange shades

Started by using a sheet of pale orange Adorable Scorable card by Hunkydory which I scored and folded to create my A5 tent fold card

I covered this with a piece of yummy brown textured card from a pad called Chocolate Box Coredinations – it was perfect being brown one side and a peachy colour on the other side – I was using a 12 x 12 sheet so cut it down to fit the card front leaving a border, before I stuck it to the card I used a sanding block to distress the edges – this allowed the peach to show through.

Then I cut another piece slightly smaller – this time I used the Tim Holtz distesser to really give a good distressed edge – again I cut to leave a narrow border

The base piece was stuck brown side up and the next piece peach side up

I did stamp a flourish in the bottom left and top right corners using Rich Cocoa Memento Ink – but really didn't like the effect so covered it up by added more of the brown card – because of the way I had cut the 12 x 12 sheet I was left with smaller pieces so I used one piece at the left which followed on with the sanded edges and the piece on the right I put through the Cuttlebug using Swiss Dots embossing folder – then rubbed over with the sanding block

Both pieces were stuck with brown side up and a border.

I had a set of pretty flourish dies by Sizzix so cut out 2 different ones – one of them was cut twice – all from kraft paper.

I stuck the 2 matching flourishes to the left side and with the other one I sprayed it with Crafters Companion Stick & Stay then dropped it into a tub of fine gold glitter – this was then stuck to the right side of the card!

Down to the beautiful ruffled dress – I stamped this onto a scrap of cream card using the Rich Cocoa Memento ink pad – then stamped the same image onto lots of different patterned papers with the same ink

Next I cut a small section from different papers and stuck them onto the base image covering almost the entire image in colour!

This was then attached to my card across the seam of the two top pieces of card using sticky pads to add height!

Ages ago I bought some Tim Holtz adage labels with printed sentiments so decided they would be ideal on this card – so I simply tucked 3 different behind the flourishes and dress on the left side – they arent actually stuck in place so if I see something else I can easily remove these

Finally I added a lovely bunch of peach flowers – I twisted the stems and turned them up and covered them by laying a Love sentiment over it – this was held in place with 3 small sticky pads.

I keep looking at this card and I think I like it – as I said its something very different and out of my normal comfort zone...

Would love to know your thoughts please...

What can I do to make it better – if anything.....

Thanks for looking

x

Tuesday, 26 June 2012

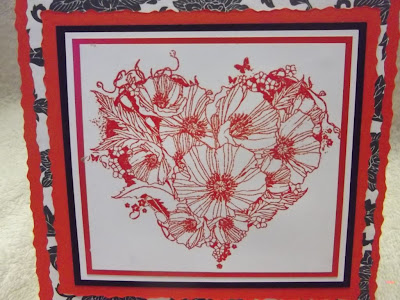
Poppy Heart


Thank you for dropping by again

I finally got round to making up a card after my stamping session yesterday so just hope you like it!

The stamps I used were Poppy Heart Code PH by IndigoBlu – available online and at most craft shops that stock the IndigoBlu range of stamps – this was cost £8.99 and was already mounted onto eazi mount

And the verse was from a set of stamps by Flower Soft – this was the Floral Sentiments Design Set 1

I started by stamping the heart onto white smooth card with a versamark ink pad and covered with WOW Rudolph Red embossing powder – tapped off the excess then heated until the powder melted.

I did the same with the sentiment stamp.

Starting with the heart stamp I matted first on to a reddish pinky satin card then onto white and lastly matt black leaving a narrow border around each layer

Then I matted this onto a piece of bright red card that was cut using a deckle edge blade in the Woodware Finger Guard Trimmer, leaving a deeper border.

The sentiment was matted on to the same satin card then white and then black – with the narrow borders on each layer.

To make the card itself I cut an A4 sheet of red card down to a 6x6 card then used the deckle edged trimmer on 3 sides

I cut a 6x6 piece of red with a straight blade then re-cut it using the deckle blade – this was secured on the folded card front – my easel card was ready!

I came across a sheet of backing paper that was white with a black pattern across it so I created 3 square panels approx 5x5 when cut with a deckle edge – one panel was stuck to the card front and the other to the card base – leaving the border round all sides on both panels.

I stuck the matted and layered poppy heart onto the card front centrally.

As I had a scrap of the matt black and some red card left over I decided to make a mount for the card base so cut the black piece to measure 3cmx14.5cm and a red panel 2.5cmx14.5cm – these were stuck on top of each other and placed across the card base approx 3cm up from the bottom edge – I attached using double sided tape

Next I added large double sided pads to cover the base of the matted sentiment panel and positioned it centrally over the black and red panel to act as the easel stopper.

As yet the card hasn't been embellished as I aren't too sure what I want to do – it could be some pretty AB gems in the corners, or card candy – glitter? Who knows

If you have any suggestions I would love to hear them please...

What do you think to today's card?

See you next time

x

Monday, 25 June 2012

Fashion...


Hello friends

I am getting excited now as my twin daughters Nicky & Vicky are due back from their holidays tomorrow – I cant wait to see my grandson Layton – I have missed them all so much but especially him...I was over the moon today when I got back for the shops to find a postcard from him saying I love you lots love Layton and robot xxx and he wrote it himself too – will treasure it as its the 1st postcard he has sent and it was to me!!!

I have enjoyed a play today – I finally used an IndigoBlu stamp its all matted and layered but I didn't get round to actually making it into a card – something for another day I suppose...

My card for today is made using the My Craft Studio cd – but I cant recall which one...what am I like eh? Only part of the info...sorry!!

To make the card I used the complete card section on the cd – I believe its called the Elements section

It all printed onto one sheet which is great for a quick card that still gives you room to design – that is the downside with crafts you print sheets – they are all laid out so its just cut and stick and then when you embellish that the only part you can really claim to have done yourself...

I started by scoring and folding a black sheet of card to create my A5 card blank – I have used it landscape – or tent fold – that is fold along the top.

The backing paper from the sheet was cut and matted onto a piece of bright purple card leaving an all round border.

This was then glued to the card black using double sided tape.

A piece of black card was cut and one edge was then punched using my Martha Stewart Cherish border.

To that I attached a length of the purple card leaving a border to the left and the punched border at the right free

Then I used a bought gem embellishment which really could have been made to fit the panel.

I cut out the topper and matted onto black then purple card again leaving the borders all round

This was stuck to the card with sticky pads then a sentiment added inside the topper again on sticky pads.

To finish I decorated using patterned card candy in the corners of the topper and used different Cosmic Shimmer PVA coloured glue to highlight the sentiment and the bag

A great quick and easy card for a lady of any age!!

Catch up again tomorrow folks

x

Sunday, 24 June 2012

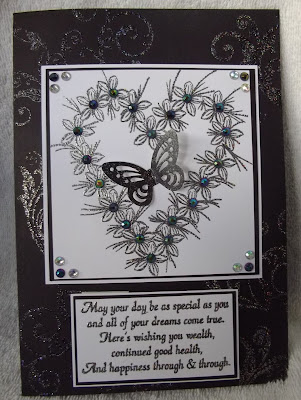
Heart of Flowers


Hello

Well after days of not actually making a card I decided today that I wanted to do something

We were planning on going out – that was before we saw the rain and dark skies!!!

So it was out with the stamps for a change

This card was made using Chloe's Stamps

www.chloescreativecards.co.uk and the stamp is MAR005 Flower Heart Wreath at £5.99

I started by folding a sheet of matt black A4 card to create my A5 card blank

I then stamped randomly with a swirly stamp by My Paper World – it was stamped with versamark and then covered with granite embossing powder and heated

That was put to one side while I worked on the topper.

I stamped the heart onto white card using versamark then sprinkled with granite embossing powder and heated.

This was then cropped and matted onto black then white card leaving a narrow border each time.

I stuck this to the card blank using double sided tape and PVA glue to be sure it stuck securely.

Next stamped a sentiment by Lindsey Mason onto white card again with versamark – and again covered with the granite embossing powder – tapped away the excess and heat embossed

This was matted like the heart – so black then white card – this was then fixed to the card under the topper but I used large sticky pads and pva too.

A butterfly was punched from pressed black glitter card – I used the Papermania butterfly punch – I folded the wings up and glued along the body only – this was placed inside the heart wreath.

To finish I used black AB gems in the centre of all the flowers that make up the heart wreath and also one in each of the 4 corners of the topper – then I added clear AB gems either side of the black in the corners!

I am so pleased with the card – hubby said it was ok – but too heavy for his liking – men – what do they know anyway??

Would welcome your thoughts please....

Hugs

Angie

x

Saturday, 23 June 2012

Christmas Robin....


Hi...

Back to christmas again today

The sheet is another from www.craftsuprint.com but it has no maker details on the sheet – sorry!!!

I started by colouring the edges of a scallop edge 6x6 card blank.

I used a Tim Holtz Tumbled Glass distress ink pad

After cutting out the main image I stuck it to the card using double sided tape – I added dots of cosmic shimmer PVA glue to the tape as I needed it to stick and stay on the inked card.

The decoupage was a pain to cut out – in places I did ignore parts as no matter how I tried I just couldn't get close enough and keep it neat!

The second panel was the robin inside the frame and I had to cut around the leaves and berries – arrgghhhh – it looks great now but I was close to tearing my hair out!!!!!!

I continued to add the layers, shaping where it needed shaping until everything was done

On to the embellishing

I added Stickles Ice Diamond to the dots that surrounded the robin frame – this gave dimension, a hint of colour and of course lots of glittery shine.

Using a quickie glue pen and glamour dust I highlighted petals on the white flower then used the glue pen and red glitter for the centre of the smaller flowers and the berries.

Some of the smaller berries were glazed with glossy accents and within the greenery I added a thick layer of PVA and sprinkled with iridescent glitter!

A very pretty card that I know I would love to receive

I'm pretty sure I will be making several more of this one before this christmas arrives!!!

See you again soon

x